Medicare Online claiming: user manual
Verifying patients, eligibility checks, bulk bill, patient, DVA, in-patient, in-hospital and overseas claims, reports and troubleshooting.
About this manual
This manual explains how to use HealthOS to claim through Services Australia's Medicare Online and ECLIPSE web services: patient, concession and veteran verification, online eligibility checks, bulk bill, patient, DVA, in-patient medical, in-hospital and overseas claims, the documents given to the claimant, and the reports used to reconcile what was paid.
| Software product | HealthOS, registered with Services Australia as HealthOS_Prod_MCOL_v1.0 (the dhs-productId every transmission carries) |
| Component | HealthOS Online Claiming (Medicare Online / ECLIPSE / DVA web services) |
| Vendor | HealthOS Pty Ltd, ABN 81 697 460 889 |
| Manual version | 2.0 — written against the checklist in section 6.1 of the Medicare Online and ECLIPSE Web Services Developer's Guide V2.2.1 |
| Companion document | HealthOS Installation and Authentication Guide (installing/accessing HealthOS, PRODA B2B device activation and renewal, user sign-in) |
How to find what you need (searching this manual)
This manual is supplied as a Word document (and may be saved as PDF). Both are fully text-searchable. Press Ctrl+F (Cmd+F on a Mac) and type any word or phrase — a button label such as "Lodge claim", a web service such as "BBSW", an error code such as "9633", or a document name such as "Lodgement Advice" — and the reader jumps to every place it appears. You never need to work through the contents to find a subject.
Every heading is numbered and is a real Word heading, so the Navigation Pane in Word (View → Navigation Pane) and the bookmarks panel of a PDF reader list the whole manual and jump to any part of it. Every screenshot has a caption naming the screen, so searching for a screen name finds its picture as well as its instructions. Section 17 lists Services Australia reason codes, so searching for the code shown on a claim goes straight to what it means.
Contents
- About this manual
- 1. Support and contact details
- 2. Installing and accessing HealthOS
- 3. Configuring claiming
- 4. PRODA
- 5. Verifying the patient (OPVW, OCVW, OVVW)
- 6. Online eligibility check (OECW)
- 7. Bulk bill claiming (BBSW)
- 8. Patient claims (PCIW) and same-day delete (SDDW)
- 9. DVA claims (DVAW and VAAW)
- 10. In-patient medical claims (IMCW)
- 11. In-hospital claims (IHCW)
- 12. Overseas visitor claims (OVSW)
- 13. Documents given to the claimant
- 14. Reports, report retrieval and reconciliation
- 15. Resubmitting rejected services
- 16. Reference data: MBS fees and descriptions, reason codes, provider numbers, health funds
- 17. Messages, errors and troubleshooting
- Appendix A. Glossary
Developer's Guide section 6.1 — compliance matrix
Services Australia's Developer's Guide (V2.2.1, section 6.1, pages 27–28) lists what a software user manual must contain. The table shows where each requirement is answered. Page numbers refer to the Word/PDF edition of this manual.
| 6.1 item | Requirement (Developer's Guide wording, abridged) | Answered in | Page |
|---|---|---|---|
| 1 | Contact details for customers needing assistance and support | Section 1 — Support and contact details | 1 |
| 2 | Instructions on how to install and/or access the software | Section 2 — Installing and accessing HealthOS; and the companion Installation and Authentication Guide | 2 |
| 3 | Troubleshooting: possible errors or problems and how to fix them | Section 17 — Messages, errors and troubleshooting | 17 |
| 4 | Locate content by searching words or phrases without navigating the structure | "How to find what you need" above | Go |
| 5 | Brief description of the Statement of Claim and Benefit and the Lodgement Advice (5a, 5b) | Section 13.1 and 13.2 | 13 |
| 6 | Step-by-step instructions with screenshots of all claiming functions, and how to use them | Sections 5 to 12 (one section per web service), and 13 to 15 | 5 |
| 7a | Configure the software to enable all Medicare Online (incl. DVA and AIR) and ECLIPSE claiming functions | Section 3 — Configuring claiming (AIR: section 3.6) | 3 |
| 7b | How PRODA interacts with the software, incl. setting up the one-time code and registering the B2B device | Section 4 — PRODA | 4 |
| 7c | Link to the agency's PRODA page | Section 4.1 | 4.1 |
| 7d | How to update Medicare Benefits Schedule fee changes | Section 16.1 | 16.1 |
| 7e | How to update MBS item descriptions, reason codes and provider numbers | Sections 16.1, 16.2 and 16.3 | 16 |
| 7f | How to resubmit rejected services | Section 15 — Resubmitting rejected services | 15 |
| 7g | Reporting, reconciliation processes and report retrieval | Section 14 — Reports, report retrieval and reconciliation | 14 |
Web services covered
| Web service | What HealthOS uses it for | Section |
|---|---|---|
| OPVW — Online Patient Verification (PVM, PVF, OPV) | Confirm Medicare card and/or health fund membership | 5.2 – 5.4 |
| OCVW — Online Concession Verification | Confirm a concession card | 5.5 |
| OVVW — Online Veteran Verification | Confirm a DVA file number and card | 5.6 |
| OECW — Online Eligibility Check (ECM, ECF, OEC, ECO) | Medicare / fund benefit quote before an admission or treatment | 6 |
| BBSW — Bulk Bill Store and Forward (general, specialist, pathology) | Bulk bill claims, batches and the DB4 assignment of benefit | 7 |
| BPRW / BPYW — Bulk Bill Processing / Payment reports | Bulk bill outcomes and payment runs | 14 |
| BIRW — Bulk Bill Integrated report | Bulk bill integrated report by transaction id | 14.3 |
| PCIW — Patient Claim Interactive | Real-time patient claims, pend/resubmit, store and transmit later | 8 |
| SDDW — Same Day Delete | Withdraw a patient claim on the day it was lodged | 8.6 |
| DVAW — DVA medical claims; VAAW — DVA allied health / community nursing | DVA claims | 9 |
| DVRW / DVYW — DVA Processing / Payment reports | DVA outcomes and payment runs | 14 |
| IMCW — In-patient Medical Claims (fund and Medicare) | Private in-patient medical claims through ECLIPSE | 10 |
| IHCW — In-Hospital Claims (public, private, private-DVA) | Hospital claims to the fund through ECLIPSE | 11 |
| OVSW — Overseas claims | Claims for overseas visitors' insurers | 12 |
| STSW / RTVW — Status report and Retrieve report (IMC, IHC, OVS) | Transmission status and claim reports | 14 |
| ERAW — ECLIPSE Remittance Advice | Health fund payment advices and reconciliation | 14.4 |
| GPRW — Get Participants | The list of health funds and what they support | 16.4 |
1. Support and contact details
If you need help using HealthOS for Medicare Online, ECLIPSE or DVA claiming, contact HealthOS support. Support is by email:
| support@healthos.net.au | |
| Urgent claiming issues | Email support@healthos.net.au and say that claiming has stopped. If Services Australia's systems are down, call the eBusiness Service Centre on 1800 700 199. |
| What to tell us | Your organisation, the screen you were on, what you expected and what happened, and the Transaction ID shown on the claim or verification (for example FSX00000f74ab4b93bb348f0). |
The Transaction ID is the fastest way to have a claim looked at. HealthOS shows it on every verification, eligibility check, claim and report, and every call made to Services Australia is listed with it on the Online Claiming → Transactions tab (section 14.6).
Services Australia support the claiming channel itself, provider registration and PRODA:
| Enquiry | Contact |
|---|---|
| PRODA registration, organisation and B2B devices | PRODA support 1800 700 199, PRODA@servicesaustralia.gov.au, servicesaustralia.gov.au/proda |
| Medicare provider enquiries (claims, provider numbers) | 132 150 |
| DVA provider enquiries | 1300 550 457 |
| Medicare Online and ECLIPSE web services (eBusiness Service Centre) | 1800 700 199 |
| ECLIPSE (hospital and fund) enquiries | ECLIPSE.enq@servicesaustralia.gov.au |
2. Installing and accessing HealthOS
HealthOS is a hosted (software-as-a-service) web application, run by HealthOS in Microsoft Azure's Australia East region. Nothing is installed on a workstation. Staff use a web browser; HealthOS is updated centrally, so every user is always on the version that holds the Notice of Integration. All connections to Services Australia are made by the HealthOS server, not by the workstation.
The full installation, onboarding and authentication procedure — what HealthOS provisions, what your organisation must obtain from Services Australia, PRODA organisation registration, B2B device activation, user accounts and sign-in — is in the companion HealthOS Installation and Authentication Guide. The summary for a claims officer is:
2.1 What you need
- A current version of Microsoft Edge, Google Chrome, Mozilla Firefox or Apple Safari (see the Installation Guide for minimum versions), with pop-ups allowed for your HealthOS address so claim documents can open for printing.
- Your organisation's HealthOS web address, given to you by your administrator.
- A HealthOS user account. Your administrator creates it and gives it the role(s) that include billing and claiming.
- HTTPS (port 443) access from your workstation to the HealthOS address. No firewall rule for Services Australia is needed at your site.
2.2 Signing in
- Open your organisation's HealthOS address in the browser.
- Enter your Username and Password, or choose your organisation's single sign-on button (for example Microsoft) if one is shown. If your organisation requires multi-factor authentication you must use the single sign-on button.
- You arrive at the HealthOS staff portal. Claiming is done from the patient's chart (sections 5 to 12) and from PAS → Billing & Claims → Online Claiming (Medicare, DVA & Health Funds) (section 14).
HealthOS signs you out after a period of inactivity set by your organisation (15 minutes unless your administrator has changed it). Work not yet saved on an open form is lost, so lodge or save a draft before leaving the workstation.
2.3 Where claiming lives in HealthOS
| Place | Used for |
|---|---|
| Intake → Referrals → the referral → Eligibility & Financial Consent | The eligibility check (OECW) for a planned admission, before it happens, and the patient's informed financial consent to what it quotes |
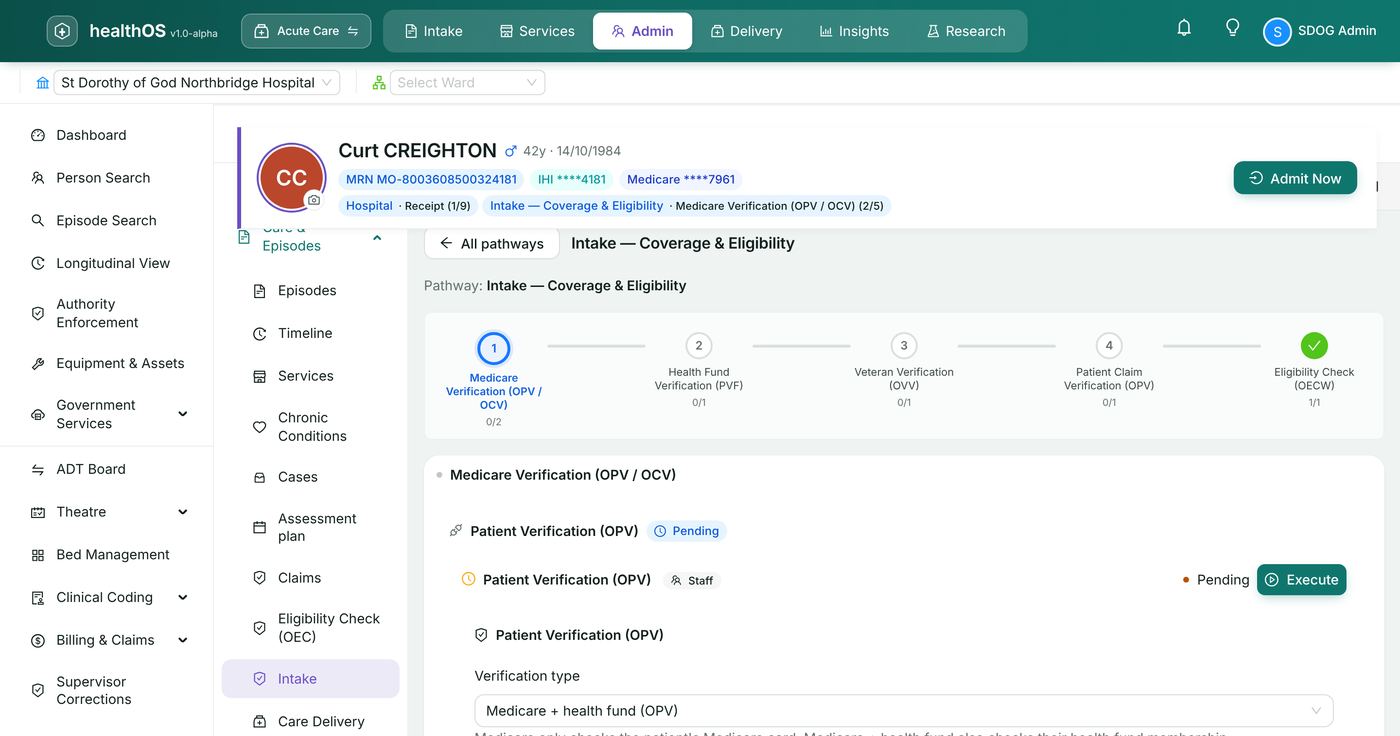
| Patient chart → Intake → pathway System: Intake — Coverage & Eligibility | Patient, health fund, concession and veteran verification; the eligibility check (OECW) alongside them |
| Patient chart → Eligibility Check (OEC) | Stand-alone eligibility checks (ECM, ECF, OEC, ECO) and the OEC report |
| Patient chart → Care Admin → one pathway per claim type | Drafting and lodging claims, the claim's documents, its reports, same-day delete and corrections |
| PAS → Billing & Claims → Online Claiming (Medicare, DVA & Health Funds) | Ready to Claim, Batches, Remittances, Reports and Transactions — the claiming workspace across all patients |
| Admin portal (your HealthOS address followed by /admin/) | Configuration: PRODA and Medicare Online / ECLIPSE settings, health funds, MBS items, users and roles |
The claiming pathways on the Care Admin section are:
| Pathway | Claim types | Stages |
|---|---|---|
| System: Bulk Bill Claiming (BBSW) | BBSW | Claim → Reports & Reconciliation |
| System: Patient Claiming (PCIW) | PCIW | Claim → Reports & Reconciliation (incl. Same Day Delete) |
| System: DVA Claiming (DVAW / VAAW) | DVAW, VAAW | Claim → Reports & Reconciliation |
| System: Private Hospital Claiming (IMCW / IHCW) | IMCW, IHCW | Coding & Grouping → Claim → Reports & Reconciliation |
| System: Overseas Visitor Claiming (OVSW) | OVSW | Claim → Reports & Reconciliation |
Each stage holds widgets — cards that each do one job (for example "Draft Bulk Bill Claim" or "Submit Bulk Bill Claim (BBSW)"). A widget's own button (for example Run OPV, Create draft claim, Lodge claim, Retrieve report) makes the Services Australia call and shows the answer inside the card.
3. Configuring claiming
Claiming is configured once, by an administrator of your organisation in the admin portal, and then left alone. HealthOS staff complete the platform part when your organisation is set up (Installation Guide, section 4). This section covers what your administrator does.
3.1 Before you start
You need:
- Your organisation's PRODA RA number (issued when the organisation was registered in PRODA).
- A B2B device registered in PRODA for HealthOS, its device name and its one-time device activation code (section 4.2).
- The Minor ID (also called the Location ID) for your location. HealthOS issues it when your organisation is set up: Services Australia allocate HealthOS the prefix FSX, and each location gets its own Minor ID from it (for example FSX00003). It is the prefix of every Transaction ID. Your organisation then registers the location for Medicare Online with Services Australia's form HW027, giving its PRODA RA number and this Minor ID (eBusiness Service Centre, 1800 700 199).
- The X-IBM-Client-Id, product name and product version. These belong to the HealthOS software, not to your organisation: the X-IBM-Client-Id is generated for HealthOS by Services Australia's Health Systems Developer Portal, and the product name is HealthOS_Prod_MCOL_v1.0. HealthOS support give them to you when your organisation is set up.
- The Medicare provider numbers of the practitioners who will claim (section 16.3).
3.2 Guided setup (Medicare / ECLIPSE Guided Setup)
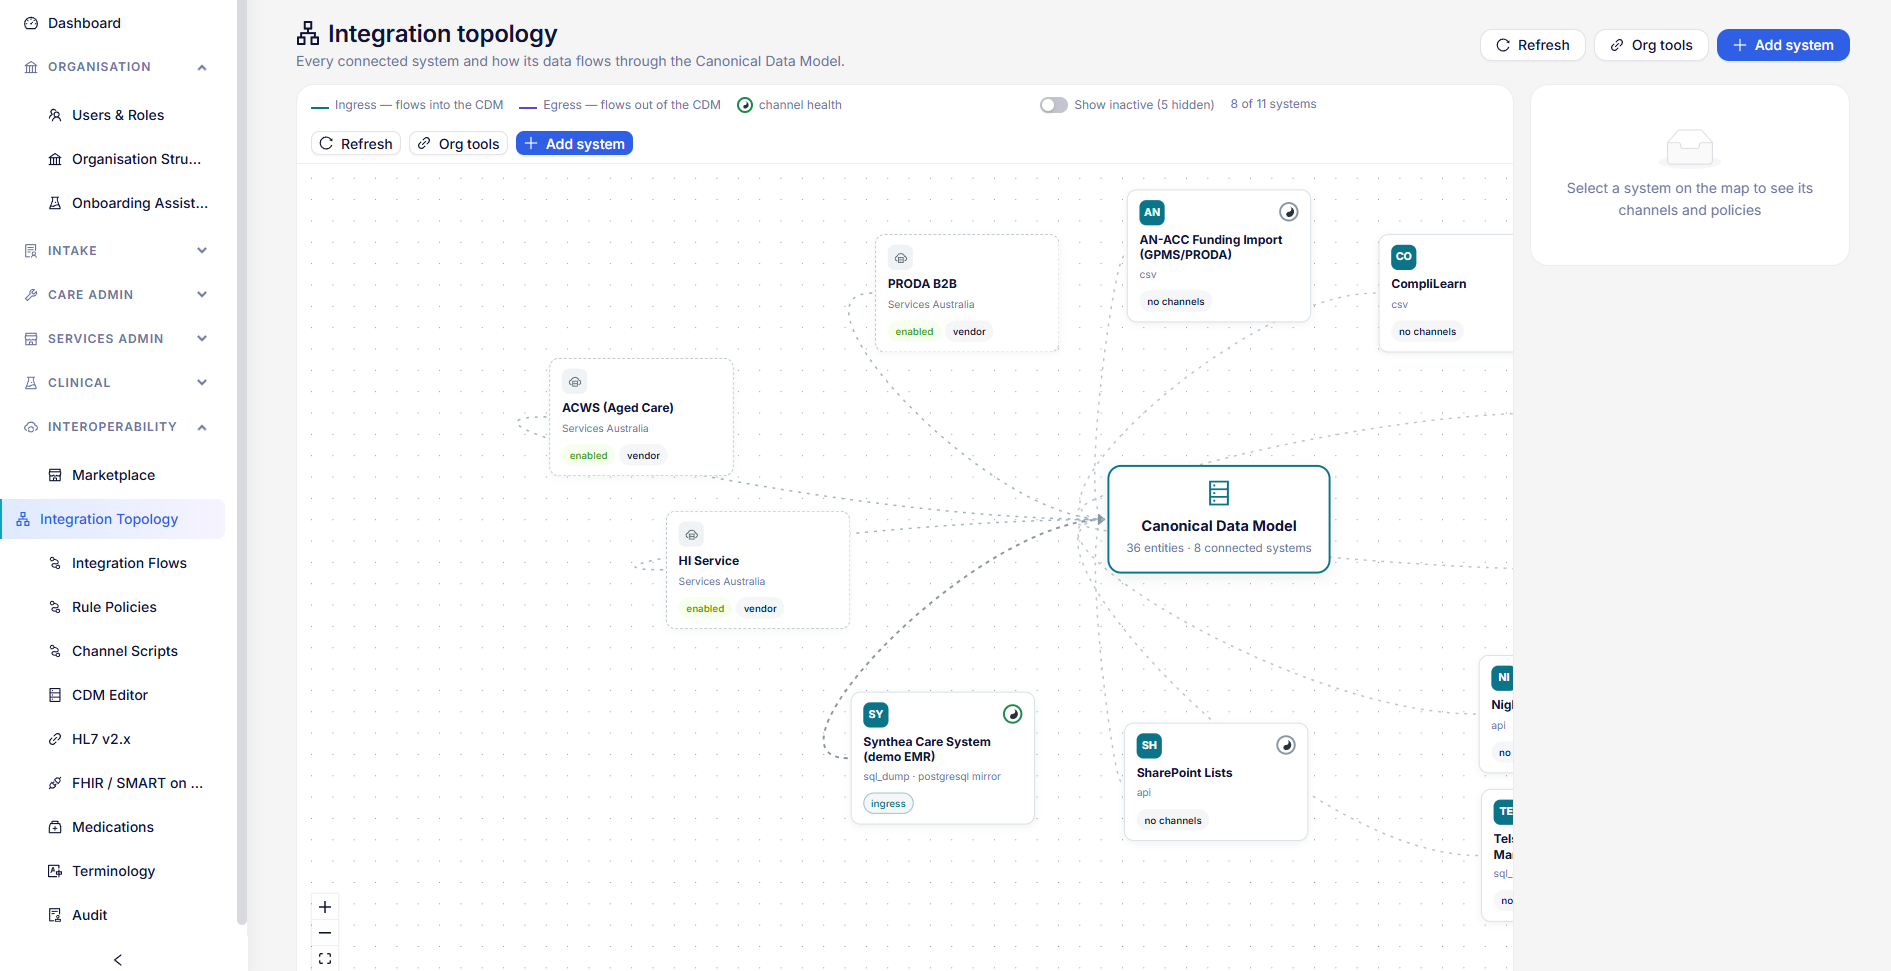
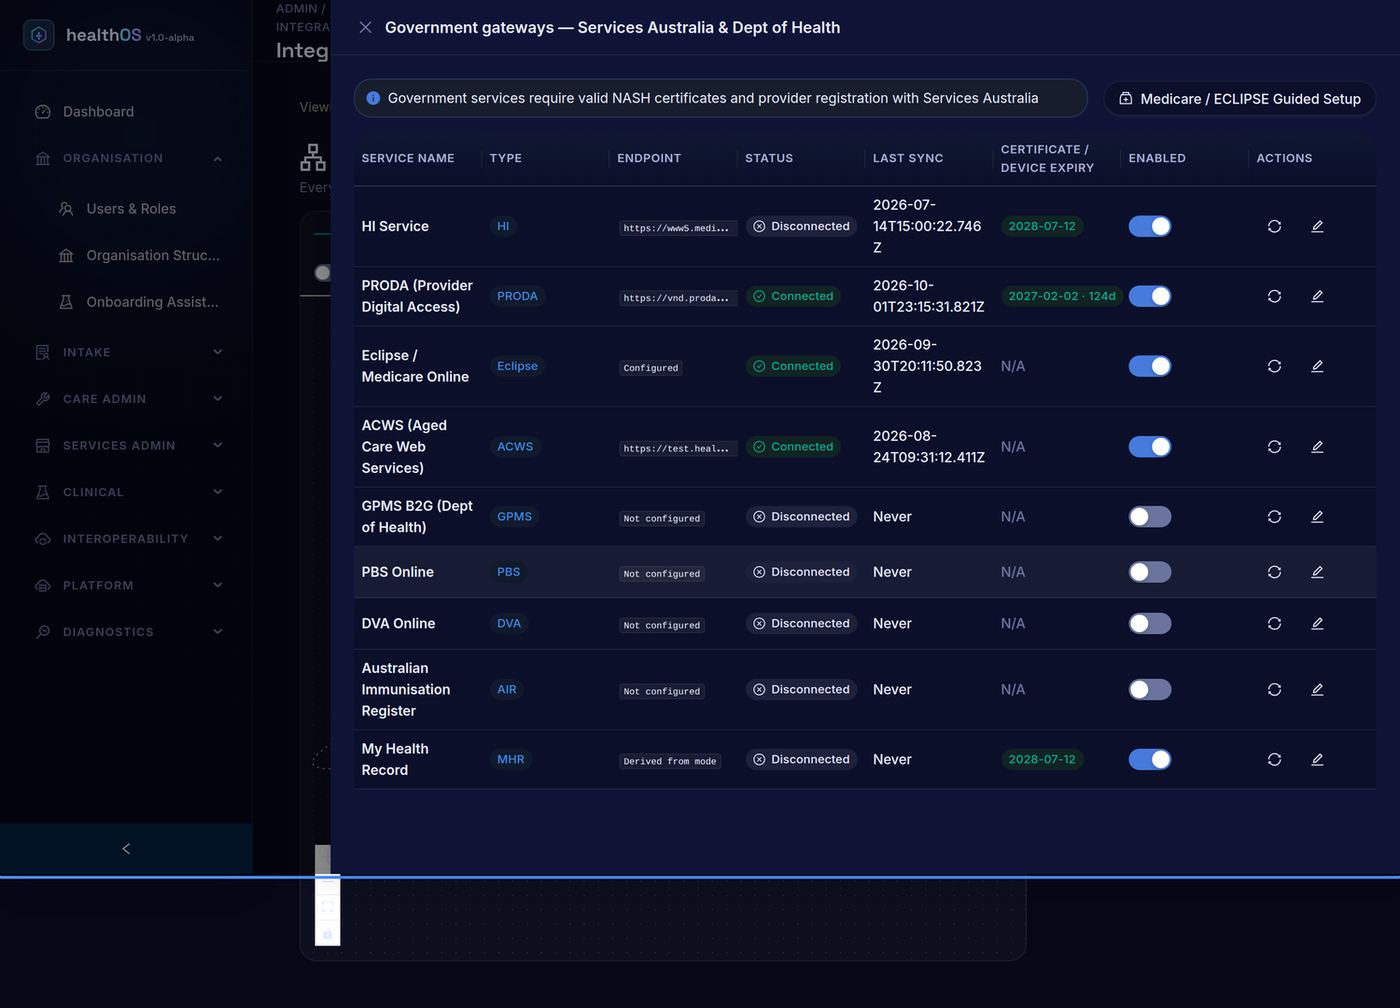
- Sign in to the admin portal and open Interoperability → Integration Topology. Select the PRODA or Eclipse / Medicare Online endpoint on the map. The Government gateways — Services Australia & Dept of Health panel opens. (Shortcut: your admin address followed by /interoperability/government.)
- Choose Medicare / ECLIPSE Guided Setup. The wizard has four steps and writes every derived setting itself — there are no endpoint addresses to paste.
- Developer Liaison — enter the Developer ID (the Minor ID, for example FSX00000) and the Organisation name. The one value is written as the PRODA client ID, the Eclipse Minor ID and the Location ID.
- PRODA B2B device — choose the Mode (section 3.3), and enter the RA number, the B2B device name and the Device activation code (section 4.2). In production mode also enter the Claiming API base URL from your production onboarding pack.
- Developer Portal — enter the X-IBM-Client-Id, the Product name (sent on every call as dhs-productId) and the Product version. These must match the Notice of Integration exactly.
- Review & apply — the wizard lists every field it will write, the value and where it came from. Choose Apply. HealthOS saves the PRODA configuration, saves the Eclipse configuration, activates the B2B device (when an activation code was entered), and then tests the connection by obtaining a PRODA token and calling Services Australia. Each step shows a tick or the reason it failed.
- When all four steps succeed the wizard shows "Medicare Online / ECLIPSE claiming is configured".
3.3 Mode
| Mode | Meaning |
|---|---|
| Production | Live claiming. Claims are real and are paid. |
| Vendor (test) | Services Australia's vendor test environment, used for integration (NOI) testing. Claims are transmitted and assessed, nothing is paid. |
| Mock | No call is made to Services Australia; responses are simulated. For training and demonstration only. |
The mode derives the PRODA token endpoint, the device activation address, the claiming API address and the token audience together, so a configuration can never be half test and half production. While PRODA is not enabled or is in mock mode, each claiming widget shows "Vendor mode required" and explains what to change.
3.4 Checking and changing the settings later
In the Government gateways panel, the edit (pencil) action on a row opens its settings:
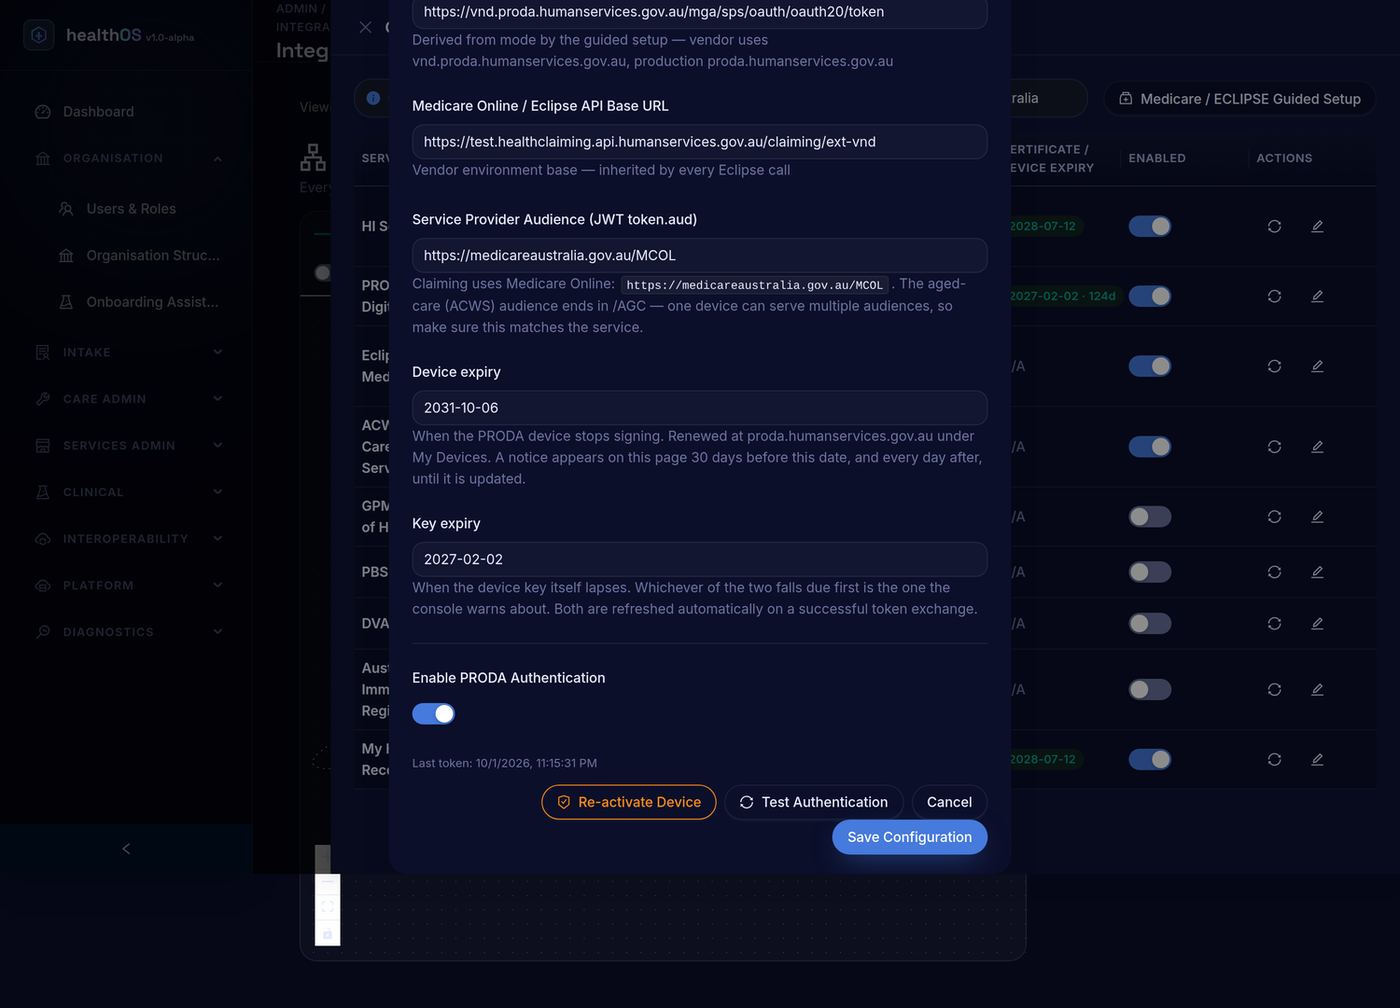
- PRODA → PRODA B2B Authentication Configuration: mode, organisation name, RA number, client ID, device name, device activation code, endpoints, service provider audience, Device expiry, Key expiry and Enable PRODA Authentication. Buttons: Activate Device / Re-activate Device, Test Authentication, Save Configuration. "Last token" shows when HealthOS last authenticated.
- Eclipse / Medicare Online → Eclipse / Medicare Online Configuration: the values inherited from PRODA (shown read-only, with Edit in PRODA settings), X-IBM-Client-Id, Minor ID / Location ID, product name and version, and the NOI number, issue date and expiry date. Test Connection checks the whole path. A notice appears from 90 days before the NOI expiry date.
3.5 ECLIPSE, health funds and DVA
- ECLIPSE hospital and specialist claiming (IMCW, IHCW, OVSW, OECW, ERAW) uses the same PRODA device and settings as Medicare Online. Nothing else needs configuring, other than keeping the health fund list current (section 16.4).
- DVA claiming (DVAW, VAAW, OVVW and the DVA reports) is enabled by the same configuration.
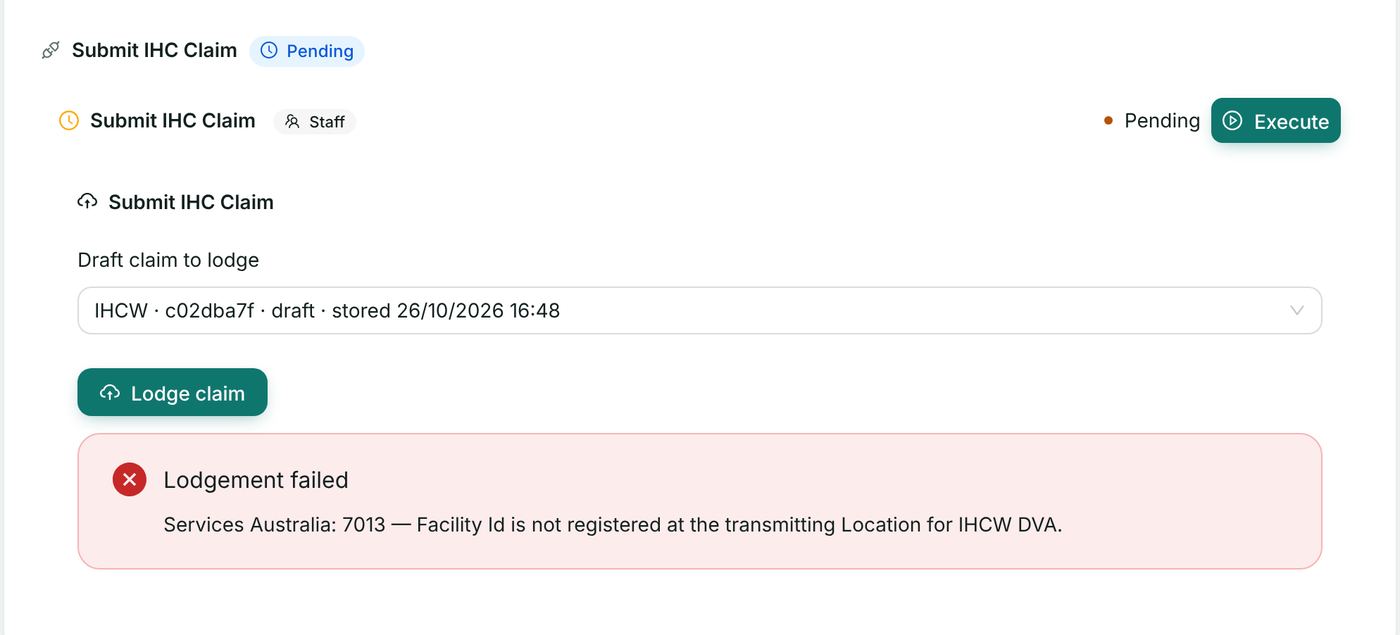
- For DVA in-hospital (IHCW private-DVA) claims, the Facility ID DVA issued for the hospital must be registered against your transmitting location; a claim without it is refused with code 7013 (section 17).
- Your organisation's HealthOS licence must include the Medicare Online / ECLIPSE (eclipse) and PRODA connectors; HealthOS enables these when your organisation is set up.
3.6 Australian Immunisation Register (AIR)
HealthOS does not connect to the Australian Immunisation Register. AIR encounters cannot be recorded or transmitted through HealthOS and there is nothing to configure. Report immunisations to the AIR through your existing AIR channel. (The Developer's Guide checklist asks for AIR configuration "where applicable"; it does not apply to this product.)
3.7 Who can do what
| Task | Who |
|---|---|
| Configure PRODA and Medicare Online / ECLIPSE, health funds, MBS items | An administrator of your organisation, in the admin portal |
| Verify patients, check eligibility, draft, lodge, delete and correct claims, retrieve reports, reconcile | Staff whose HealthOS role gives access to the patient chart and to PAS → Billing & Claims (for example Finance Officer) |
| Register and renew the B2B device in PRODA | A PRODA member of your organisation with authority to manage B2B devices |
Every call to Services Australia is recorded with the user and the time, and can be inspected on the Online Claiming → Transactions tab (section 14.6).
4. PRODA
4.1 About PRODA
Services Australia authenticate every Medicare Online and ECLIPSE message through PRODA (Provider Digital Access). HealthOS uses PRODA B2B unattended authentication: your organisation registers a B2B device for HealthOS in PRODA, HealthOS activates it once with the one-time activation code, and from then on HealthOS signs each request with the device's key. Staff never sign in to PRODA to lodge a claim.
For more information about PRODA, registering an organisation and managing members and devices, see the agency's page: PRODA (Provider Digital Access) - Services Australia — https://www.servicesaustralia.gov.au/proda-provider-digital-access
4.2 Setting up the one-time device activation code and registering the B2B device
Done once, when your organisation starts claiming through HealthOS, by a PRODA member of your organisation who can manage B2B devices.
- Sign in to PRODA (https://proda.humanservices.gov.au), select Organisations and choose your organisation.
- In the B2B Devices drop-down choose Register New B2B Device.
- Enter a device name (for example HealthOS-B2B-Device) and a description, and choose Register Device. The name must be unique in your organisation; record it exactly as entered.
- PRODA displays the device activation code with its expiry time (hover over the expiry to see the exact time). The code works once and, in production, expires 1 day after it is issued (7 days in Services Australia's vendor test environment), so use Copy to Clipboard and complete the next steps straight away.
- In the HealthOS admin portal, open the Guided Setup (section 3.2) and on the PRODA B2B device step enter the RA number, the B2B device name from step 3 and the Device activation code from step 4. Choose Apply on the last step.
- HealthOS generates a new key pair on the server, sends the public key to PRODA to activate the device, and stores the private key encrypted (AES-256) in your organisation's configuration. No user can view the private key. The Apply step Activate PRODA B2B device shows a tick and the connection test confirms a PRODA token was issued.
- The PRODA row in the Government gateways panel now shows Connected with the device expiry date.
If the activation code has expired or was mistyped, the Apply step shows Activation failed with Services Australia's reason. Generate a new code in PRODA and repeat step 5. The code is used once and is not stored by HealthOS.
To activate without the wizard, open the PRODA row's settings, enter the code in Device Activation Code and choose Activate Device.
4.3 Keeping the device current: key refresh, device renewal and expiry notices
A PRODA B2B device has two dates:
- Key expiry — the device key lapses periodically. HealthOS refreshes (rotates) the key automatically in the 7 days before it expires, on the next transmission: it generates a new key pair and registers the new public key with PRODA, signed by the current key. Nobody needs to act. If the automatic refresh fails, the current key keeps working until it expires.
- Device expiry — the device itself must be renewed in PRODA by your organisation before this date (in PRODA, under your organisation's devices). After renewing it, open the PRODA settings in HealthOS and save the new Device expiry date.
So that a lapse cannot pass unnoticed, the admin portal's Government gateways panel shows a notice for the PRODA device:
- From 30 days before the earlier of the two dates: "PRODA device expires in N days — renew the Device in PRODA", with the device name and date.
- Within 7 days the notice becomes an error-style alert.
- After the date: "PRODA device has EXPIRED — re-activate the device in PRODA".
The notice cannot be dismissed. It is recalculated every time the panel opens and appears every day until the device is renewed or the key refreshed. The aged care (ACWS) console in the staff portal shows the same banner, with a Refresh key now button.
If the key or device has already expired, the expired key can no longer sign a refresh: claiming stops with an authentication error. Generate a new device activation code in PRODA and re-activate (section 4.2, or Re-activate Device in the PRODA settings).
5. Verifying the patient (OPVW, OCVW, OVVW)
Verification confirms with Services Australia that the patient's Medicare card, health fund membership, concession card or DVA file number is current before you claim. A claim carrying a card that has been reissued is refused, so verify at each admission or first attendance.
5.1 Where to verify
Open the patient's chart, go to Intake, and open System: Intake — Coverage & Eligibility. Its stages are:
| Stage | Widget | Web service |
|---|---|---|
| Medicare Verification (OPV / OCV) | Patient Verification (OPV); Concession Verification (OCV) | OPVW (PVM or OPV), OCVW |
| Health Fund Verification (PVF) | Health Fund Patient Verification (PVF) | OPVW (PVF) |
| Veteran Verification (OVV) | Veteran Verification (OVV) | OVVW |
| Patient Claim Verification (OPV) | Patient Verification (OPV) | OPVW |
| Eligibility Check (OECW) | Eligibility Check (OECW) | OECW (section 6) |
Fields fill from the patient's record; check them against the card.
5.2 Medicare only (PVM)
- In Patient Verification (OPV), set Verification type to Medicare only (PVM).
- Check Medicare Card Number (10 digits), IRN (position on card), Family Name, Given Name, Sex and Date of Birth. Optionally enter Servicing Provider Number and Date of Service (defaults to today).
- Choose Run PVM (Medicare only).
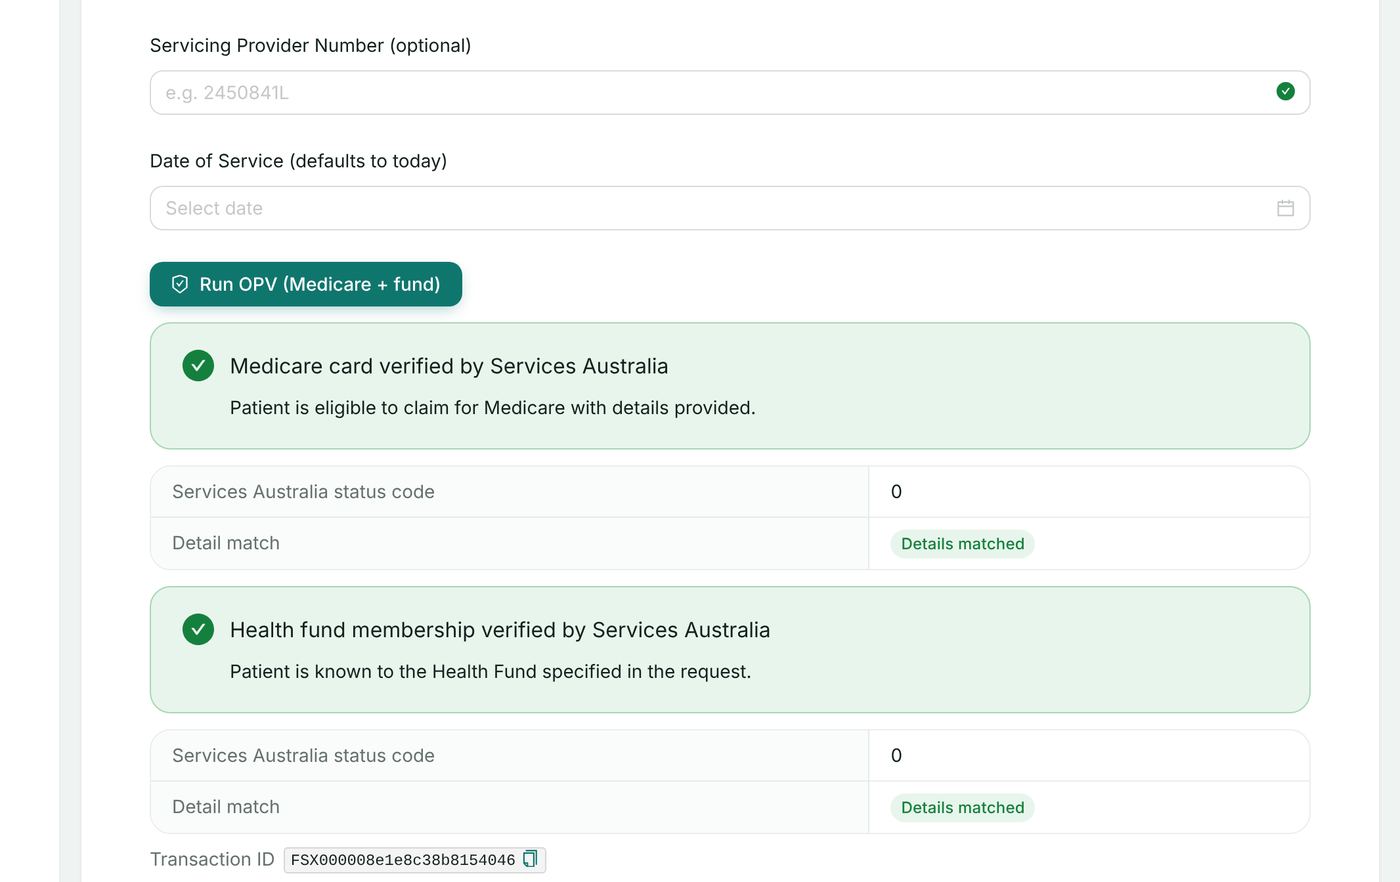
- The result shows the outcome in words ("Medicare card verified by Services Australia"), the Services Australia status code, Detail match, and the Transaction ID.
5.3 Medicare and health fund (OPV)
As 5.2, with Verification type Medicare + health fund (OPV), plus Health fund, Fund member number and Fund member reference number. Choose Run OPV (Medicare + fund). The Medicare and the fund results are shown separately.
5.4 Health fund only (PVF)
On the Health Fund Verification (PVF) stage, enter Health fund member number, optional Member reference number and Fund / brand id, the name, sex and date of birth, and run the check.
5.5 When Services Australia return different details
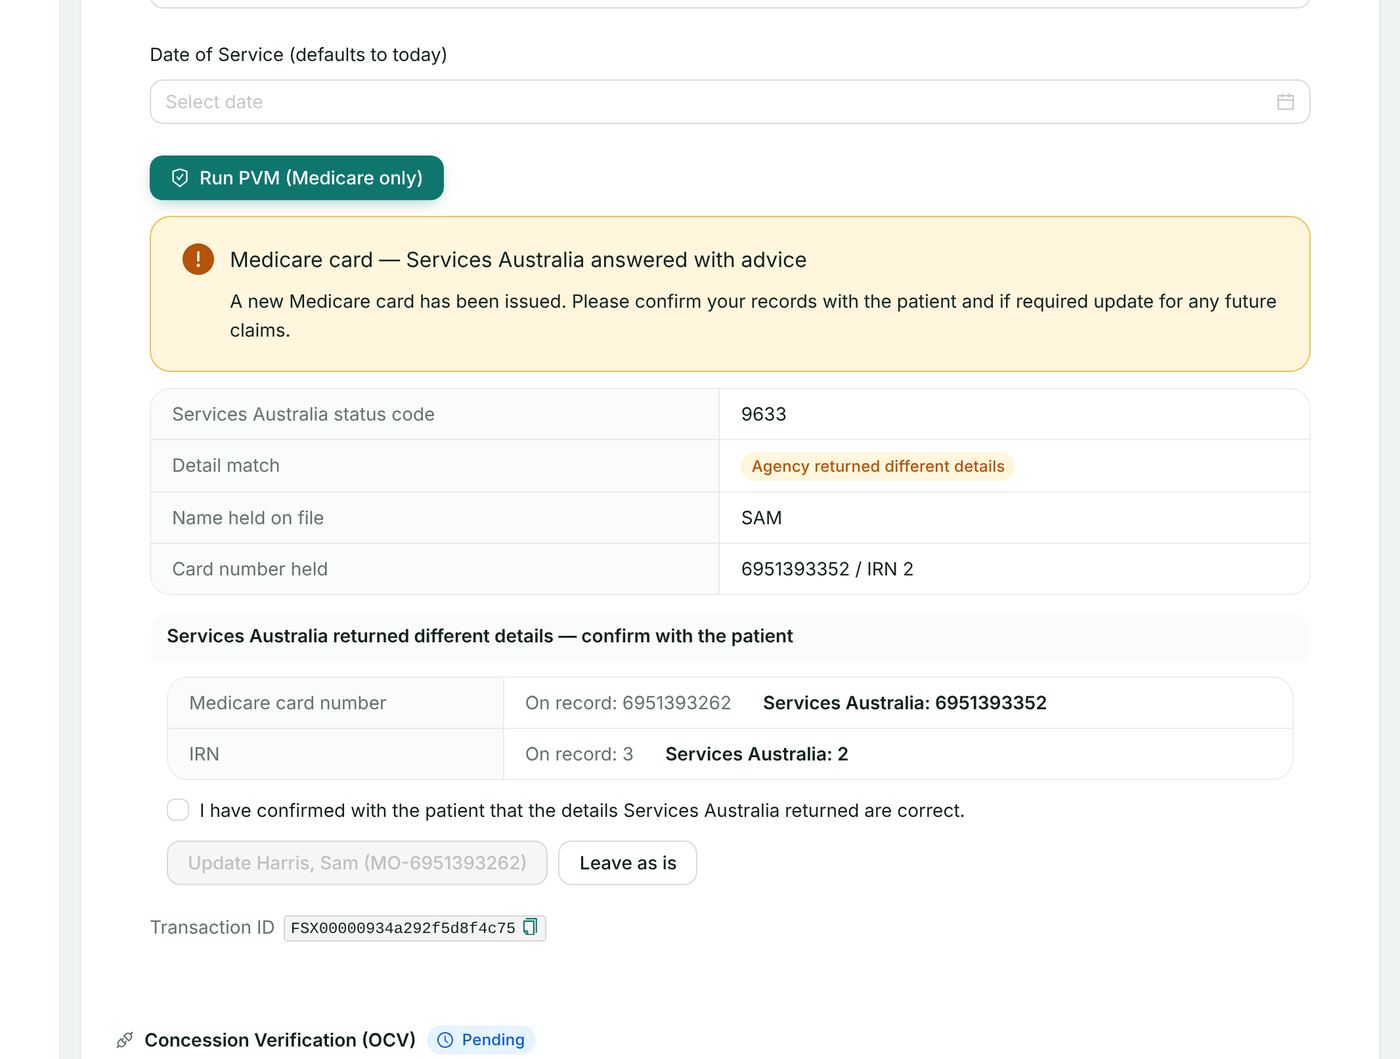
When the agency answers with advice — for example 9633 "A new Medicare card has been issued" — the widget shows the advice, the details Services Australia hold beside the ones on record, and two choices: tick "I have confirmed with the patient that the details Services Australia returned are correct" and choose Update to correct the patient record, or choose Leave as is. Nothing on the record changes until you confirm.
The date of the last successful verification is shown on the patient's Demographics (Funding → "Medicare last verified").
5.6 Concession (OCVW)
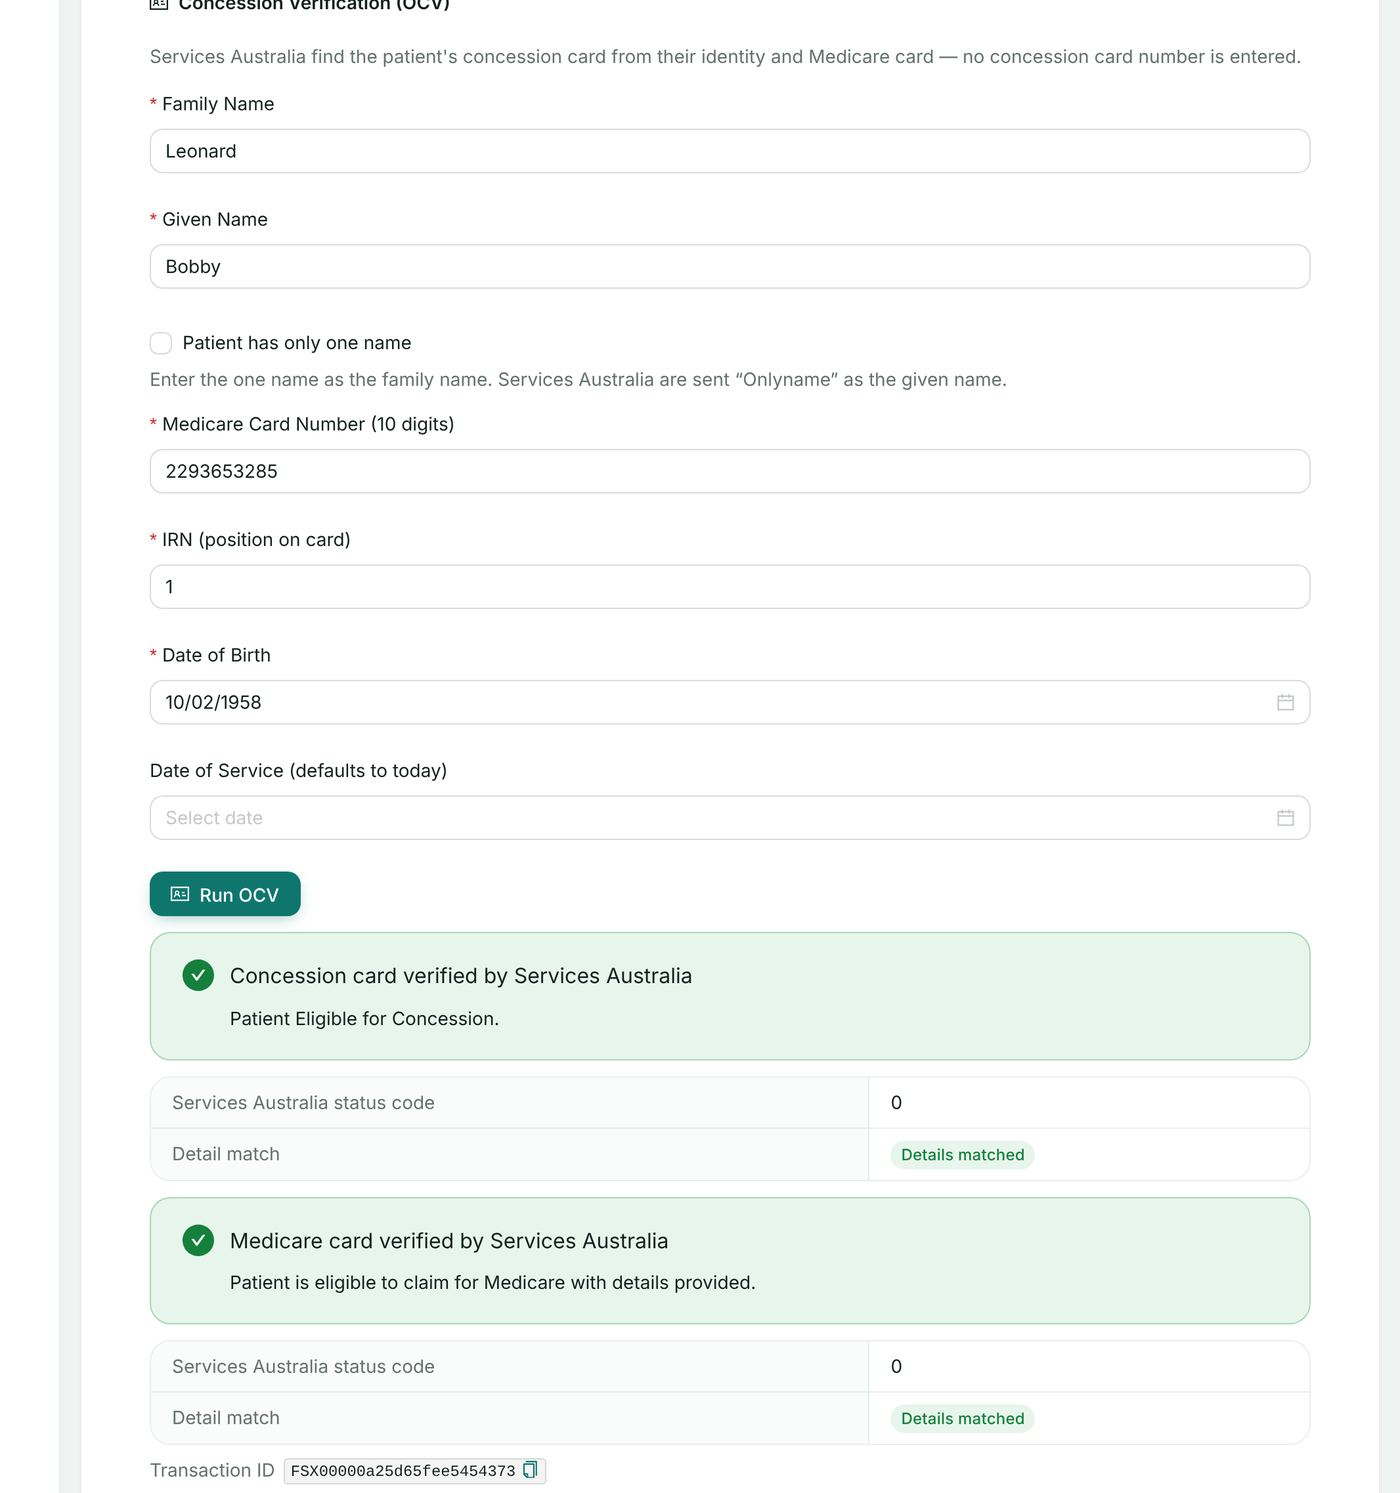
- In Concession Verification (OCV) choose the Card Type (for example CSHC — Commonwealth Seniors Health Card), and enter the Card Number, name, Medicare card number and IRN, and date of birth.
- Choose Run OCV. The result states whether the concession card and the Medicare card are verified ("Patient Eligible for Concession").
5.7 Veteran (OVVW)
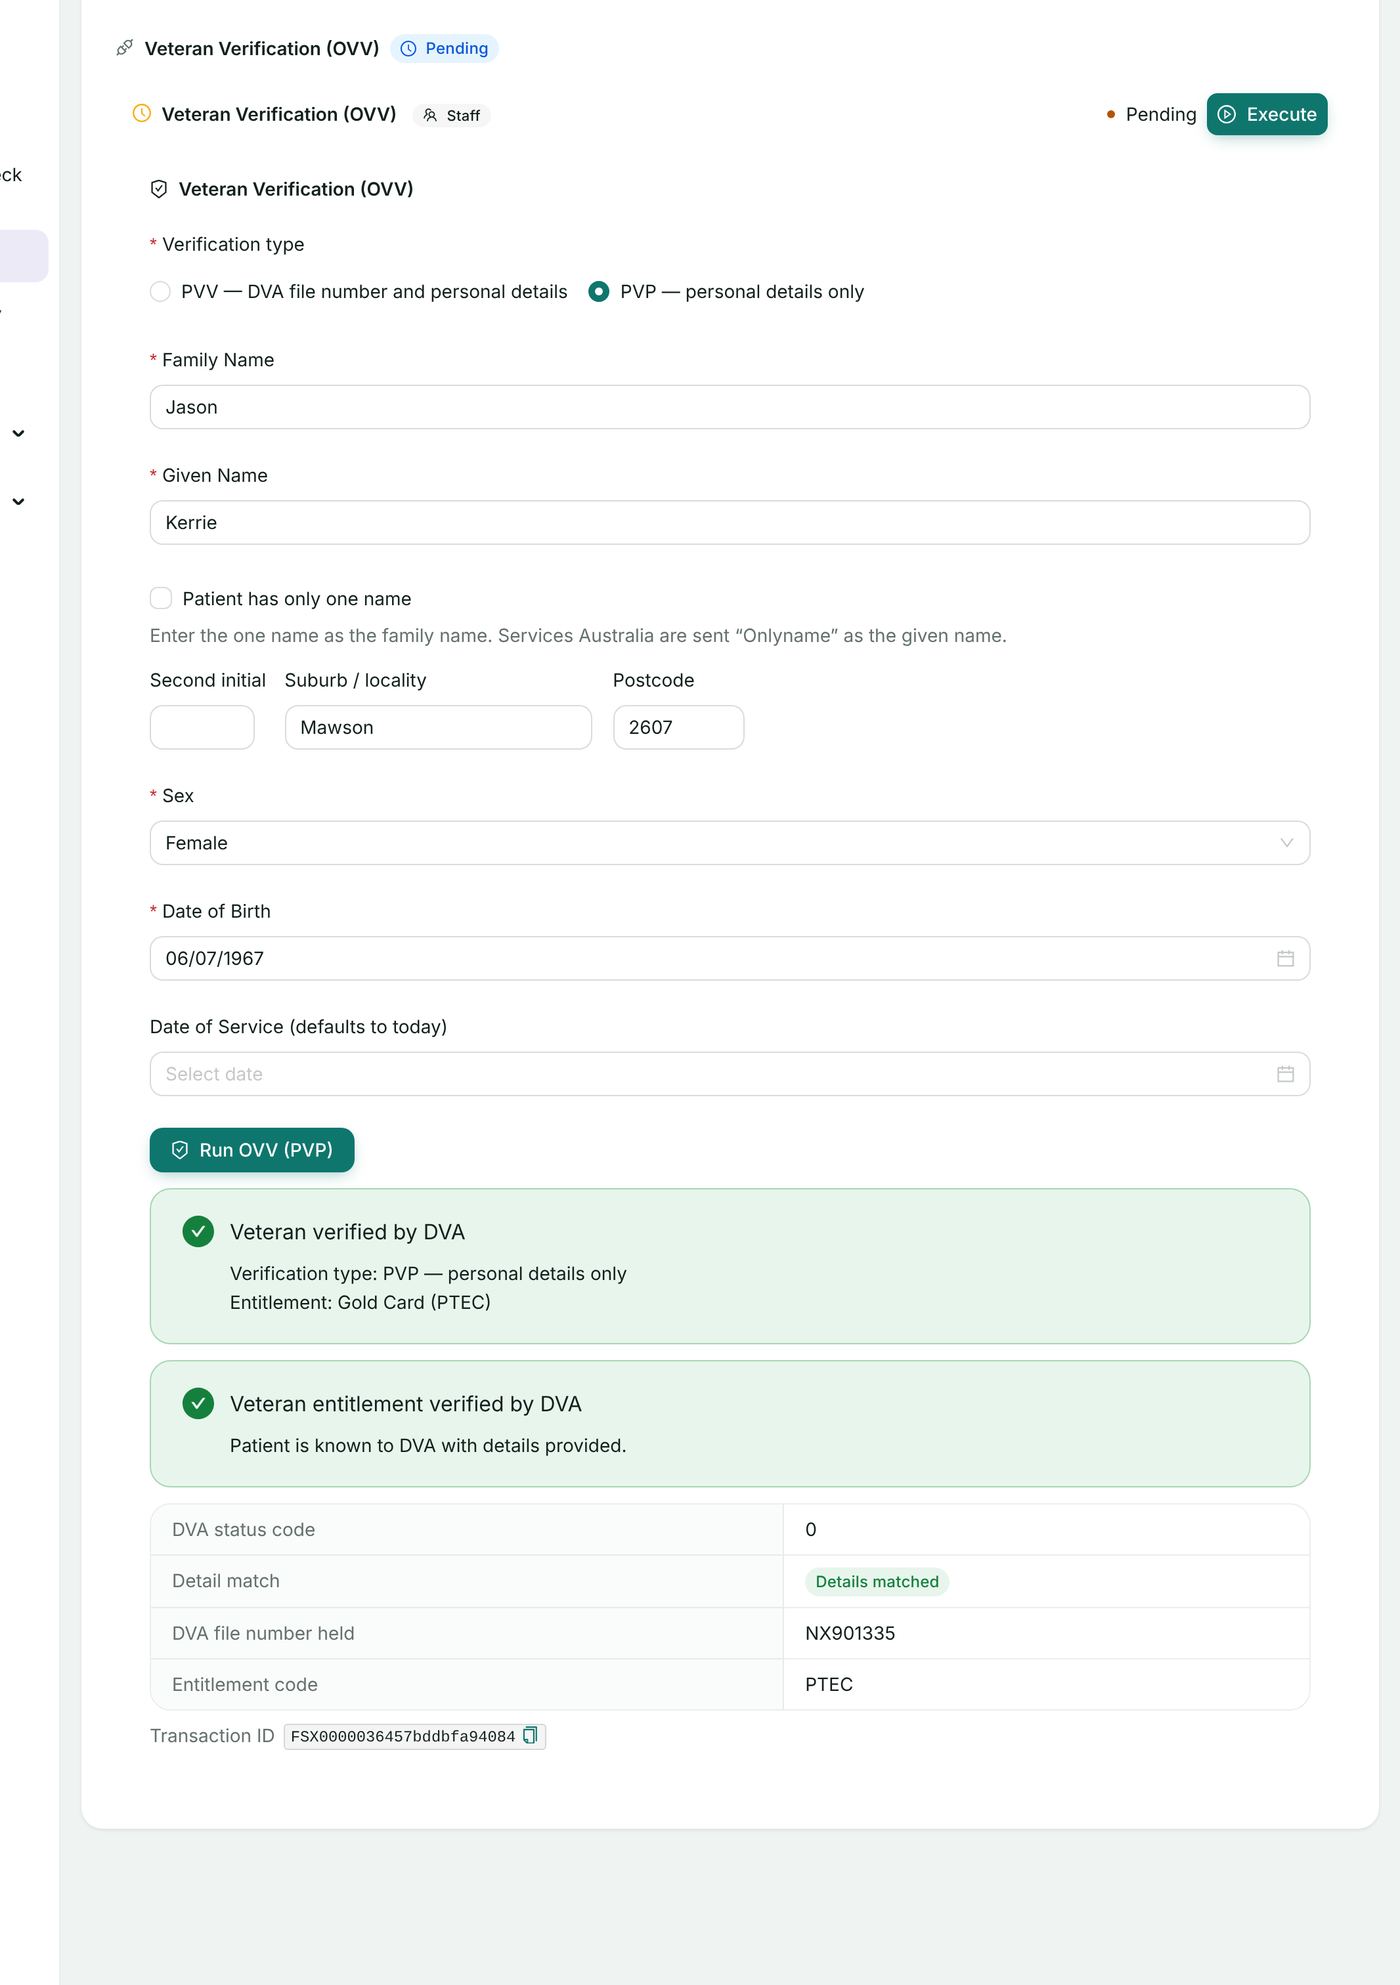
- On Veteran Verification (OVV) enter the DVA File Number, family and given name, date of birth, and optionally suburb, postcode and sex.
- Choose Run OVV. The result shows whether the veteran is verified, the card type (Gold, White or Orange), and any details Services Australia returned that differ from the record (with the same confirm and update choice as 5.5).
6. Online eligibility check (OECW)
An eligibility check asks Medicare and/or the patient's health fund what they will pay for a planned admission or treatment, before it happens, so the patient can be quoted for informed financial consent. The answer is a quote only and cannot be used to claim.
| Check | Asks |
|---|---|
| ECM — Medicare only | Medicare |
| ECF — Health fund only | The fund |
| OEC — Medicare & health fund | Both |
| ECO — Overseas | An overseas visitor's fund |
6.1 From the referral, before admission (Intake)
This is where a check for a planned admission is normally done: on the referral itself, beside the informed financial consent the quote is for.
- Open Intake → Referrals and the patient's referral.
- On its pathway, open the Eligibility & Financial Consent stage.
- In Eligibility Check (OECW), choose the Check (ECM, ECF, OEC or ECO). Medicare and fund details fill from the record.
- Enter the planned admission: principal provider, Facility ID, admission date, same day or length of stay, the presenting illness, and the services — MBS items in MBS services, a prosthesis or miscellaneous code in Fund prosthesis / miscellaneous lines with its quantity and rate.
- Choose Check eligibility. Each item's Medicare and fund assessment is shown.
- Choose OEC report to print the report for the patient (section 13.6), and record the patient's consent in Informed Financial Consent on the same stage. The check is kept on the record; the claim's draft widget later offers Start from it to fill the claim from what was checked.
6.2 From the patient's Intake hub
The same check is on the chart's Intake hub, on System: Intake — Coverage & Eligibility → Eligibility Check (OECW), for a patient whose check is being done alongside their verifications rather than from the referral.
6.3 From the patient record, at any time
Open the chart's Eligibility Check (OEC) section, choose the tab — Medicare only (ECM), Health Fund only (ECF), Medicare & Health Fund (OEC) or Overseas (ECO) — complete the form (Medicare card, IRN, name, date of birth, provider number, fund/brand id, member number, MBS item and optional charge) and choose Run eligibility check. The result shows the status for Medicare and for the fund, and the Transaction ID; OEC report opens the printable report.
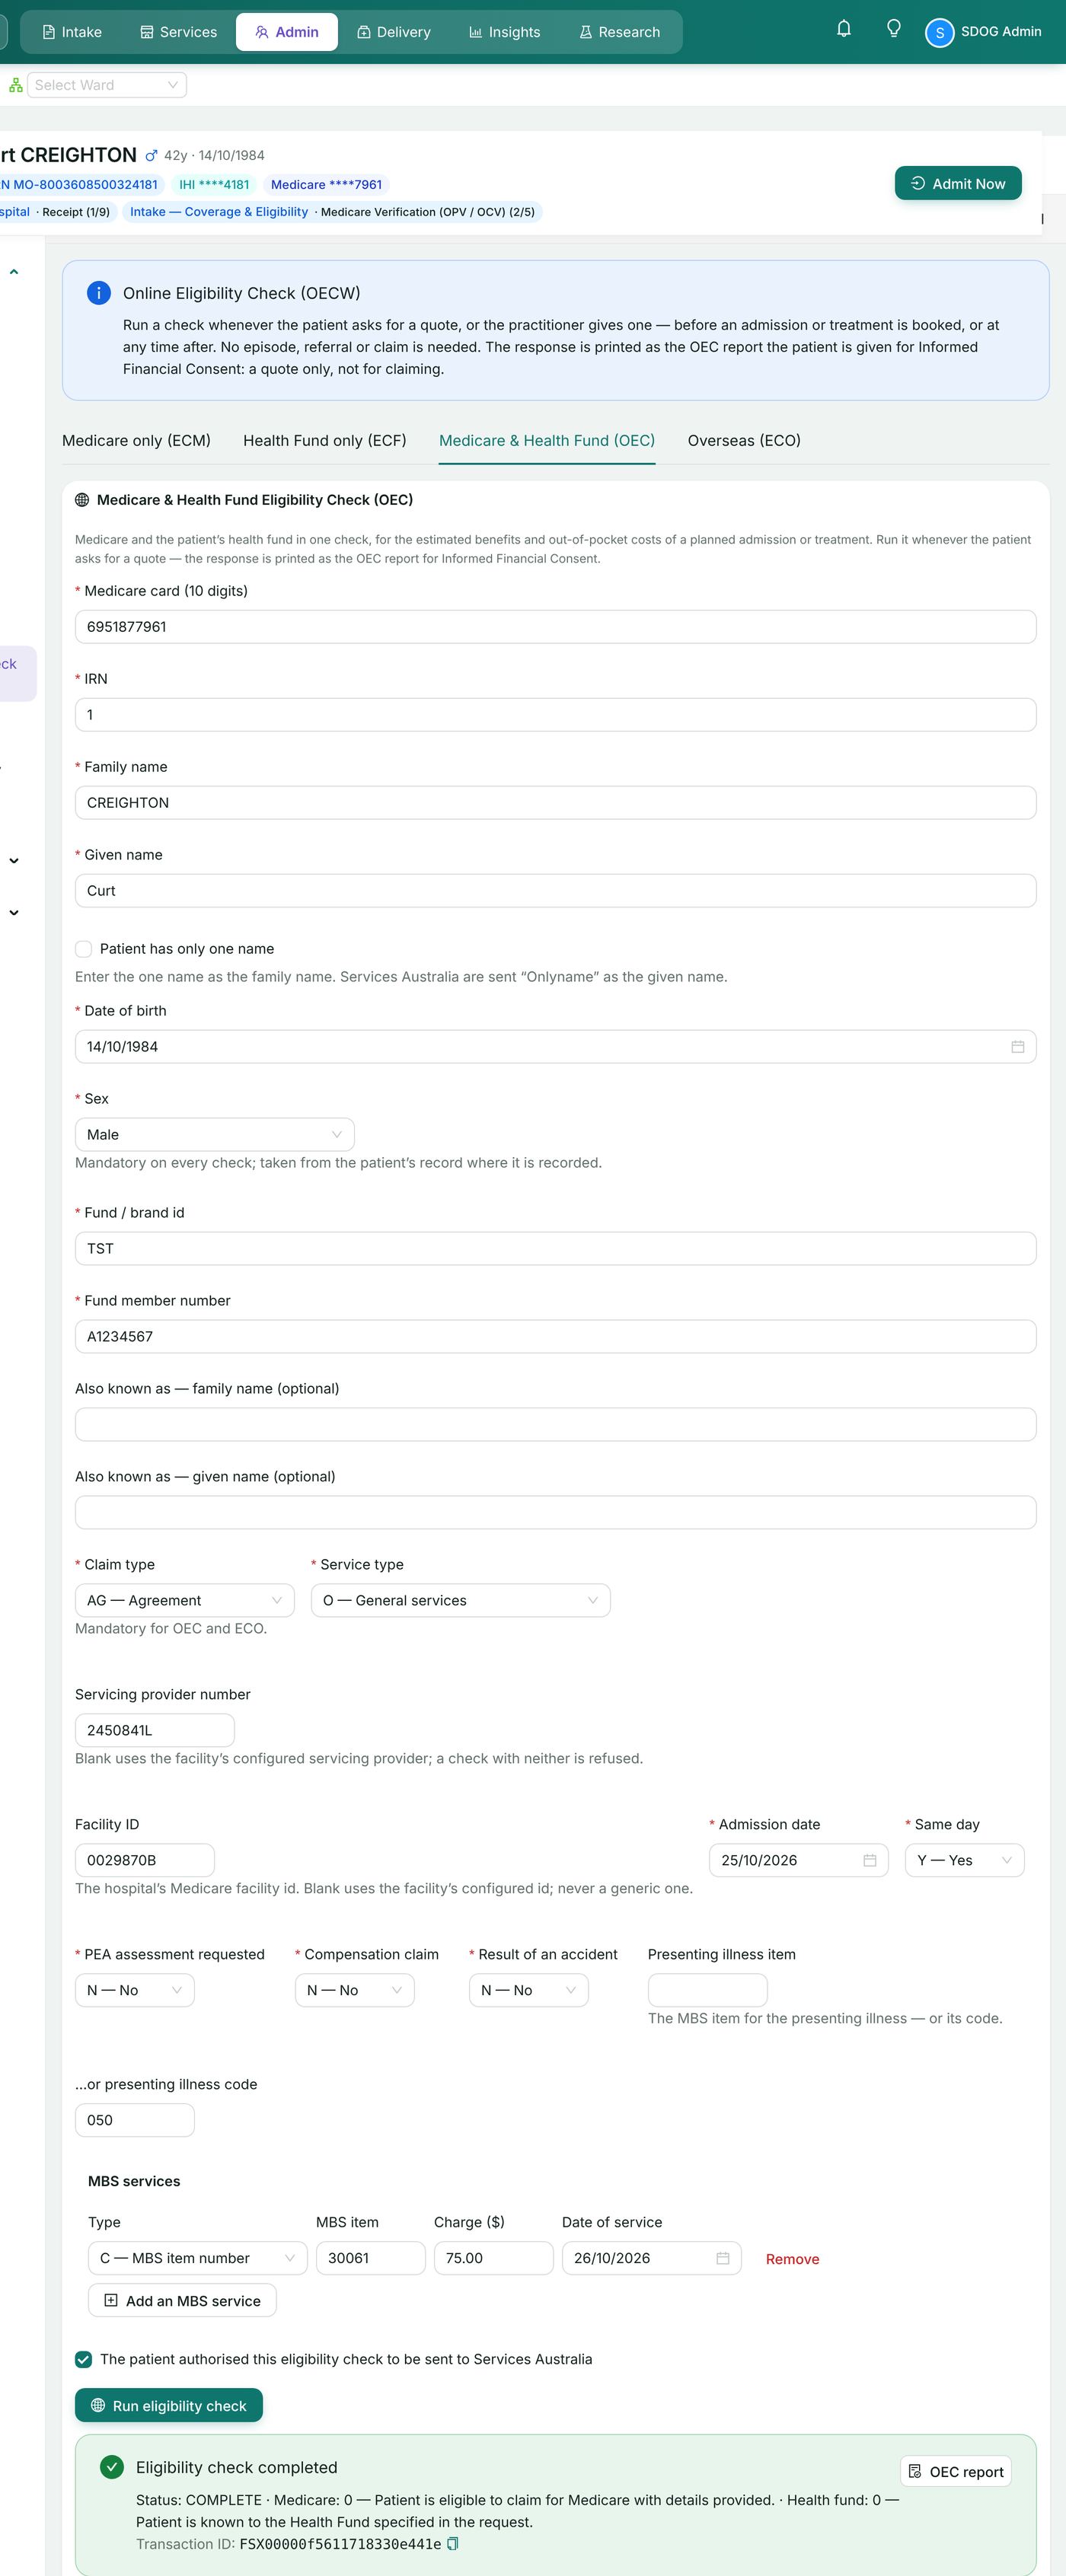
7. Bulk bill claiming (BBSW)
A bulk bill claim is lodged store-and-forward: Services Australia receive it straight away and assess it overnight. The patient assigns their benefit to the provider (DB4 assignment of benefit), and the outcome arrives in the processing and payment reports (section 14).
Pathway: patient chart → Care Admin → System: Bulk Bill Claiming (BBSW).
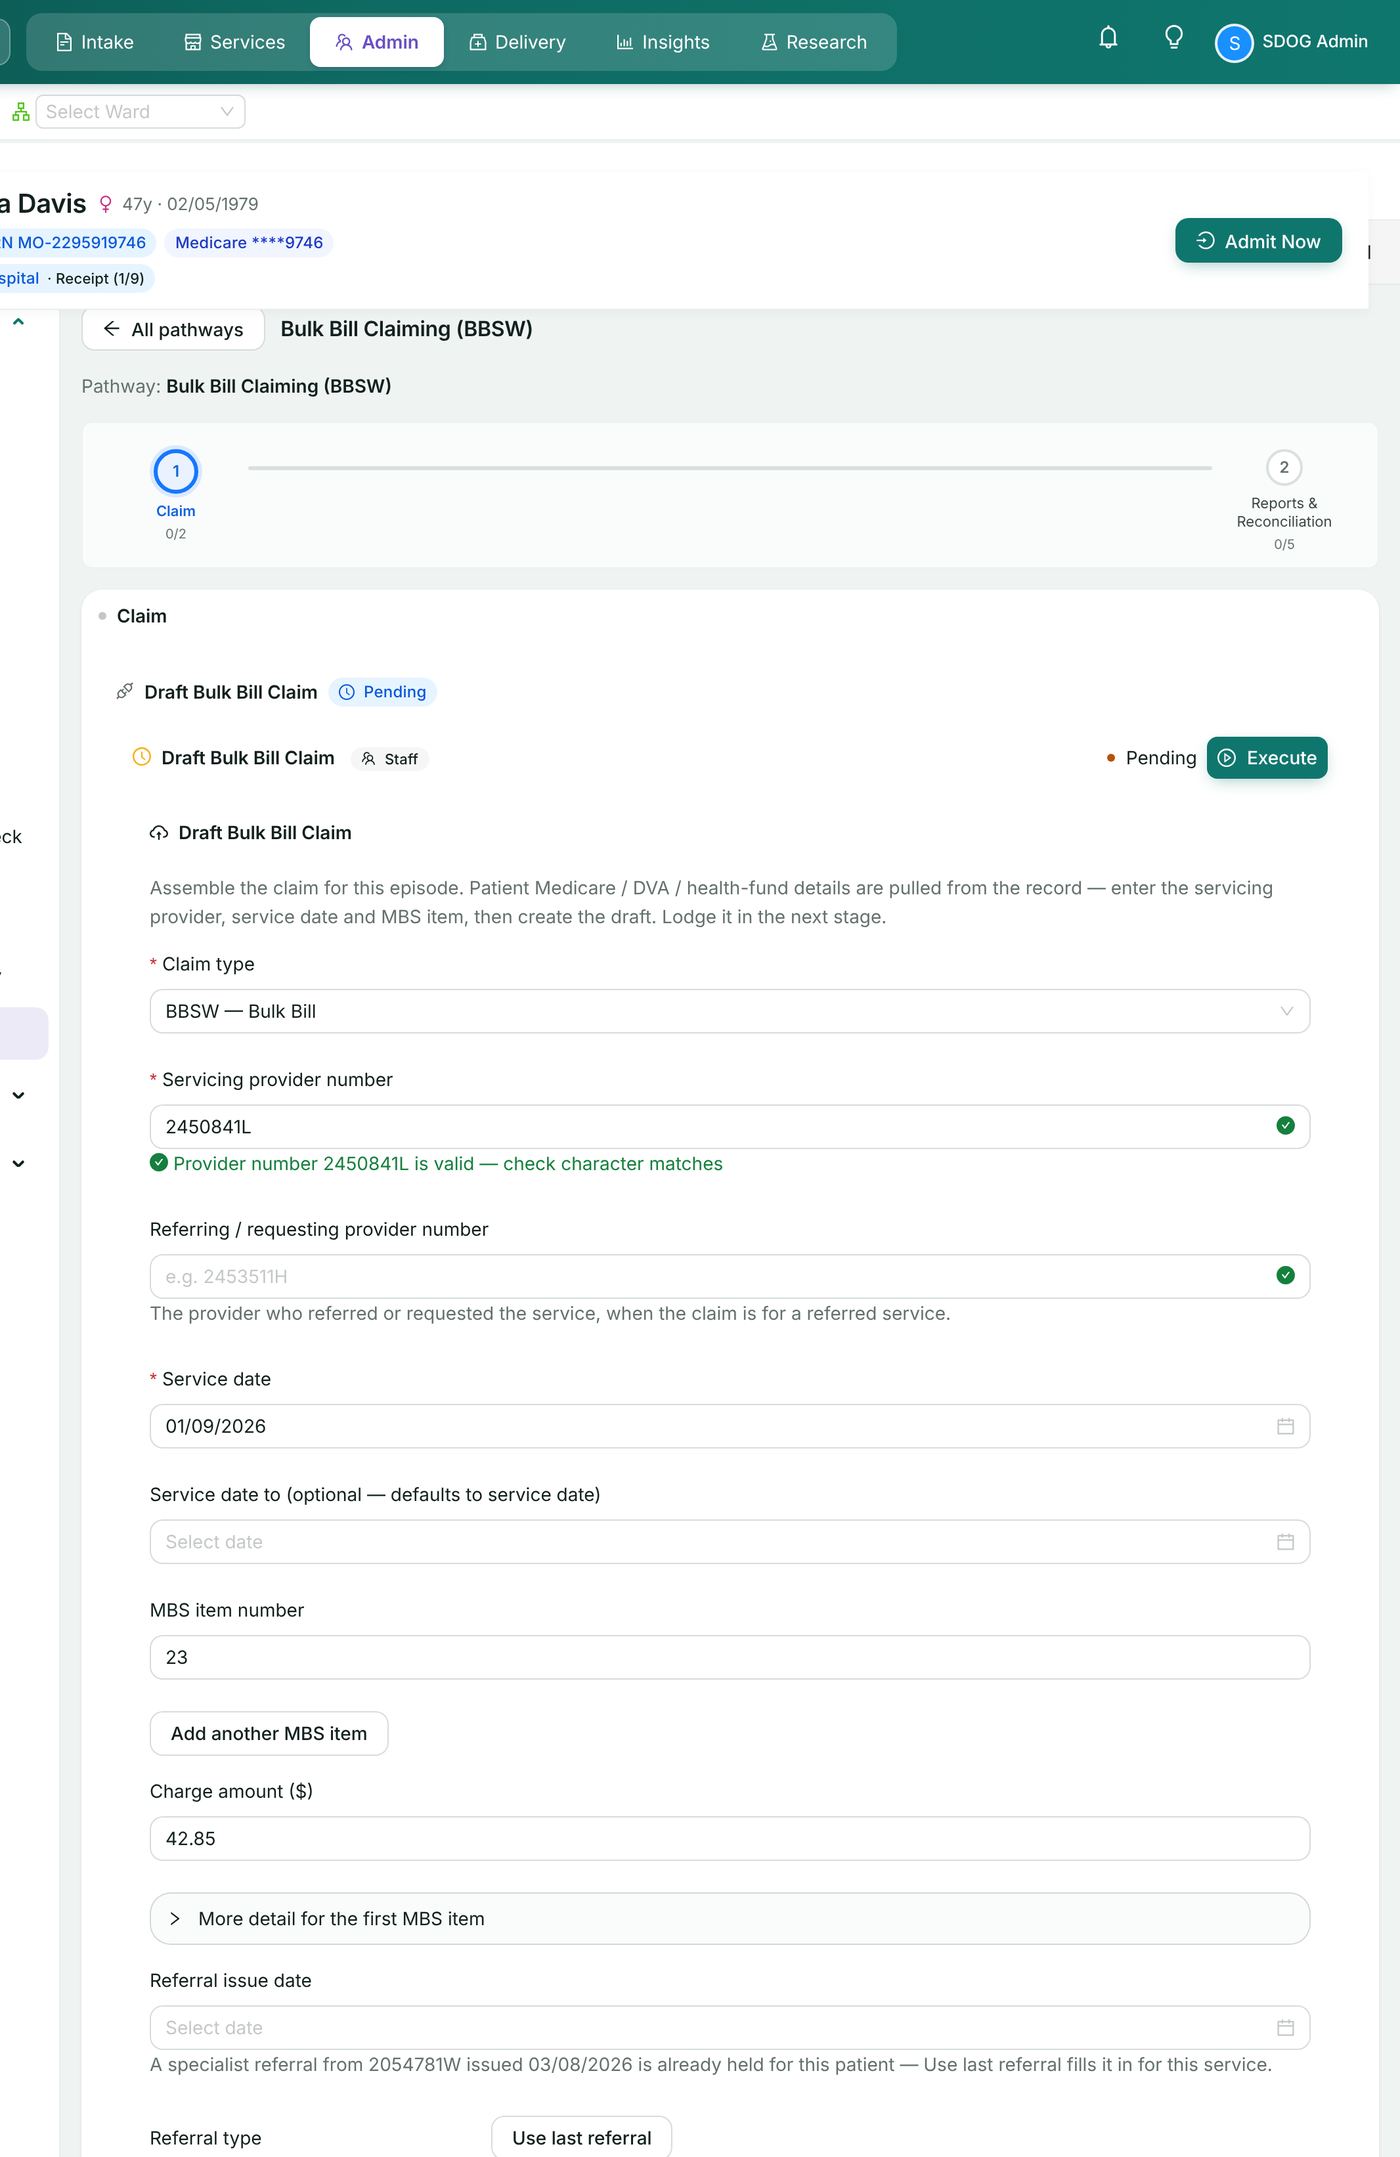
7.1 Draft the claim
- Open the Claim stage → Draft Bulk Bill Claim. Patient Medicare / DVA / fund details are taken from the record.
- Claim type is BBSW — Bulk Bill. Enter the Servicing provider number (a tick and "Provider number … is valid — check character matches" confirms it), and the Referring / requesting provider number for a referred service.
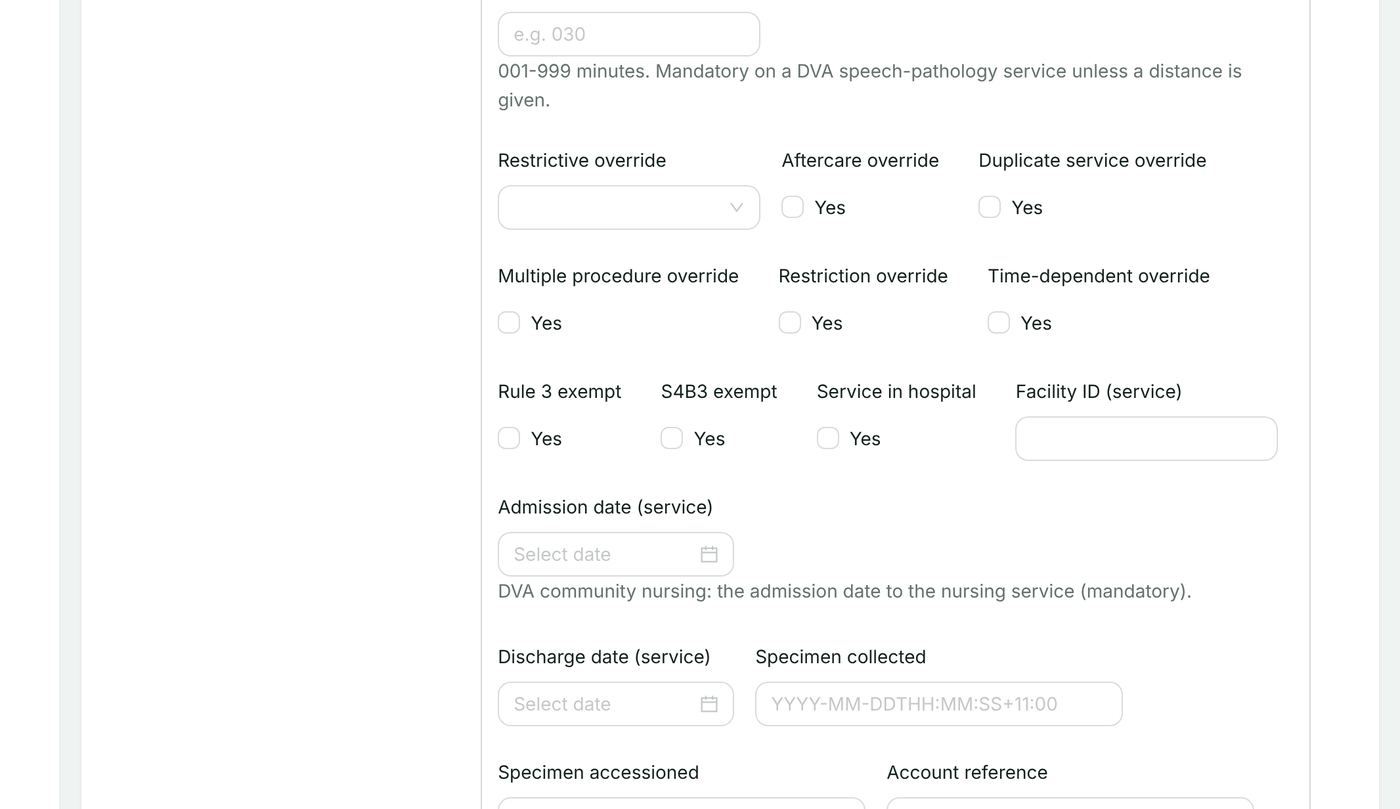
- Enter the Service date, the MBS item number and Charge amount ($). Use Add another MBS item for more services, and More detail for the first MBS item for item-level elements (overrides, pathology dates, self-deemed code, time and duration and so on).
- For a referred service enter the Referral issue date, Referral period (months), Referral type and Referral period code. If a referral is already held for the patient, Use last referral fills it in.
- Use Add medical event for a second medical event in the same claim; set Service type (general, specialist or pathology), Account paid, Service given in hospital, Facility ID and Payee provider number where they apply.
- Choose Create draft claim. The draft is stored and can be lodged now or later.
HealthOS checks item combinations as you type: for example a specialist and a pathology service (outside Group P9) cannot be lodged together, and the widget says so before anything is sent.
7.2 Assignment of benefit (DB4)
A bulk bill claim cannot be lodged until the patient's assignment of benefit is recorded.
- In Submit Bulk Bill Claim (BBSW), select the draft under Draft claim to lodge.
- Under Assignment of benefit (DB4) choose Print the DB4 for signing to print the pre-assignment form for the patient to sign (section 13.3).
- Choose how it was given — Signed DB4 form or Electronic assignment — enter an optional reference, and choose Record assignment. "Assignment recorded" appears.
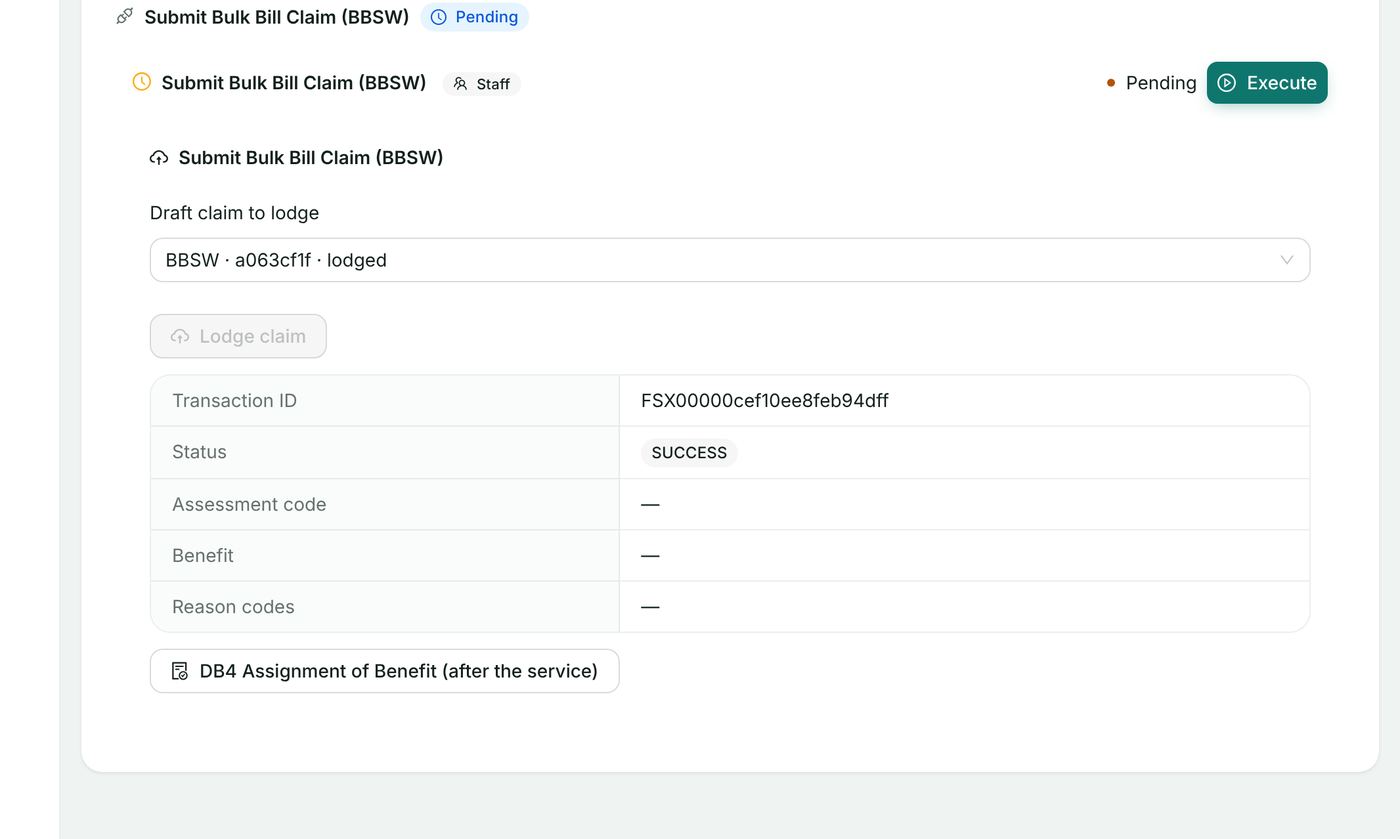
7.3 Lodge the claim
- Choose Lodge claim and confirm Lodge to Services Australia? with Lodge.
- The widget shows the Transaction ID, Status, assessment code, benefit and reason codes, and the button DB4 Assignment of Benefit (after the service) to print the post-assignment form.
7.4 Batches
Bulk bill (and DVA) claims can also be lodged in batches from PAS → Billing & Claims → Online Claiming:
- On Ready to Claim, tick the episodes whose draft claims should go together and choose Create batch (n). Enter a Batch name, the Claim type and an optional description, and choose Create batch.
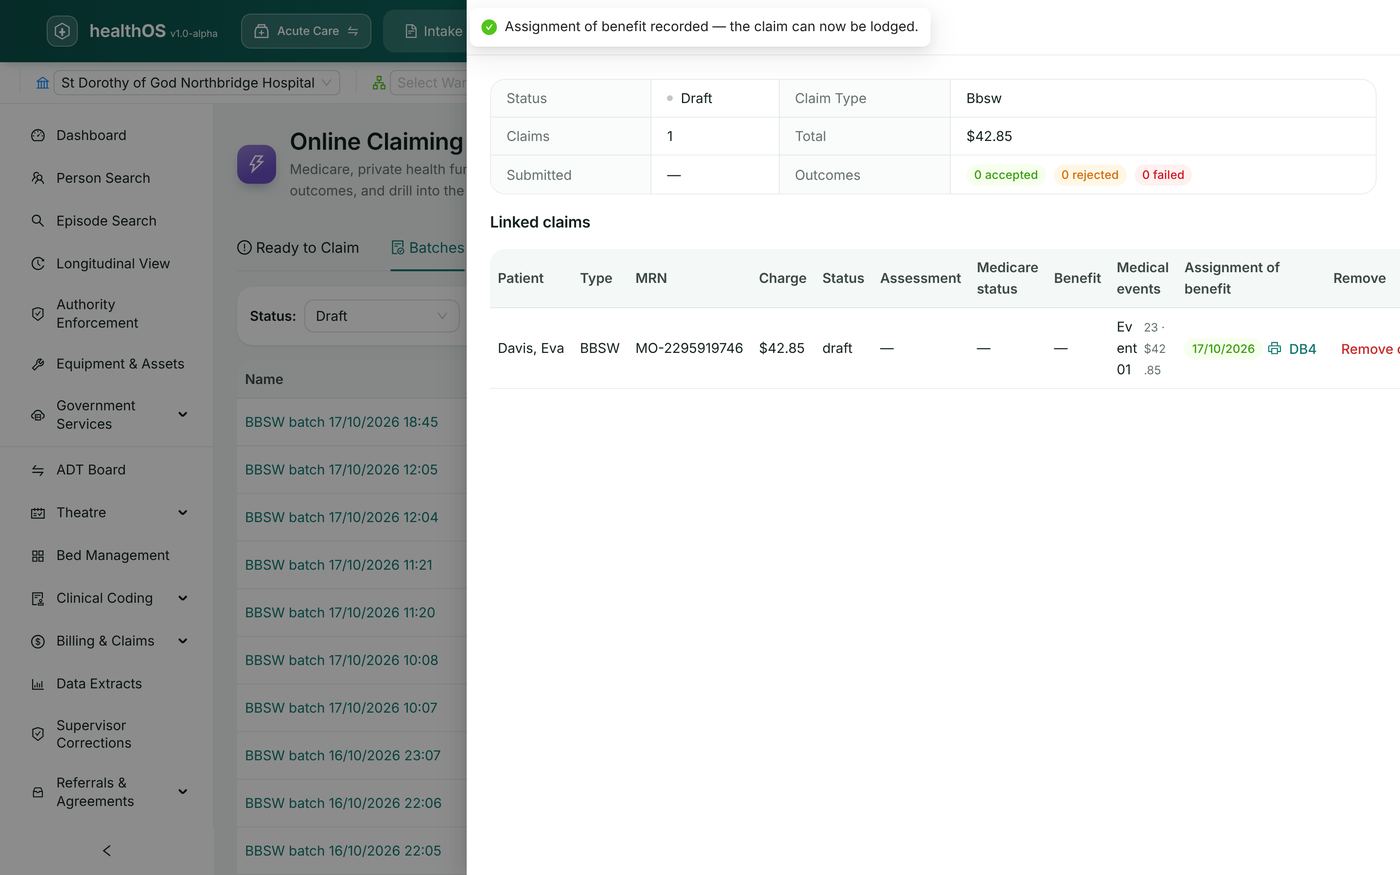
- On Batches, select a batch name to open it. Each linked claim (medical event) is listed with its charge, status and Assignment of benefit. Choose Record assignment for any BBSW claim still without one (date of assignment, how the patient assigned — signed DB4 or electronic — and an evidence reference), or DB4 to reprint it.
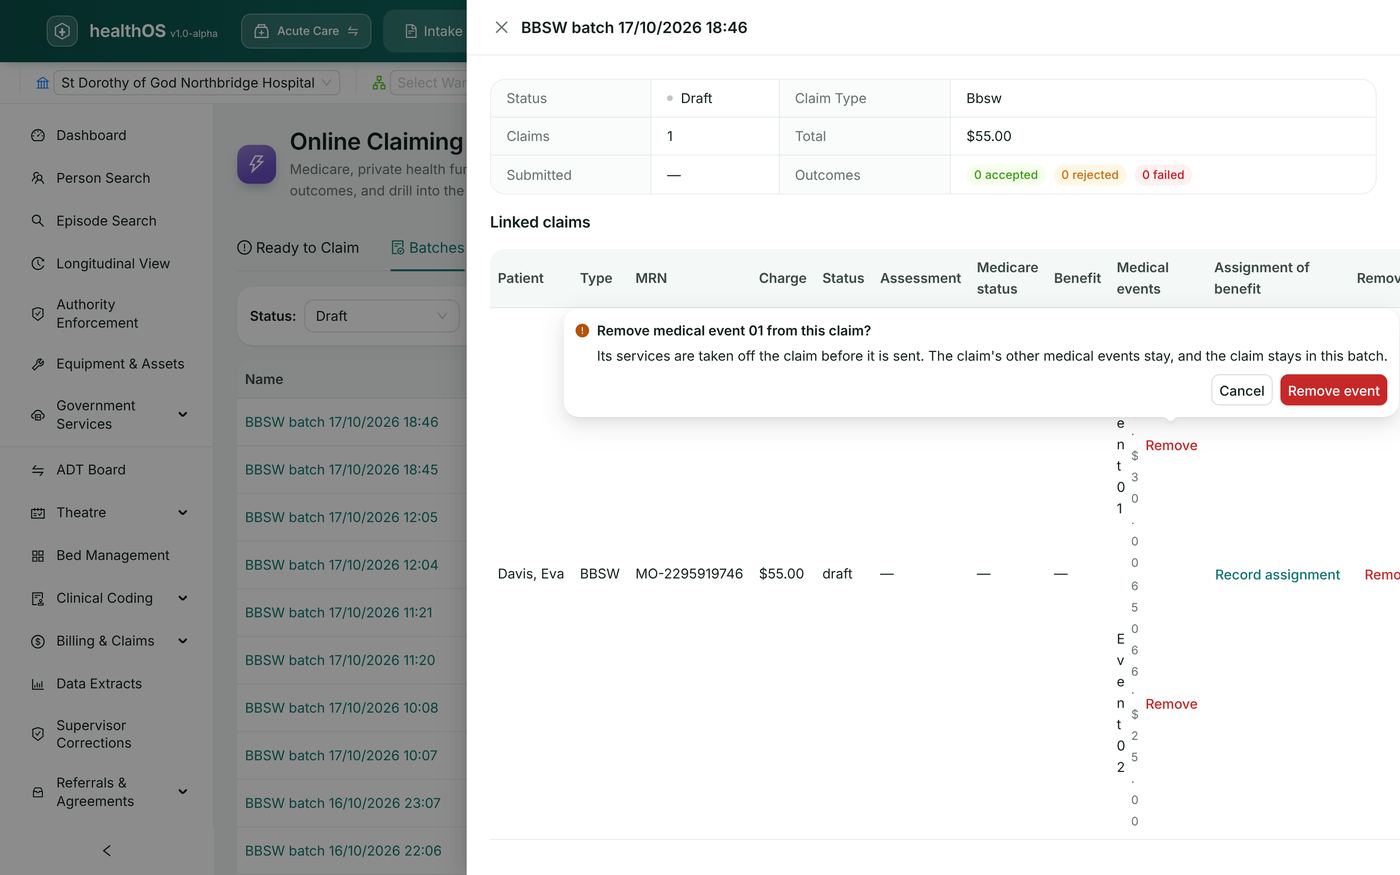
- To take a medical event out of the batch before it is sent, choose Remove on its row and confirm Remove event. The event returns to the unbatched pool and can be added to another batch; the rest of the batch is untouched.
- Choose Submit on the batch and confirm. The claims are lodged one after another and the result reads "Submitted: n accepted, n rejected, n failed". Cancel unlinks every claim so they can be re-batched.
8. Patient claims (PCIW) and same-day delete (SDDW)
A patient claim is lodged in real time while the patient is present, after the patient has paid all or part of the account (or not at all), and Medicare answers at once.
Pathway: patient chart → Care Admin → System: Patient Claiming (PCIW).
8.1 Draft the claim
- On the Claim stage, open Draft Patient Claim (PCIW).
- Complete the provider, service date, MBS items and charges as for a bulk bill claim (section 7.1), and set Account paid: Paid in full, Partially paid or Not paid.
- If someone other than the patient is the claimant, tick Claimant is someone other than the patient and enter the claimant's name, date of birth, Medicare card and IRN, address and phone, and — for a payment to their bank account — the account name, BSB and account number.
- Choose Create draft claim.
8.2 Lodge the claim
- In Submit Patient Claim (PCIW) select the draft and choose Lodge claim, then Lodge.
- The answer shows the Transaction ID, Status (for example MEDICARE_ASSESSED), assessment code, benefit, and a line per service with its item, assessment, benefit and reason code with Medicare's wording.
- Print the document for the claimant: Statement of Claim & Benefit Payment when the claim was assessed, or Lodgement Advice when it was referred (section 13).
8.3 Store a claim and transmit it later
A draft claim is stored as soon as Create draft claim is chosen. To lodge it later, open Submit Patient Claim (PCIW) on the same pathway, select the stored draft and choose Lodge claim.
8.4 A claim Medicare cannot assess straight away (pendable)
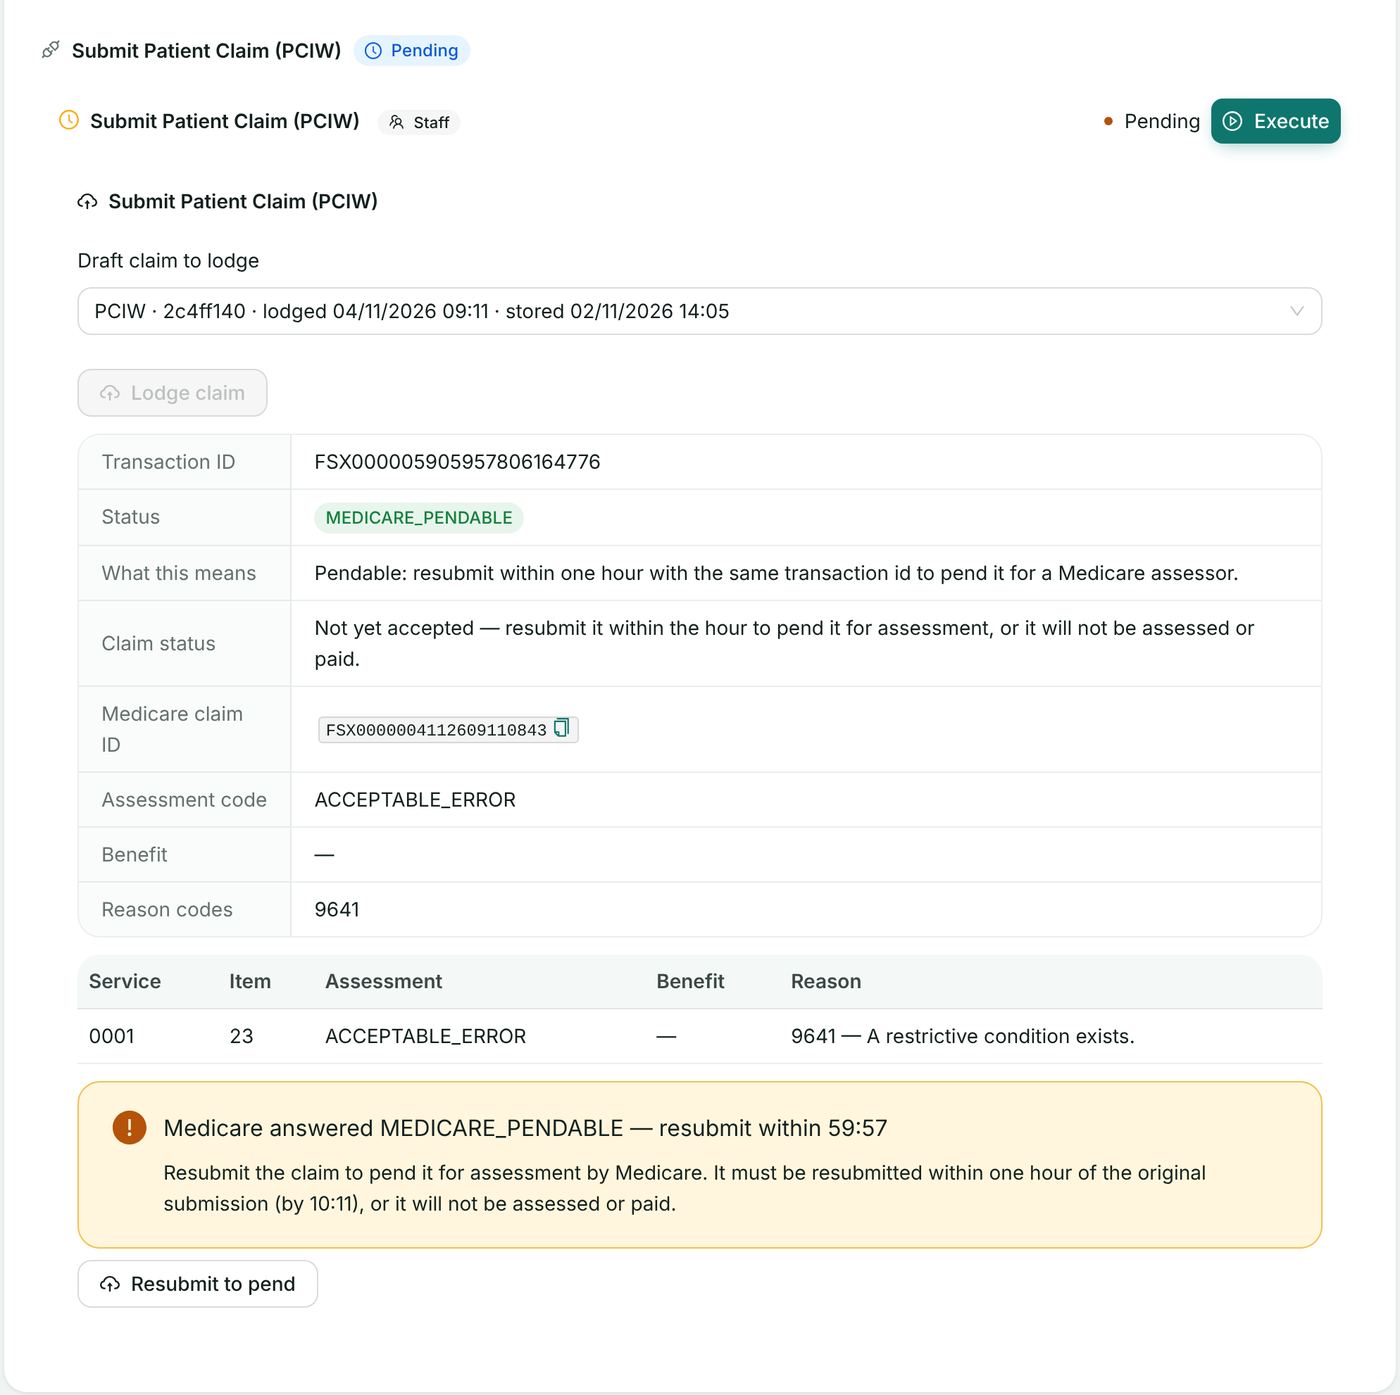
If Medicare answers MEDICARE_PENDABLE (an acceptable service-level error, for example reason 9601 "The claim needs to be referred to a Medicare Customer Services Officer for further assessment"), the widget shows "Medicare answered MEDICARE_PENDABLE — Resubmit the claim to pend it for assessment by Medicare."
- Give the claimant the Lodgement Advice.
- Choose Resubmit to pend and confirm Resubmit. HealthOS resubmits the claim under the same correlation id, Medicare moves it to MEDICARE_PENDED and queues it for an operator; the result is shown under Resubmitted.
The same action is offered on Online Claiming → Transactions as Accept for assessment.
8.5 Referrals carried forward
For a subsequent attendance under the same referral, Use last referral on the draft fills the referral details from the initial attendance.
8.6 Same-day delete (SDDW)
A same-day delete withdraws a patient claim at Services Australia. It is available only for a PCIW claim, lodged through web services today (Australian date), that Medicare has assessed.
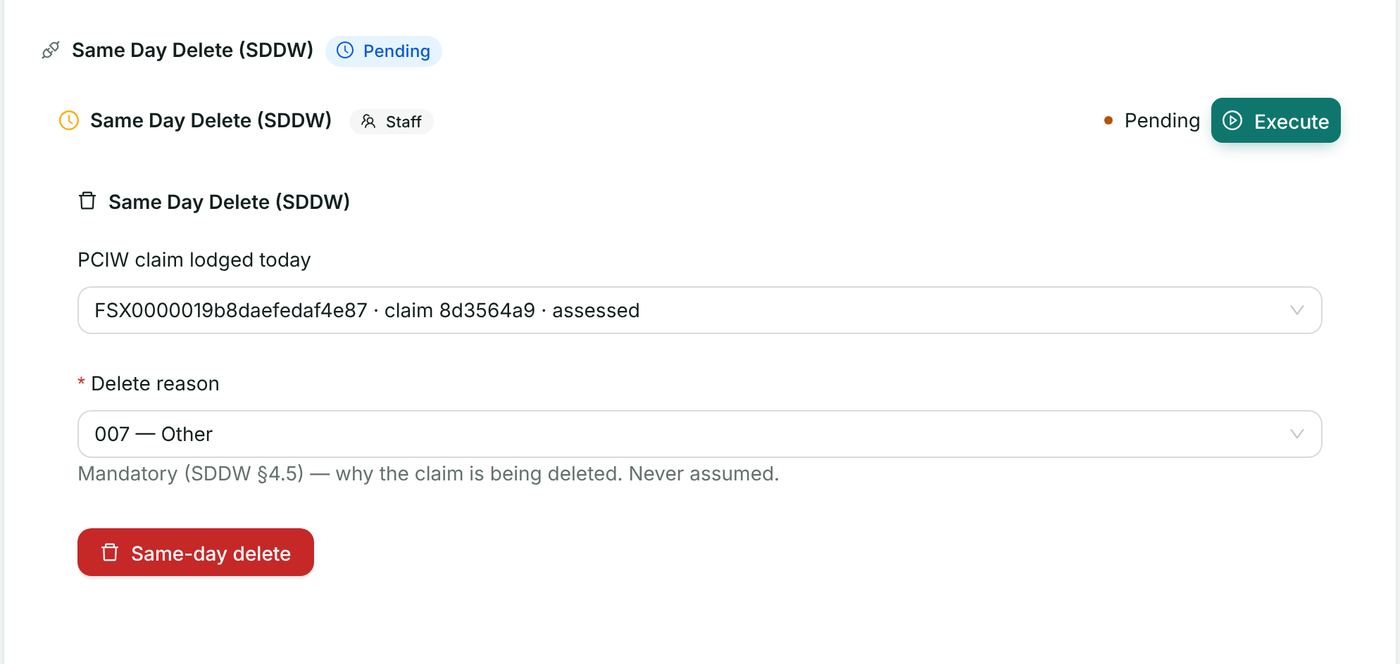
- On System: Patient Claiming (PCIW) → Reports & Reconciliation, open Same Day Delete (SDDW).
- Choose the claim under PCIW claim lodged today — only claims that qualify are listed.
- Optionally choose a Delete reason code (001–005, for example 001 Incorrect Patient Selection).
- Choose Same-day delete and confirm Delete. The withdrawal cannot be undone.
A claim Medicare pended is also listed, after the assessed ones; Services Australia answer its delete with 9645 (status other than Paid Same Day), and the widget says so before you send it. A claim lodged on an earlier day cannot be deleted — correct it with Medicare instead.
9. DVA claims (DVAW and VAAW)
DVA medical claims (DVAW — general, specialist, pathology) and DVA allied health and community nursing claims (VAAW) are lodged for a veteran verified with OVVW (section 5.7). DVA processes them overnight; the outcome arrives in the DVA processing and payment reports.
Pathway: patient chart → Care Admin → System: DVA Claiming (DVAW / VAAW). (A single DVA claim can also be lodged from PAS → Billing & Claims → DVA.)
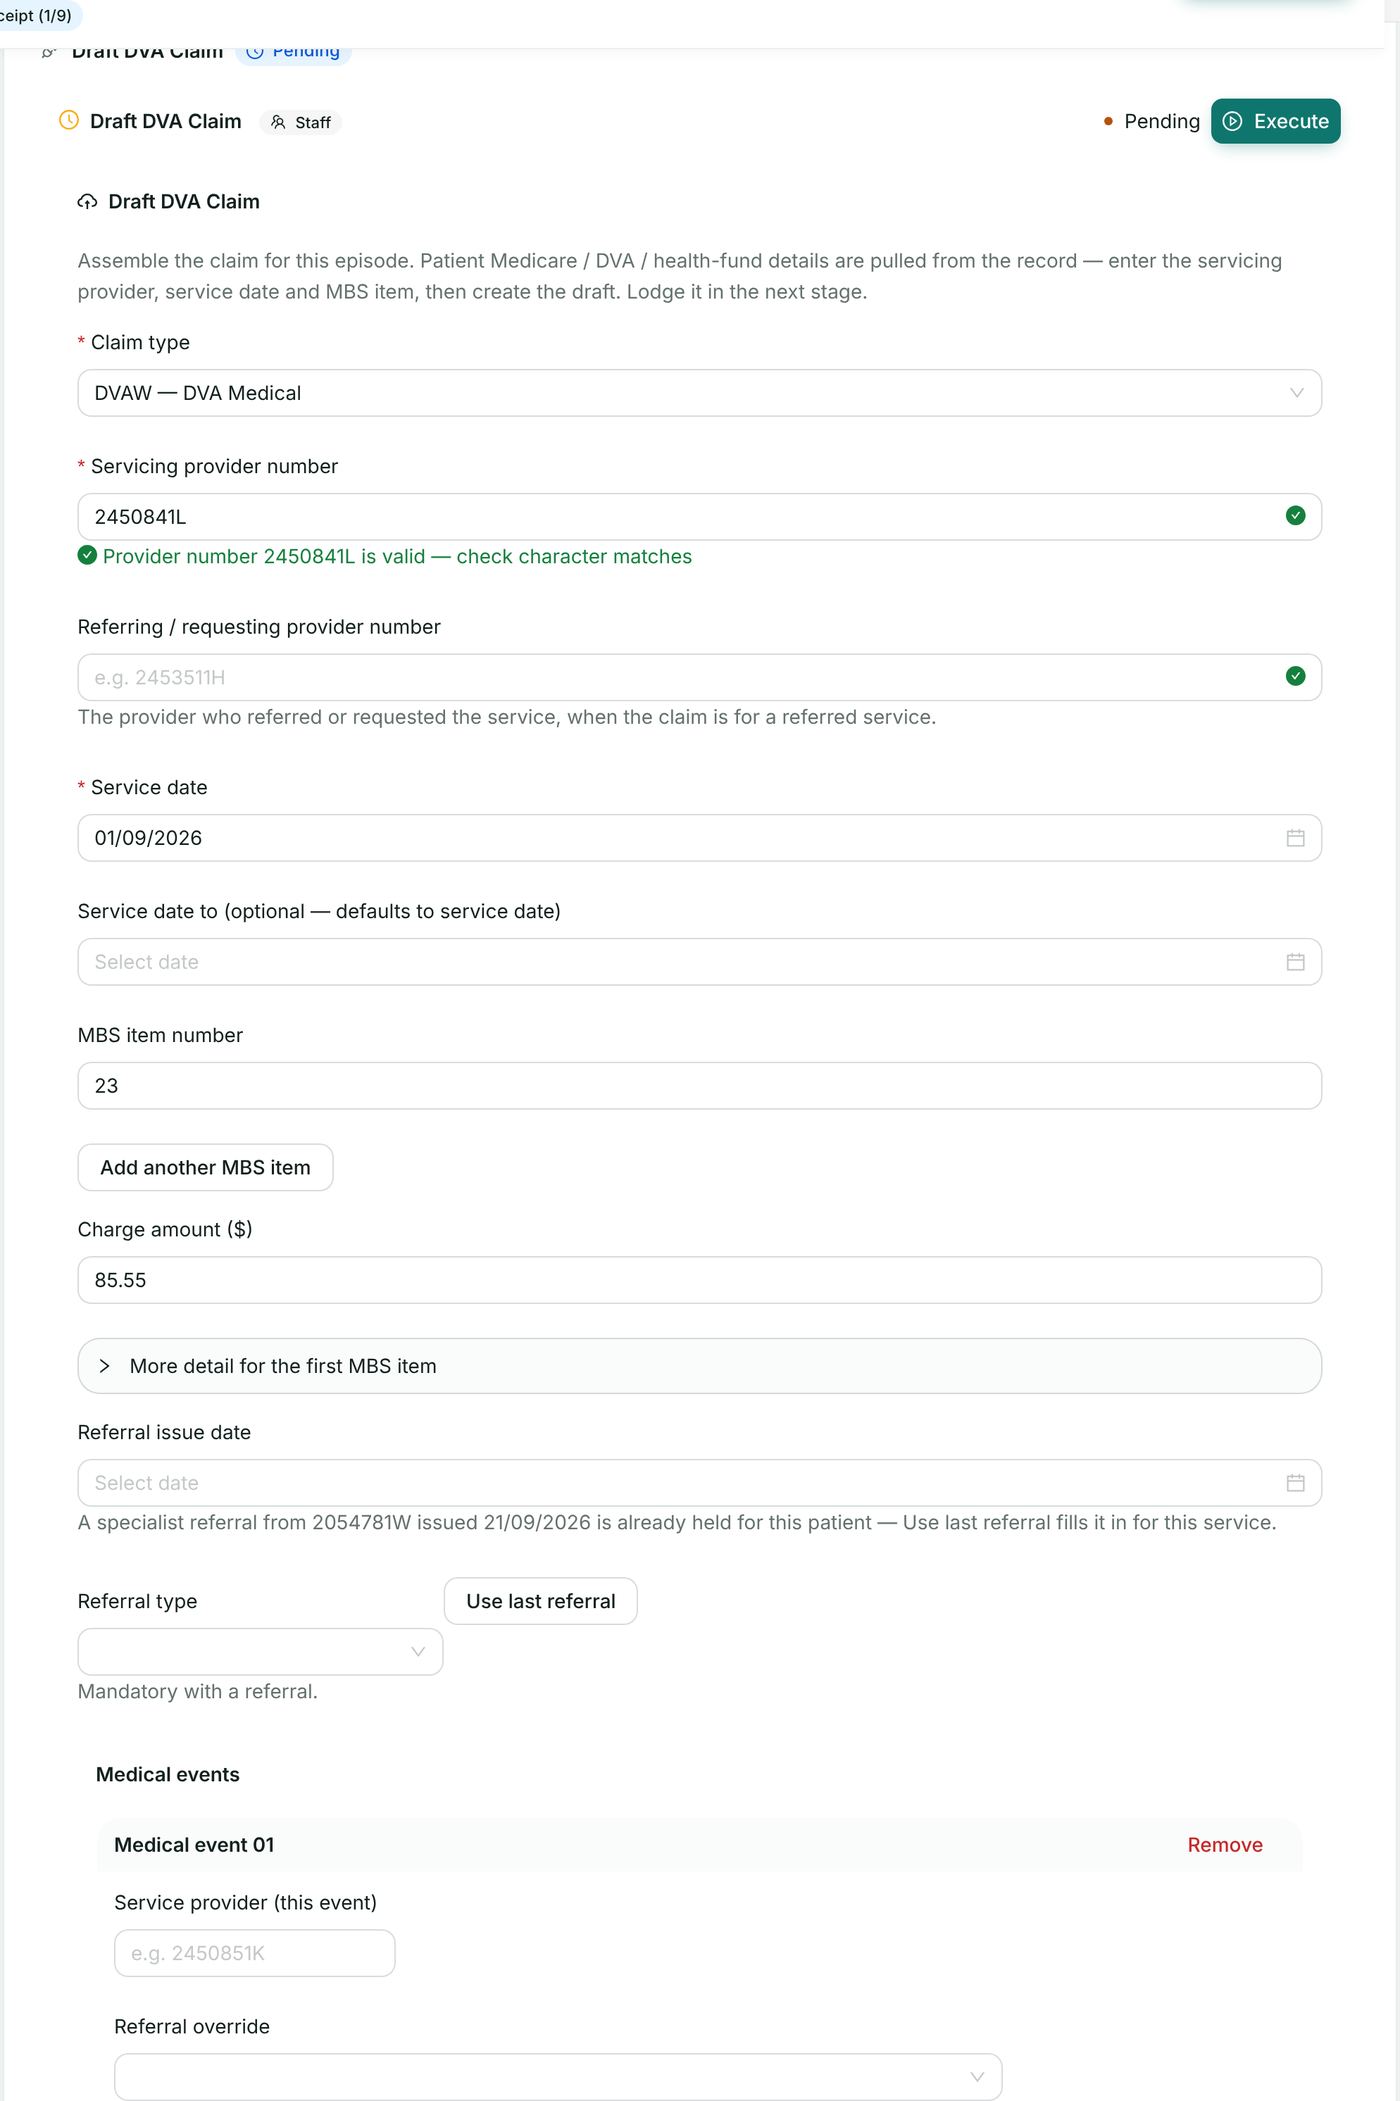
- On the Claim stage, open Draft DVA Claim. Choose the Claim type (DVAW or VAAW) and complete the provider, service date, items and charges as in section 7.1. The veteran's DVA file number comes from the record.
- Choose Create draft claim.
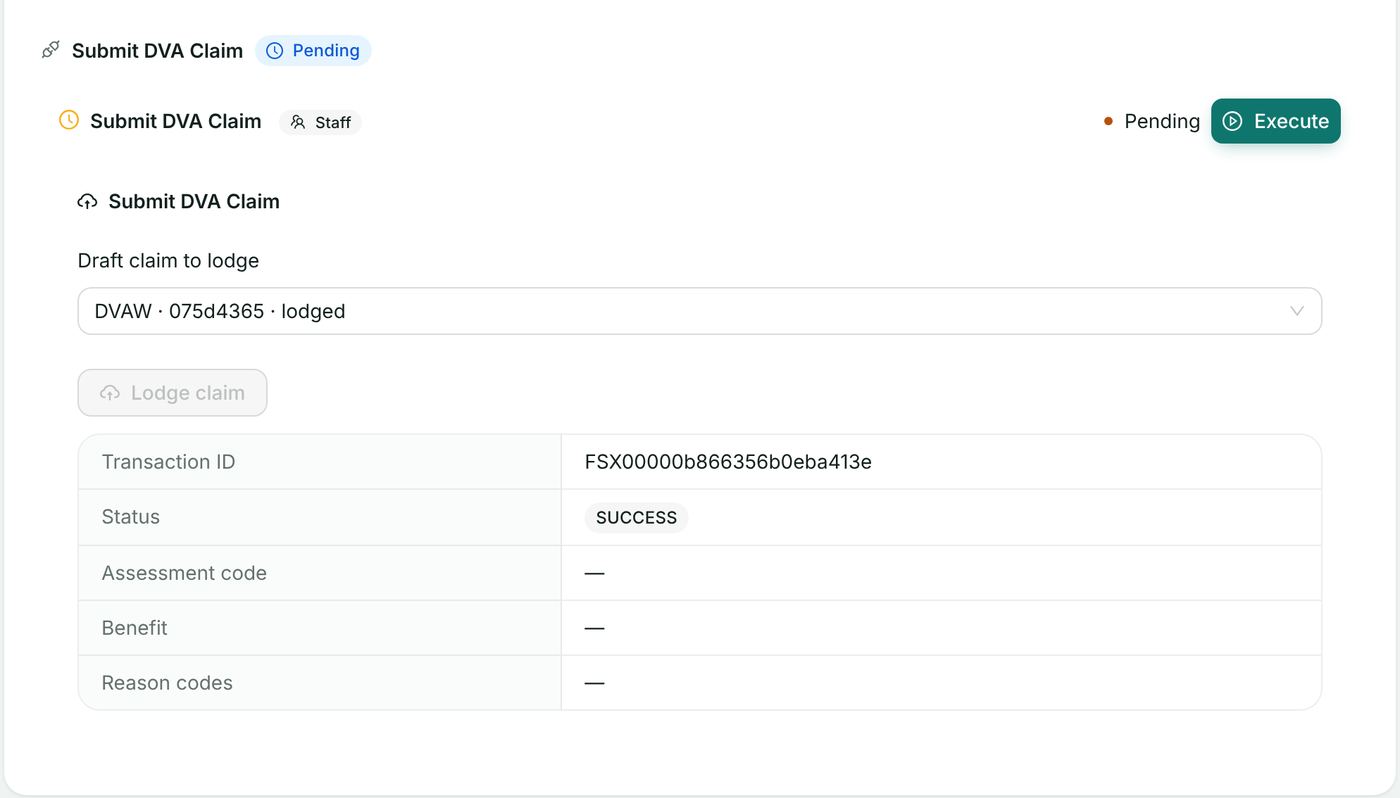
- In Submit DVA Claim, select the draft. Under DVA claim voucher choose Print the voucher for signing; the veteran signs it before the claim is lodged (section 13.5).
- Choose Lodge claim and confirm. The Transaction ID and status are shown.
DVA claims can also be batched, and a medical event removed from a batch before lodgement, exactly as in section 7.4.
10. In-patient medical claims (IMCW)
An in-patient medical claim (IMC) sends a private in-patient's medical services to the health fund and Medicare together through ECLIPSE. Channels: Medicare Benefit (mb), Medicare Only (mo), Agreement (ag) and Patient Claim (pc); service types general, specialist and pathology.
Pathway: patient chart → Care Admin → System: Private Hospital Claiming (IMCW / IHCW).
- Coding & Grouping — Code the Episode: assign the ICD-10-AM diagnoses and ACHI procedures. (Optional: AI Coding Assistant suggests codes for a coder to review.)
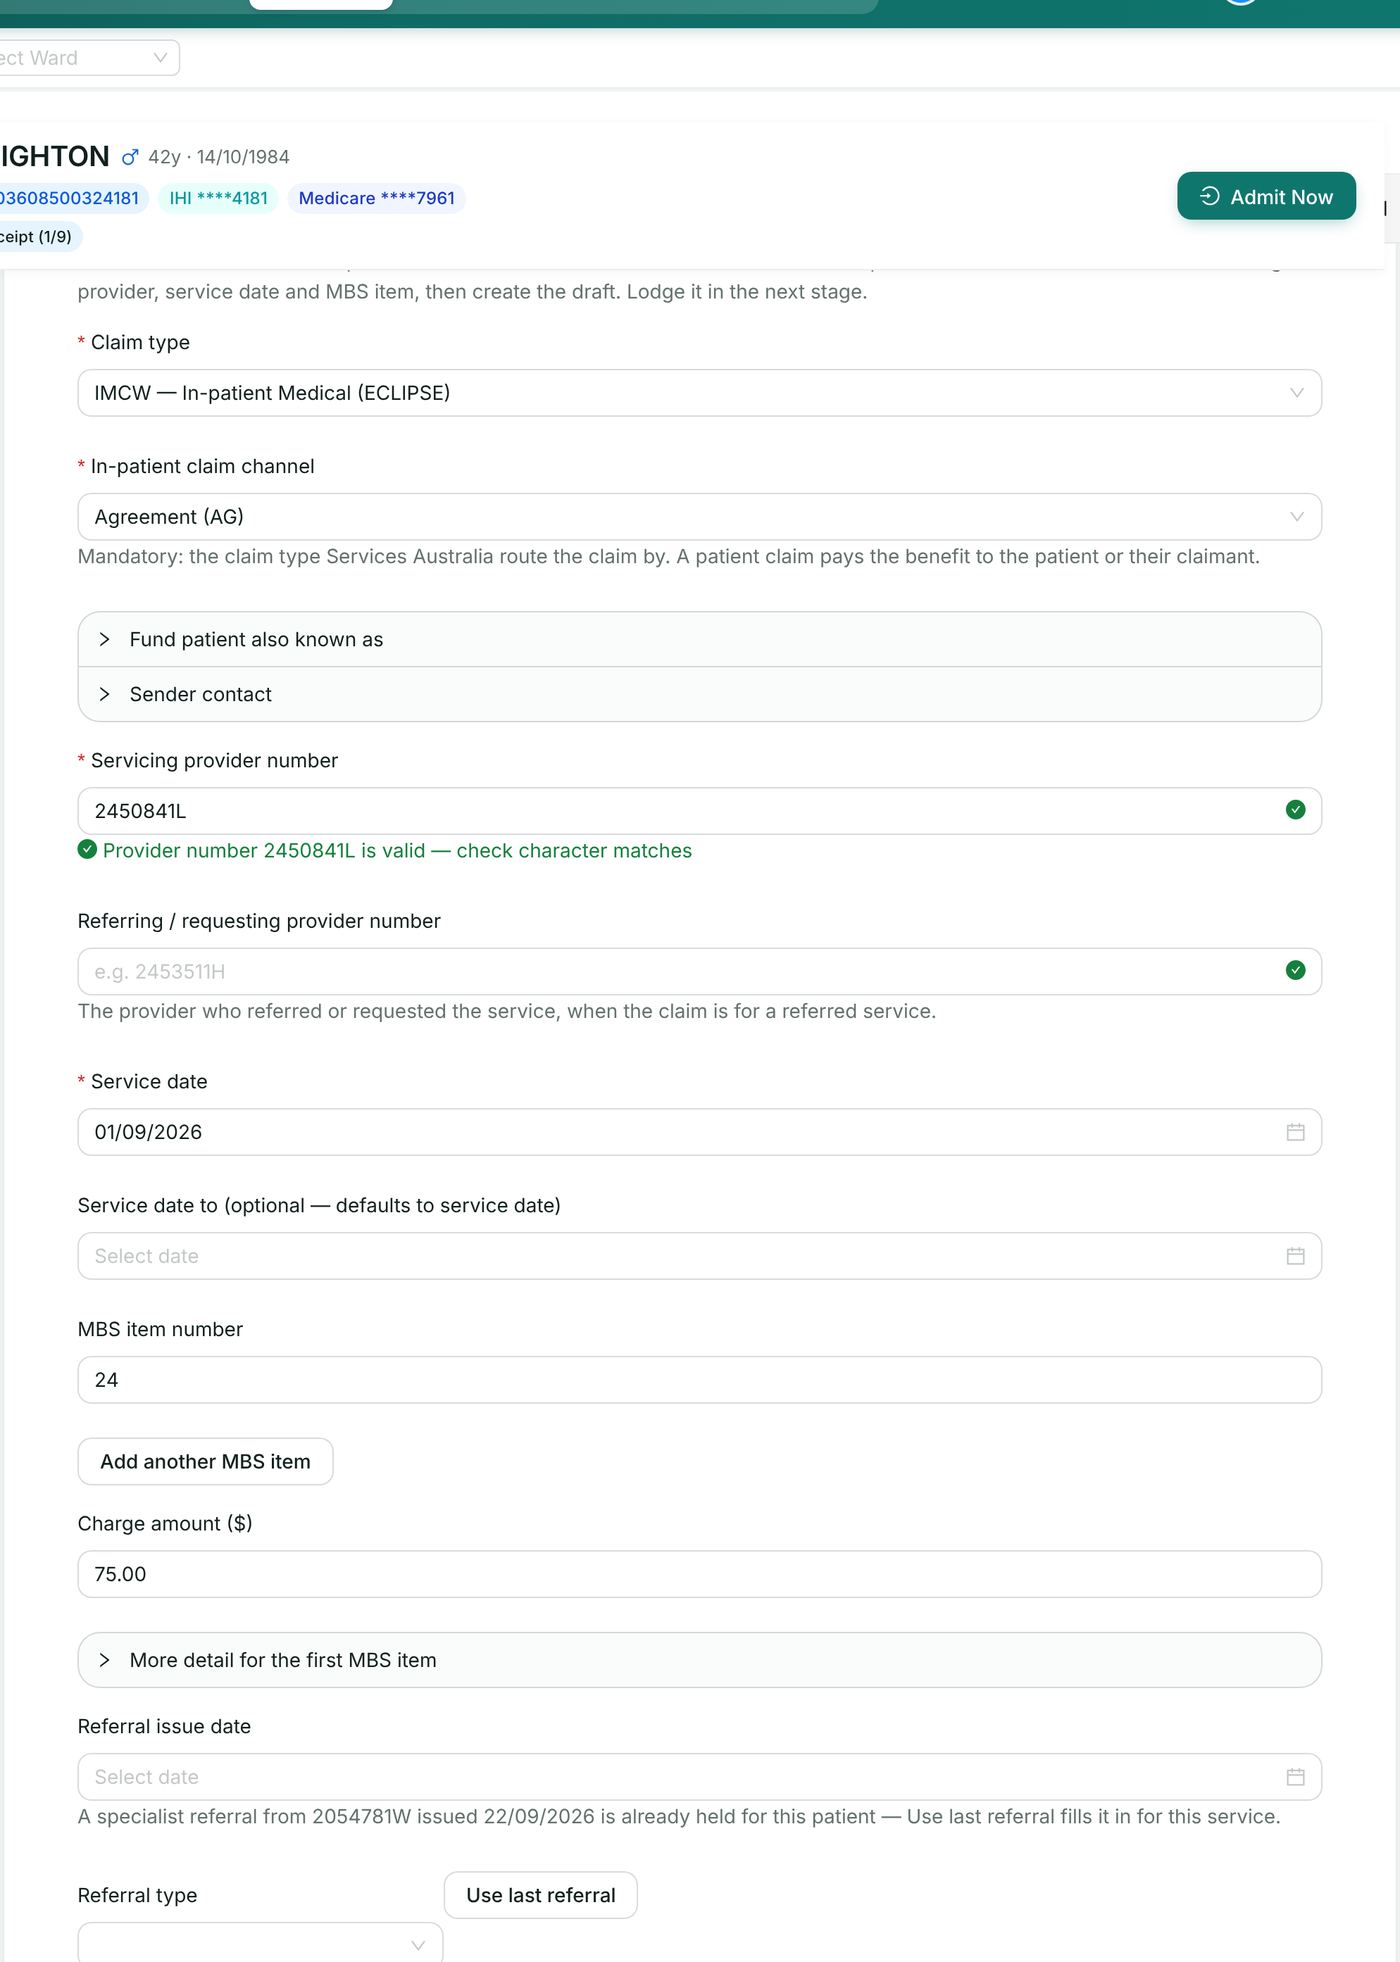
- Claim → Draft IMC Claim: choose IMCW, and complete the provider, service dates, items and charges; the health fund block (Health fund, Fund member number, Fund member ref), Accident related, Benefit assignment, Account reference id, Facility ID, Compensation claim, Fund payee, admission and discharge dates, and the payee provider. If an eligibility check was made at intake, Start from it fills these.
- Choose Create draft claim.
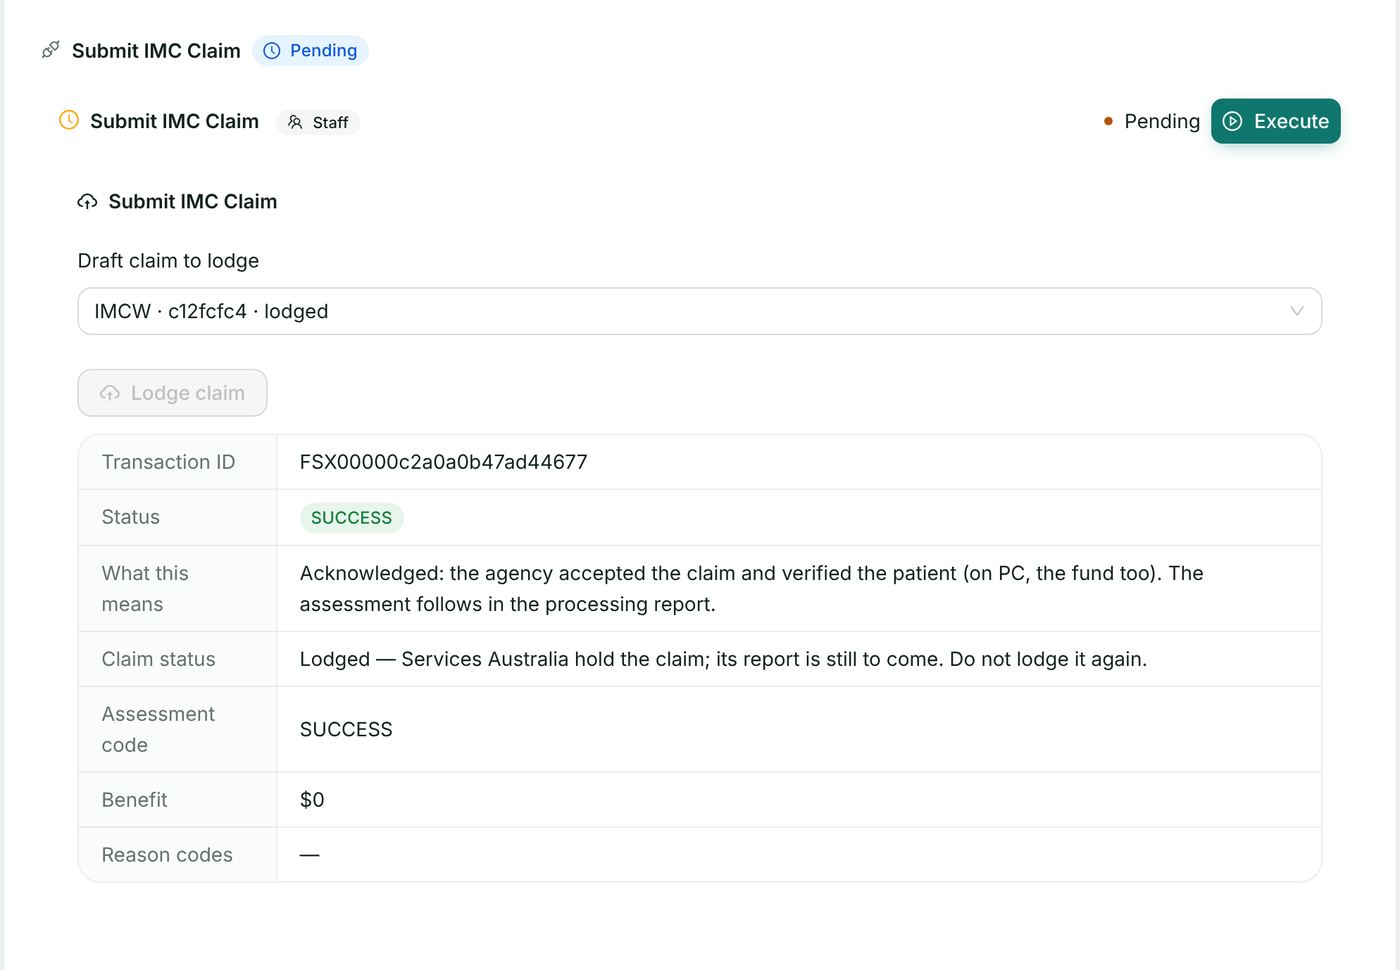
- Submit IMC Claim: select the draft. For a patient claim, choose Show the consent and declaration, show it to the patient, and tick The patient has consented to this claim being lodged (section 13.4). Lodge claim stays disabled until consent is confirmed.
- Choose Lodge claim and confirm. The Transaction ID and status are shown. If Medicare returns corrected patient details with the claim, the same confirm-and-update choice as section 5.5 appears.
11. In-hospital claims (IHCW)
An in-hospital claim (IHC) sends the hospital's own charges — accommodation, theatre, prostheses — to the fund through ECLIPSE.
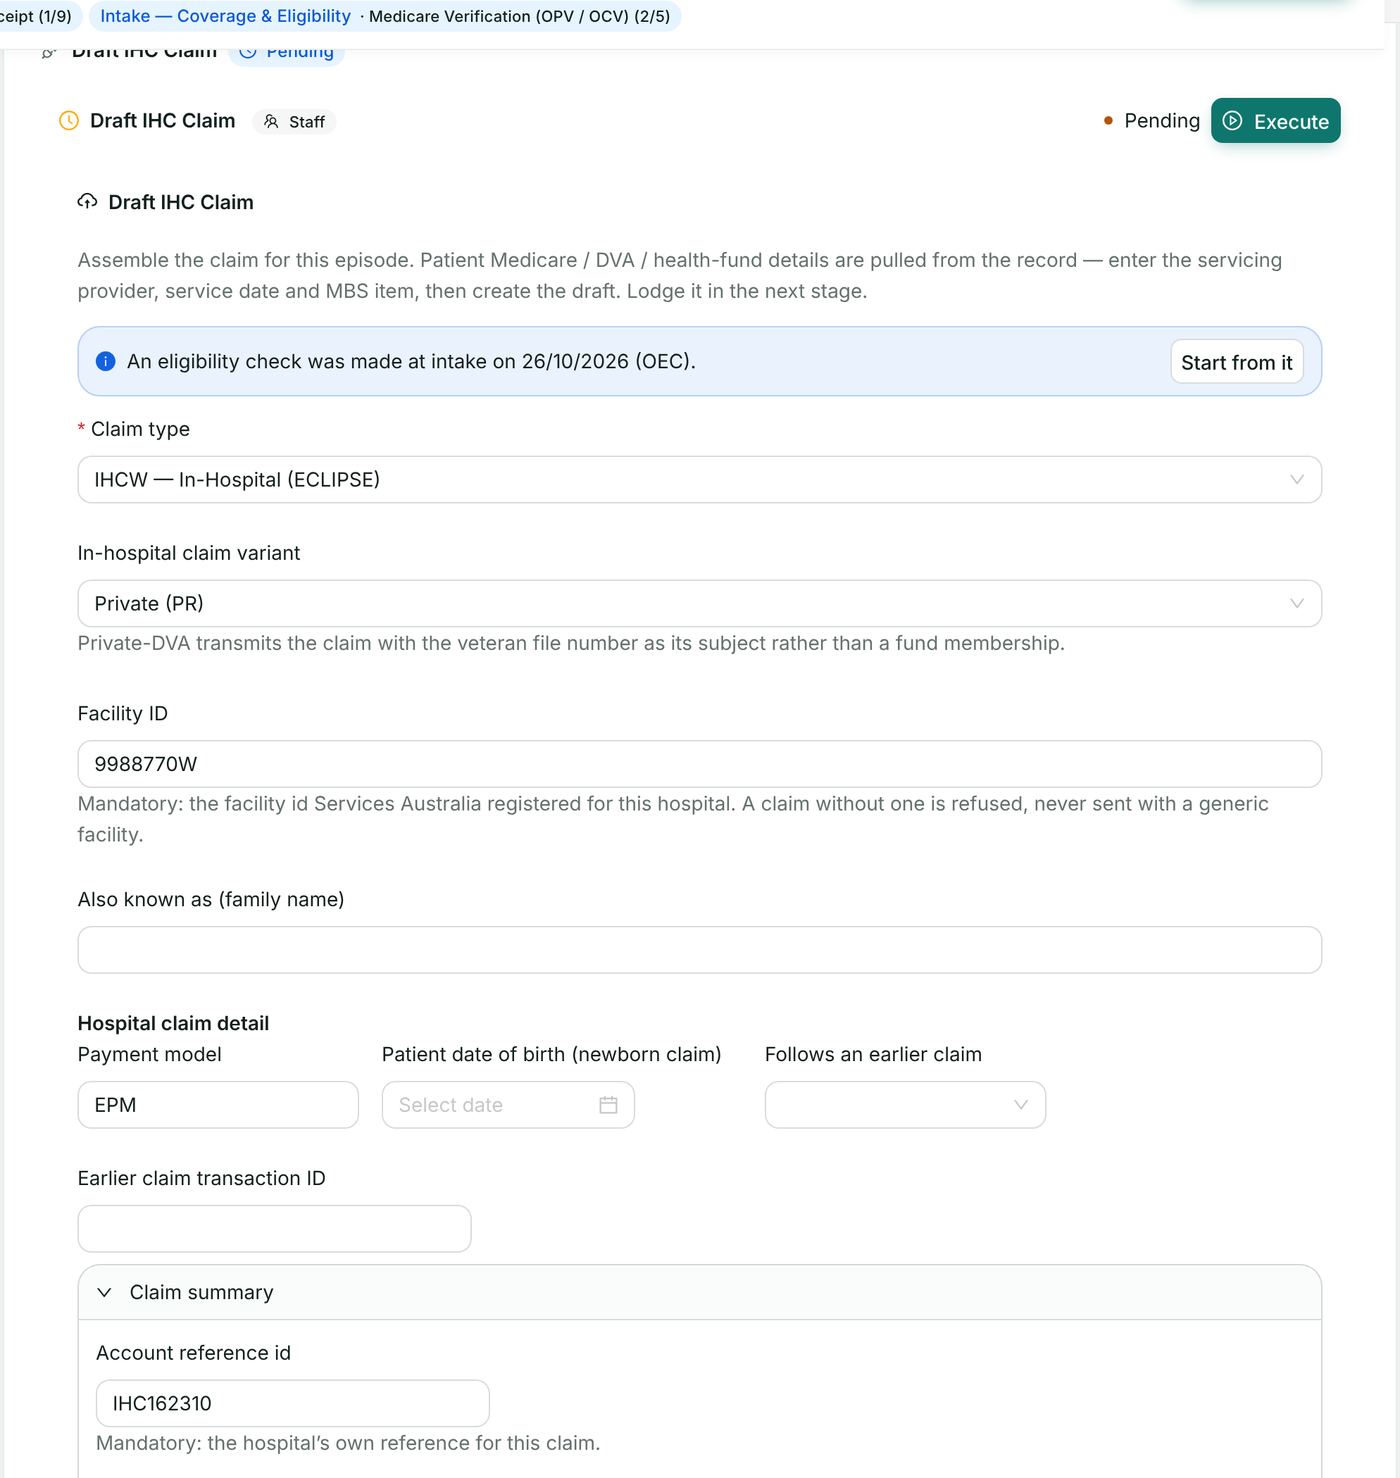
- On System: Private Hospital Claiming (IMCW / IHCW) → Claim, open Draft IHC Claim.
- Choose IHCW and the In-hospital claim variant: public, private, or private-DVA. For private-DVA enter the DVA Facility ID.
- Complete the fund, admission and discharge (blank takes the episode's) and charge details, and choose Create draft claim.
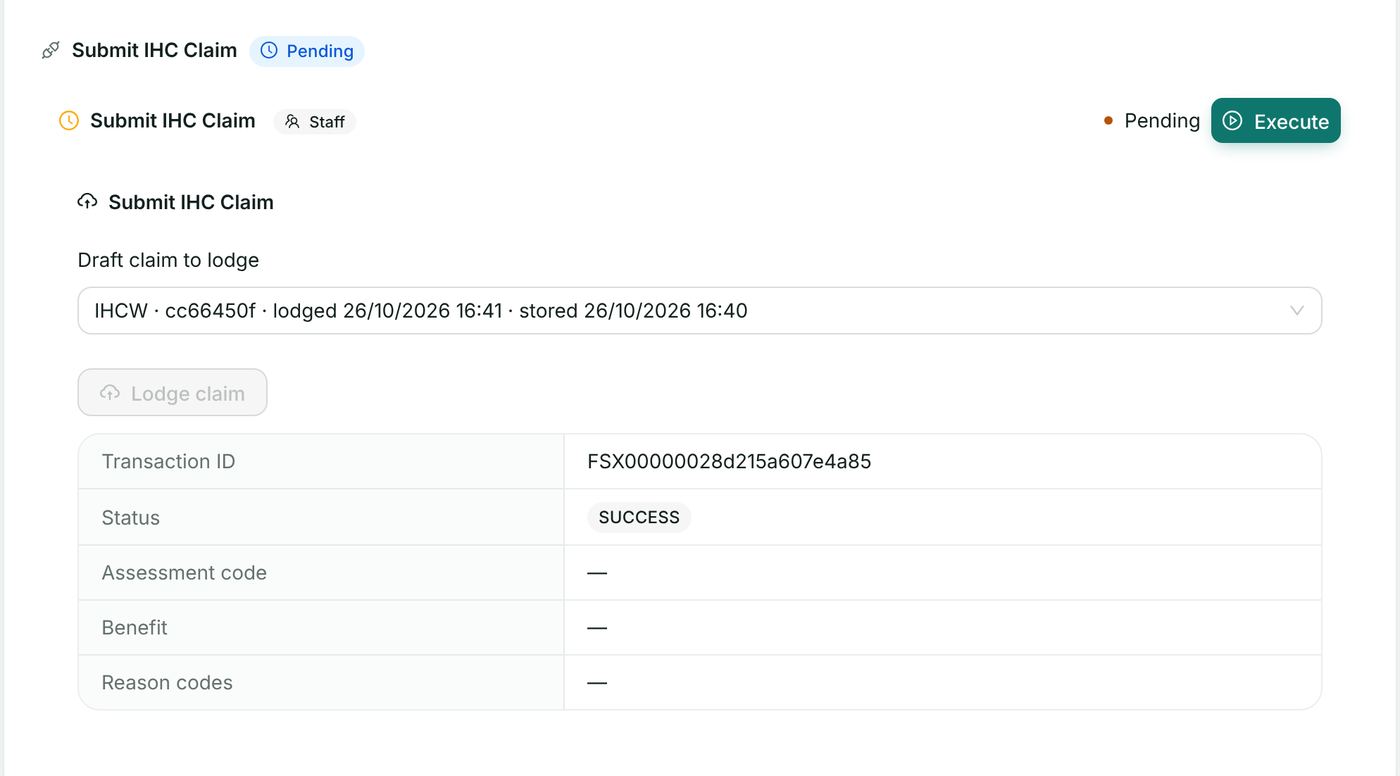
- In Submit IHC Claim, select the draft and choose Lodge claim, then Lodge.
12. Overseas visitor claims (OVSW)
An overseas claim is for a patient covered by an overseas visitor's insurer rather than Medicare. The visitor's cover is checked first with an ECO eligibility check (section 6).
Pathway: patient chart → Care Admin → System: Overseas Visitor Claiming (OVSW).
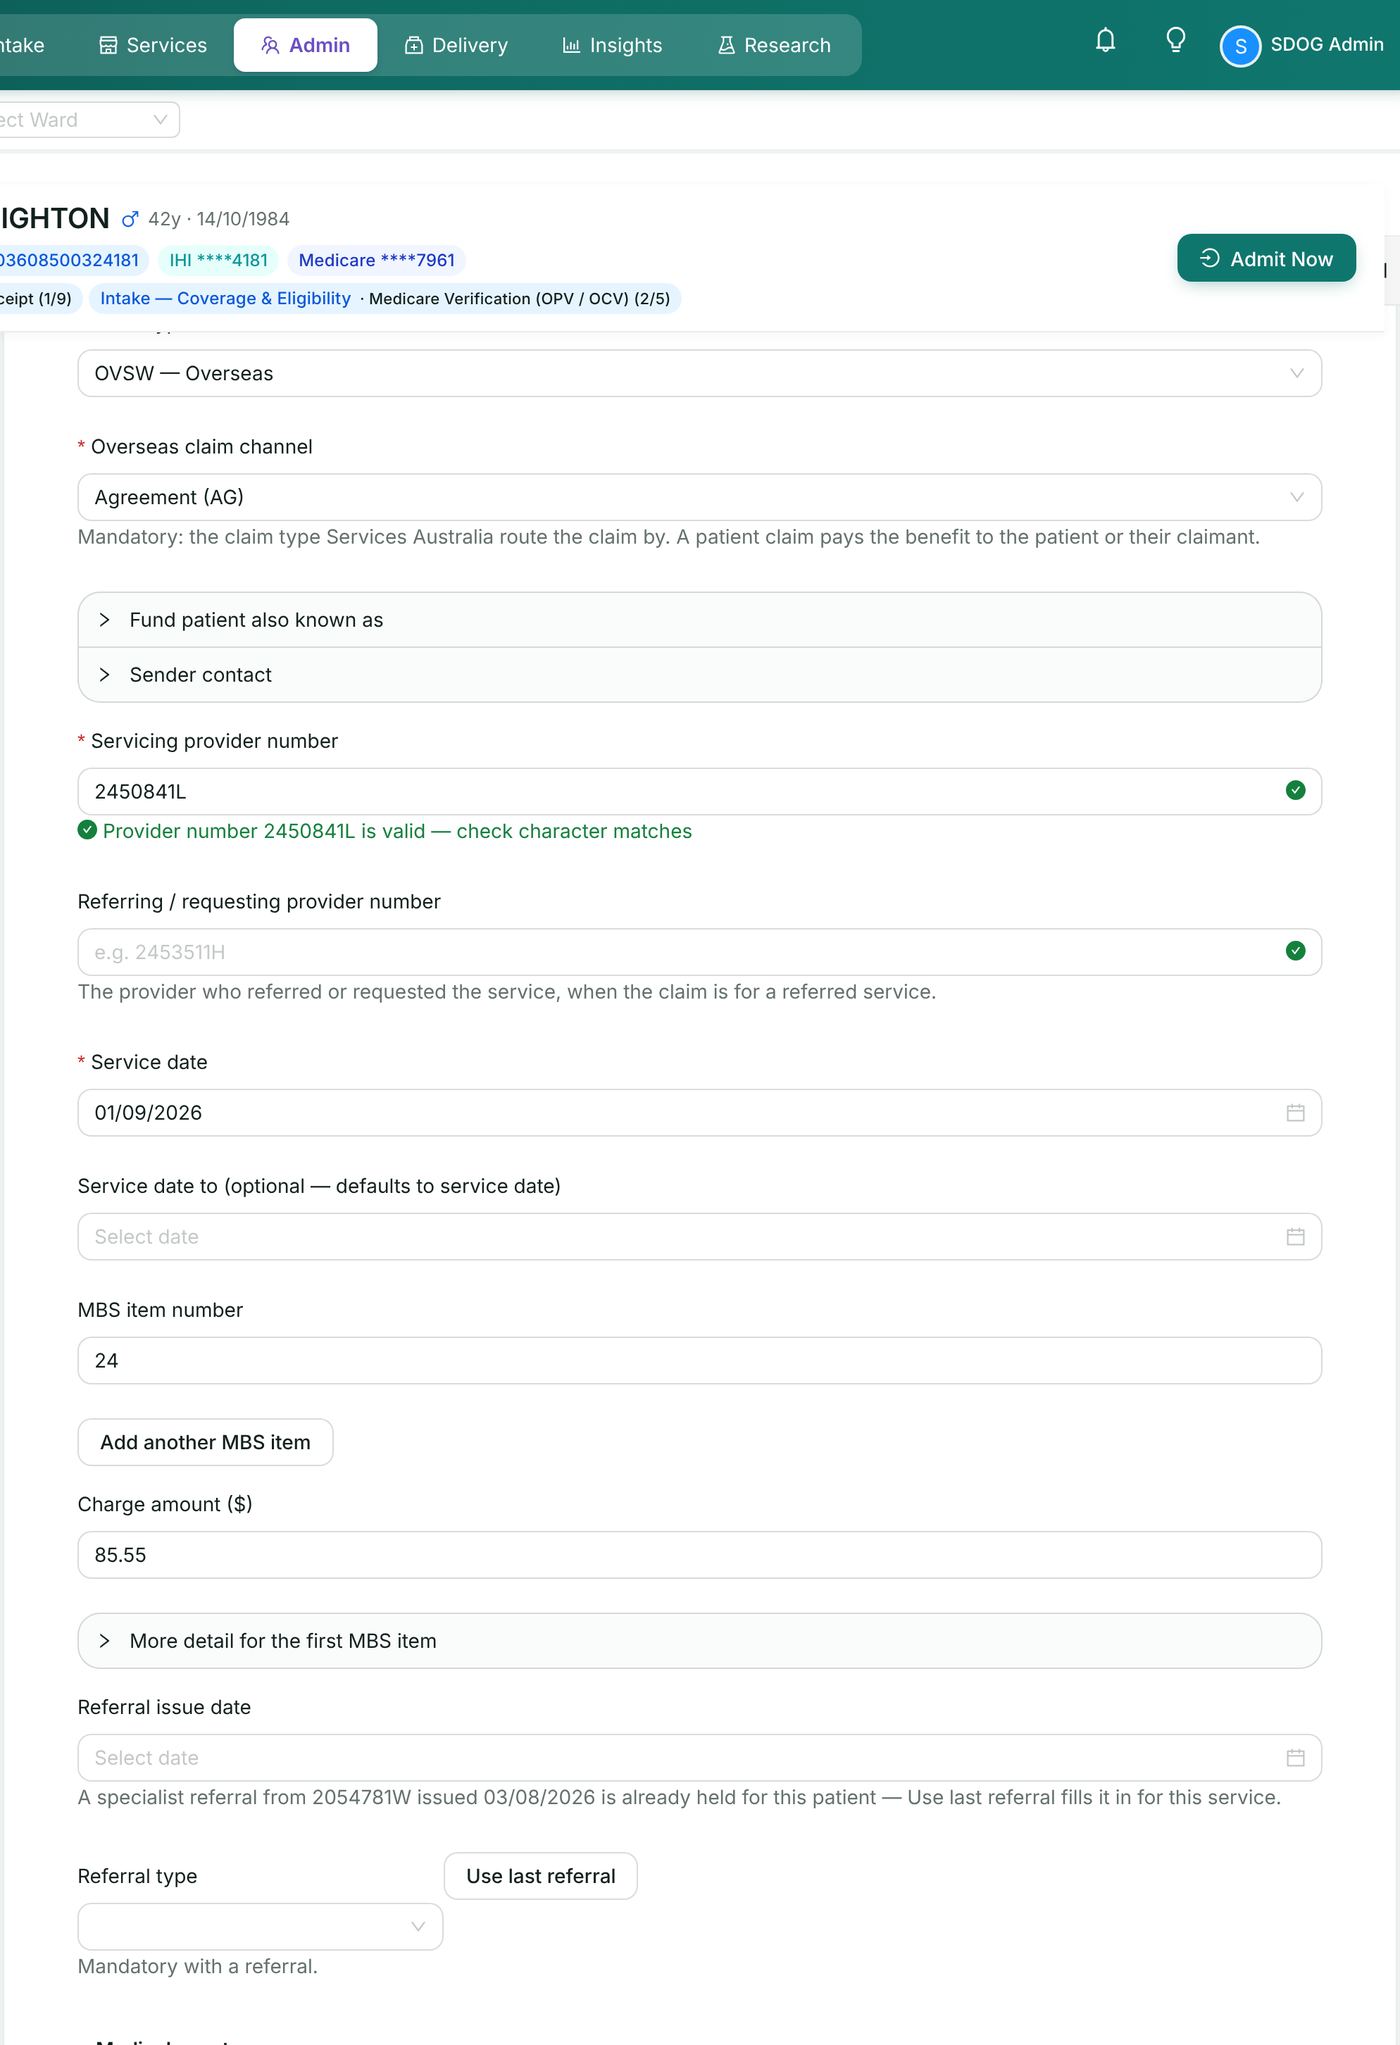
- On the Claim stage open Draft Overseas Claim (OVSW). Choose OVSW, enter the servicing provider number, service date and MBS items, and set Account paid (paid in full or not paid).
- Choose Create draft claim. The draft is held for lodgement and can be lodged now or later.
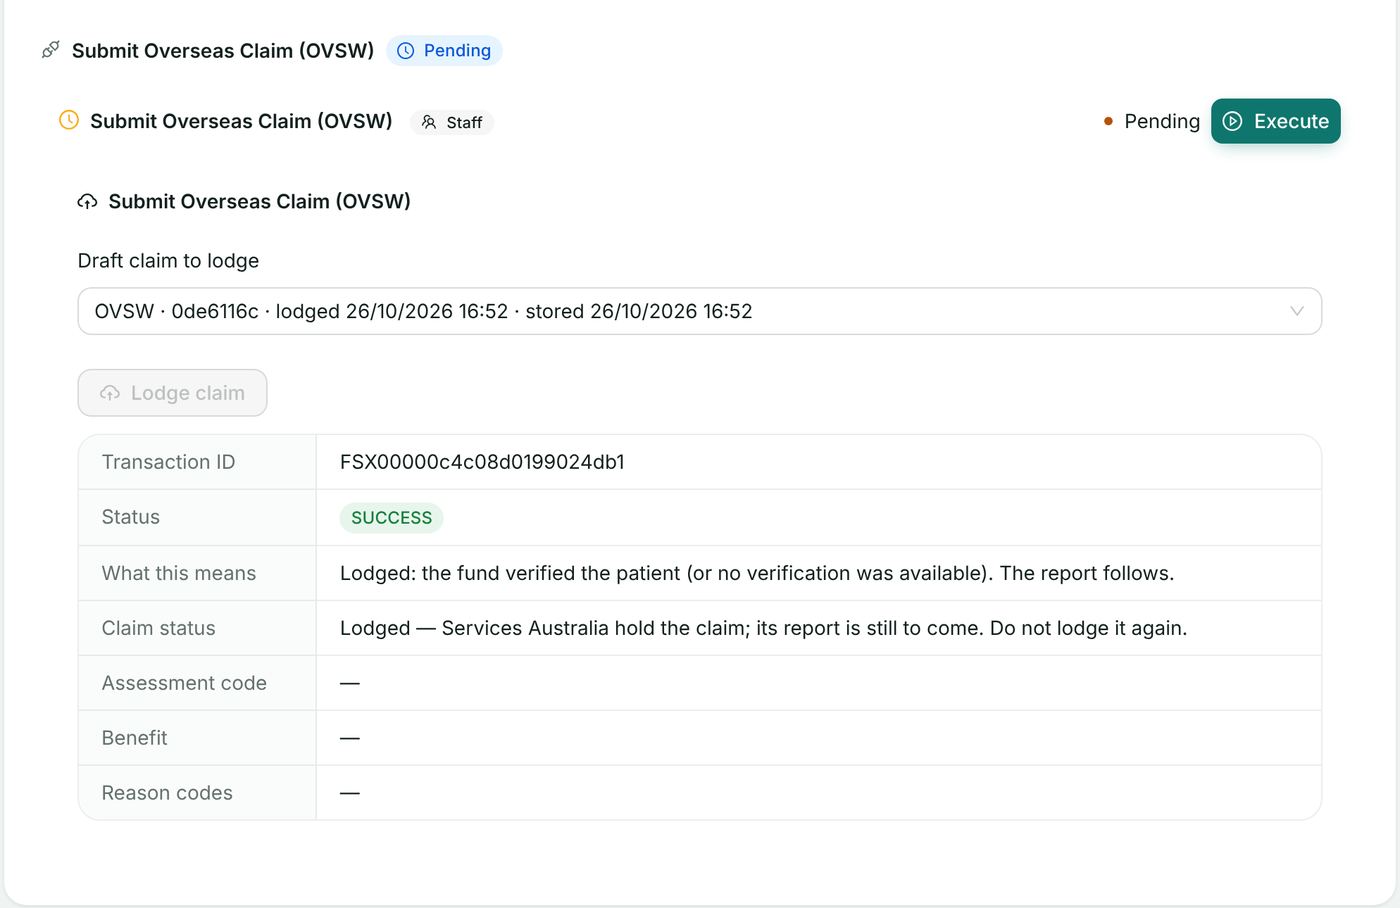
- In Submit Overseas Claim (OVSW) select the draft and choose Lodge claim, then Lodge.
- Reports: section 14 (Retrieve Overseas Report — the OVS report type).
13. Documents given to the claimant
HealthOS produces every claimant document from the claim itself; none is typed by hand. Each opens in a window ready to print or save, from the claim's Submit widget at the moment it is needed, and can be reprinted from Reprint Claim Documents on the pathway's Reports & Reconciliation stage or from Online Claiming → Transactions.
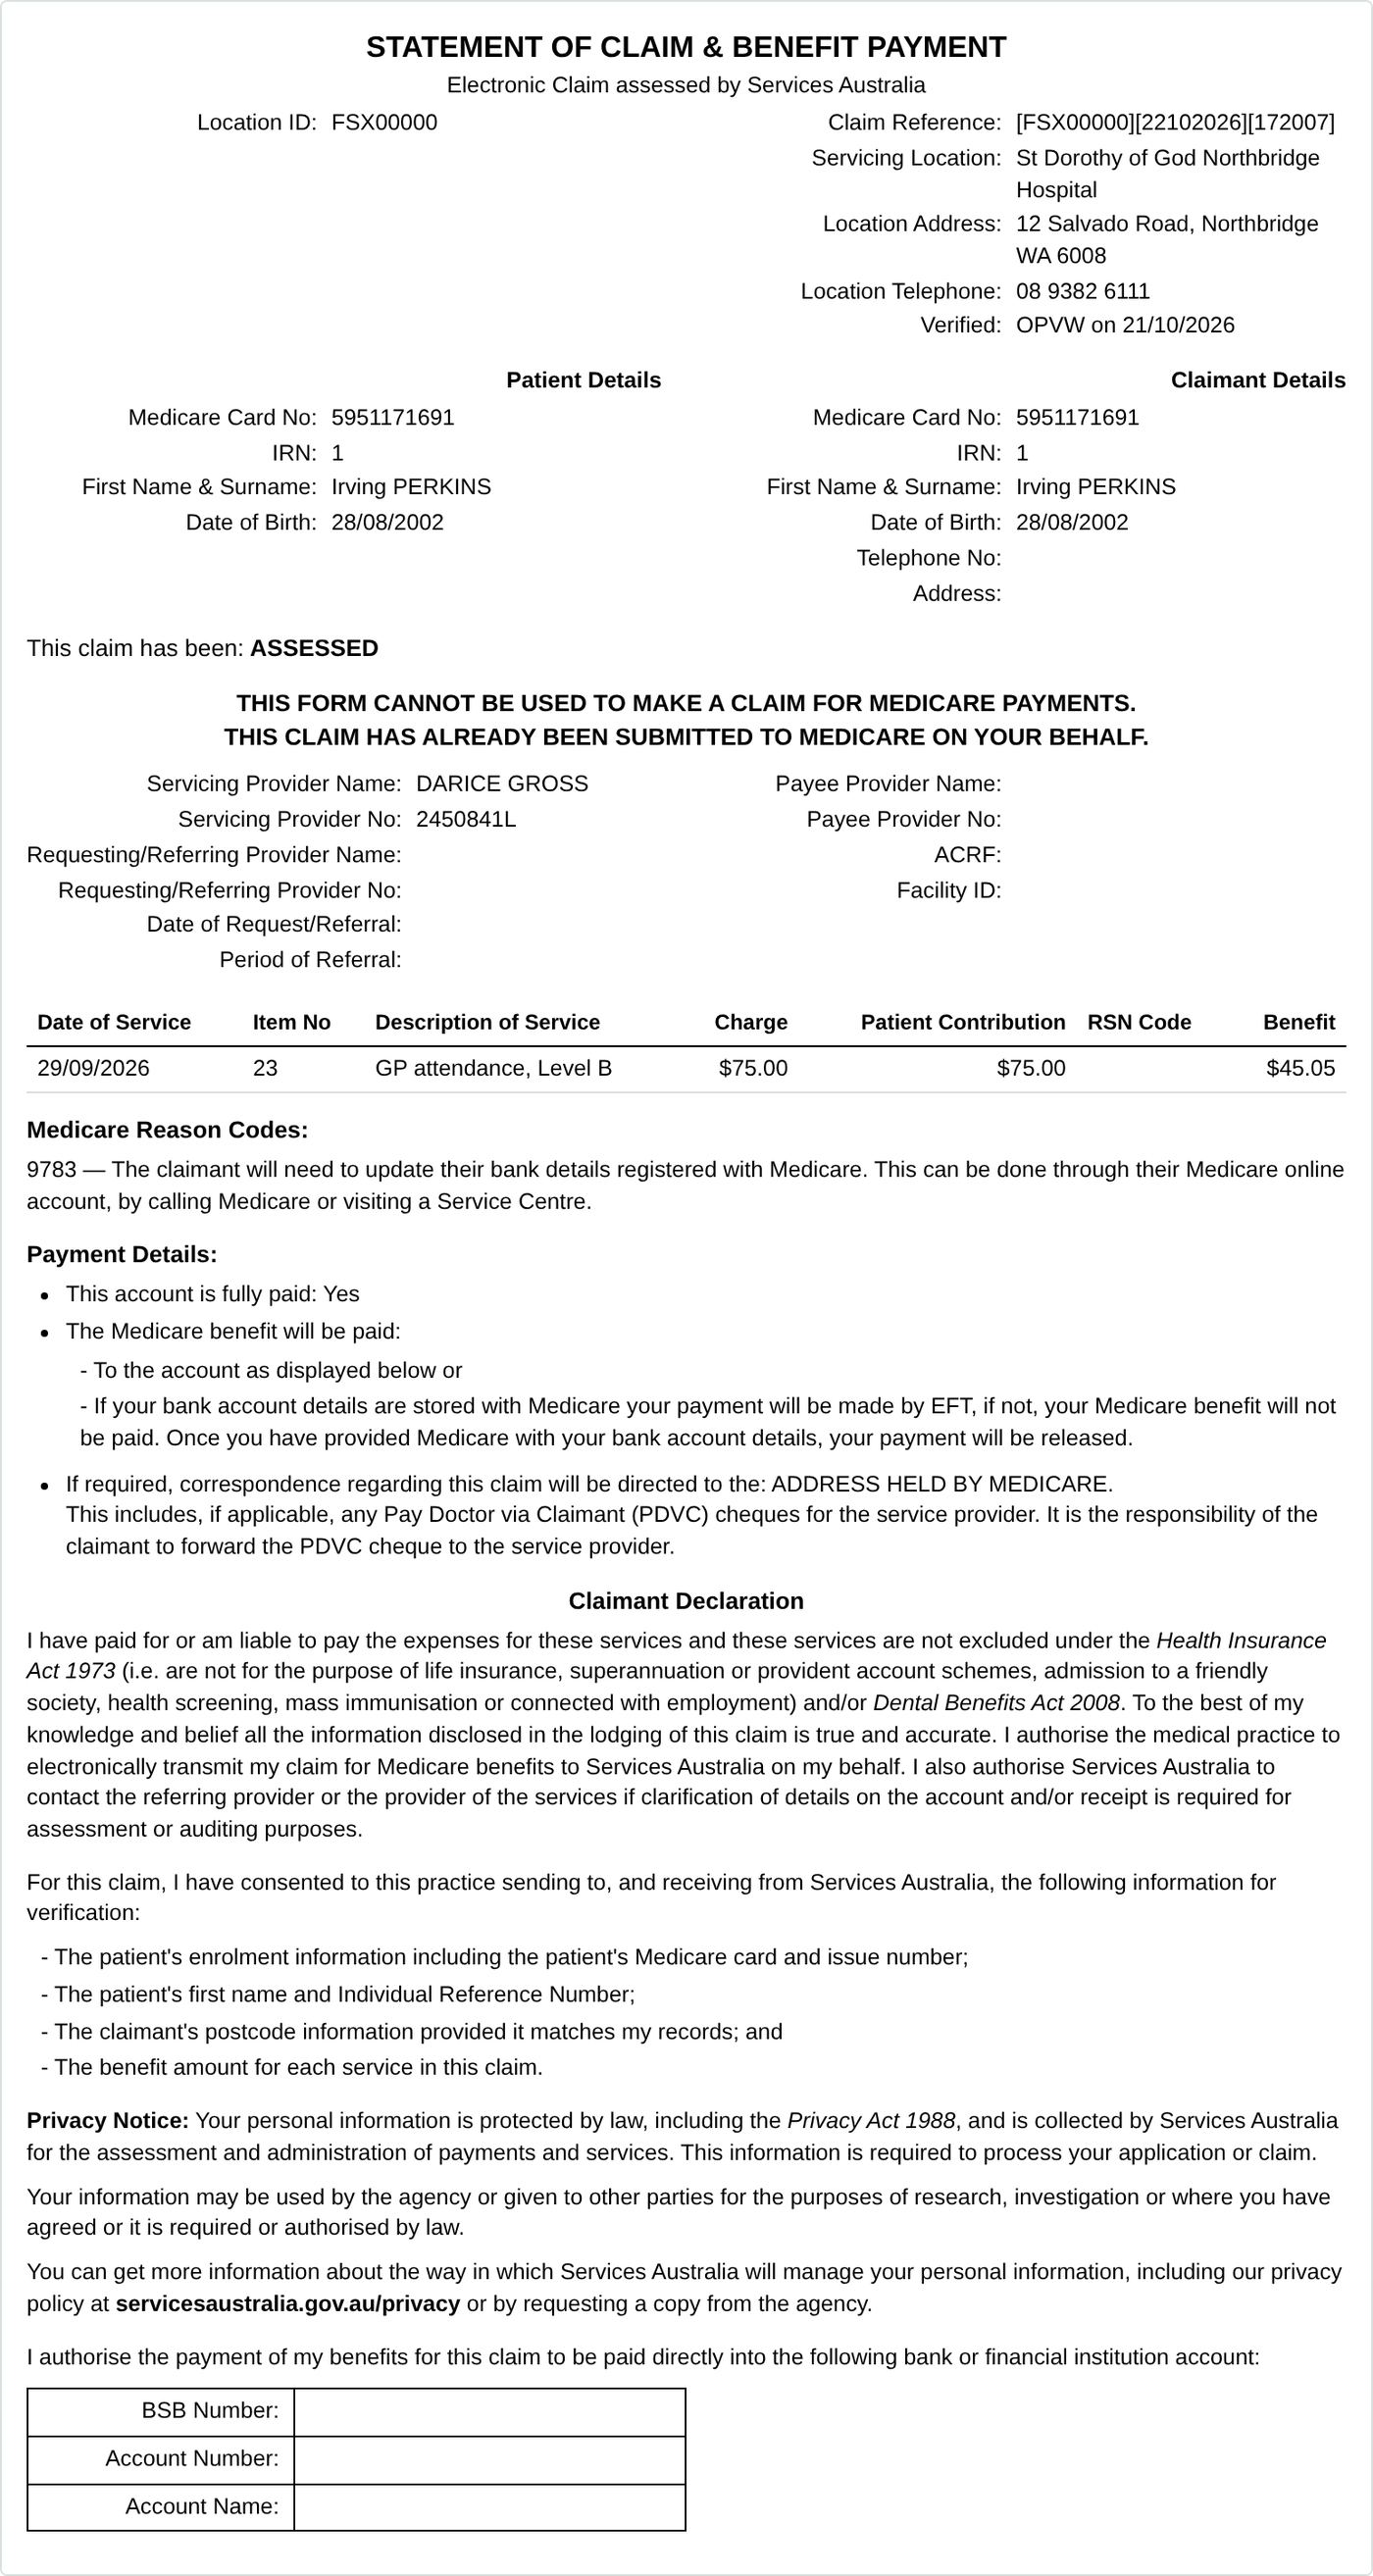
13.1 Statement of Claim and Benefit (Statement of Claim & Benefit Payment)
A Statement of Claim and Benefit is given to the claimant when a patient claim has been lodged in real time, processed by Services Australia, and a benefit amount returned to the claimant. It shows the patient and claimant, the servicing provider, each service with its charge, patient contribution, reason code and benefit, the Medicare reason codes in words, the payment details and the claimant declaration. It states "This claim has been: ASSESSED".
Print it from Submit Patient Claim (PCIW) → Statement of Claim & Benefit Payment (offered when Medicare answered MEDICARE_ASSESSED), or from Online Claiming → Transactions → Statement of claim.
13.2 Lodgement Advice
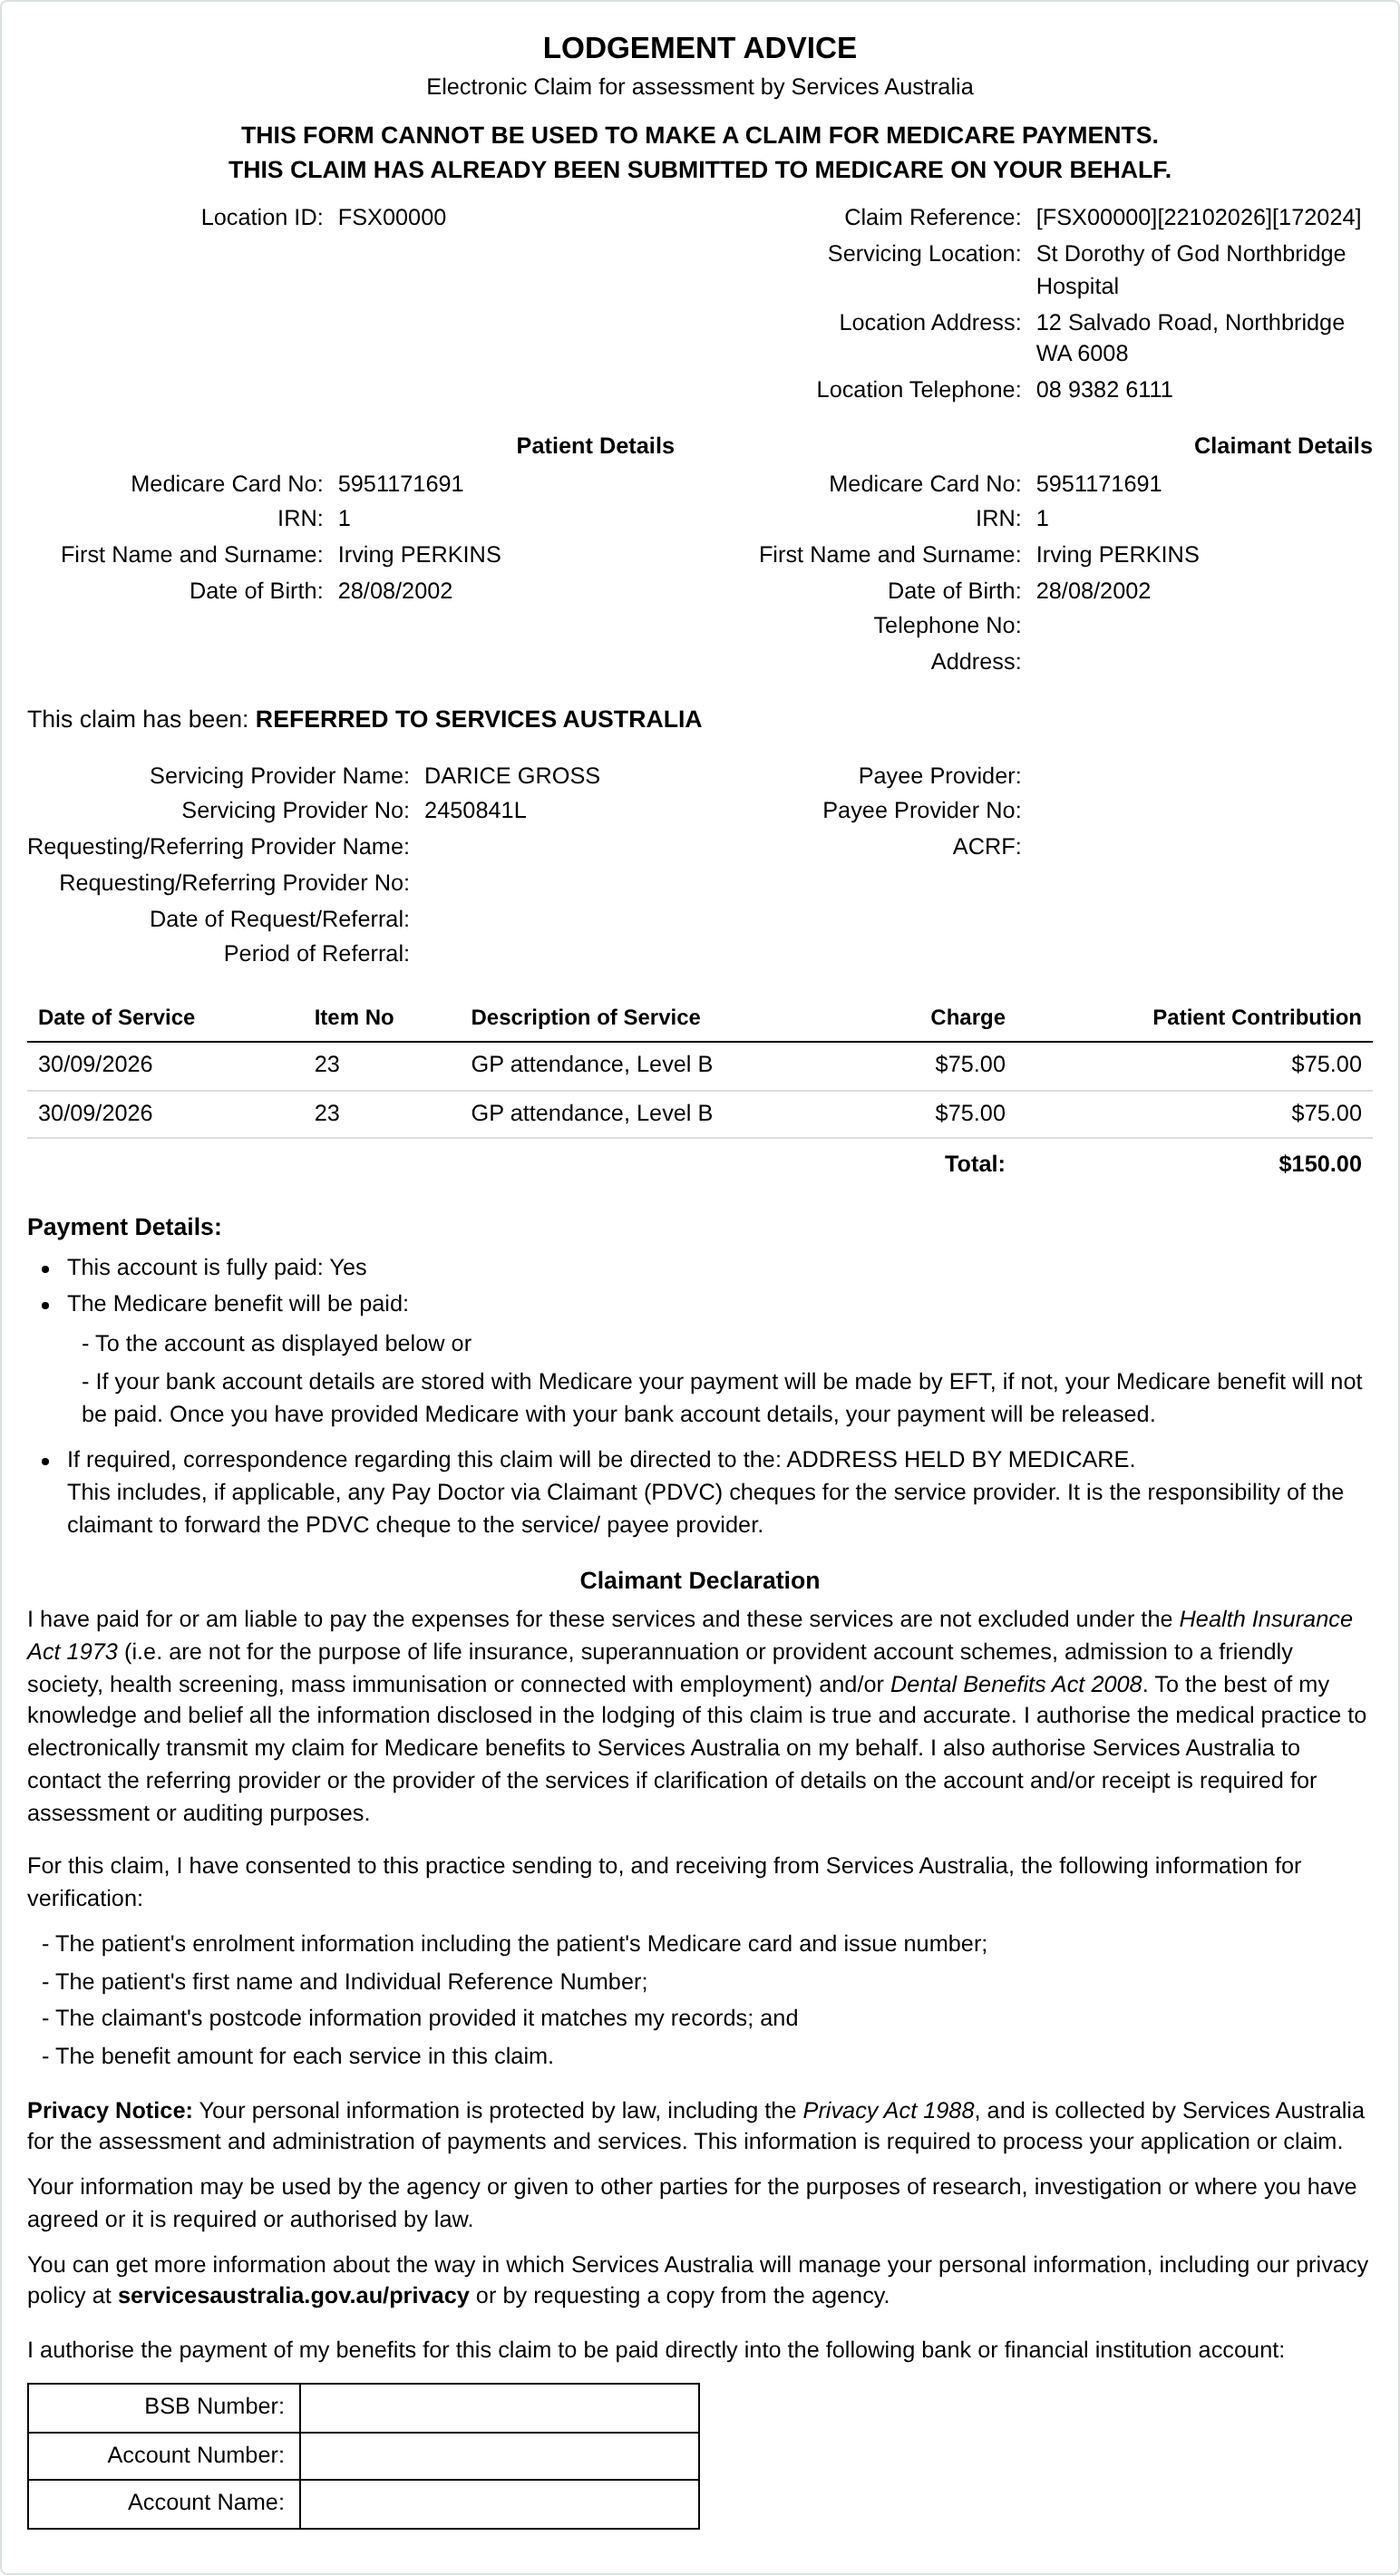
A Lodgement Advice is given to the claimant when a patient claim has been lodged in real time and referred to a Services Australia operator for action (or stored for later transmission). It confirms the claim was received; it states no benefit, because none has been determined. It reads "This claim has been: REFERRED TO SERVICES AUSTRALIA/STORED FOR LATER TRANSMISSION".
Print it from Submit Patient Claim (PCIW) → Lodgement Advice (offered for any answer other than MEDICARE_ASSESSED), or Online Claiming → Transactions → Lodgement advice.
HealthOS offers one or the other for a claim, never both: the two documents describe different outcomes.
13.3 Bulk Bill Assignment of Benefit (DB4)
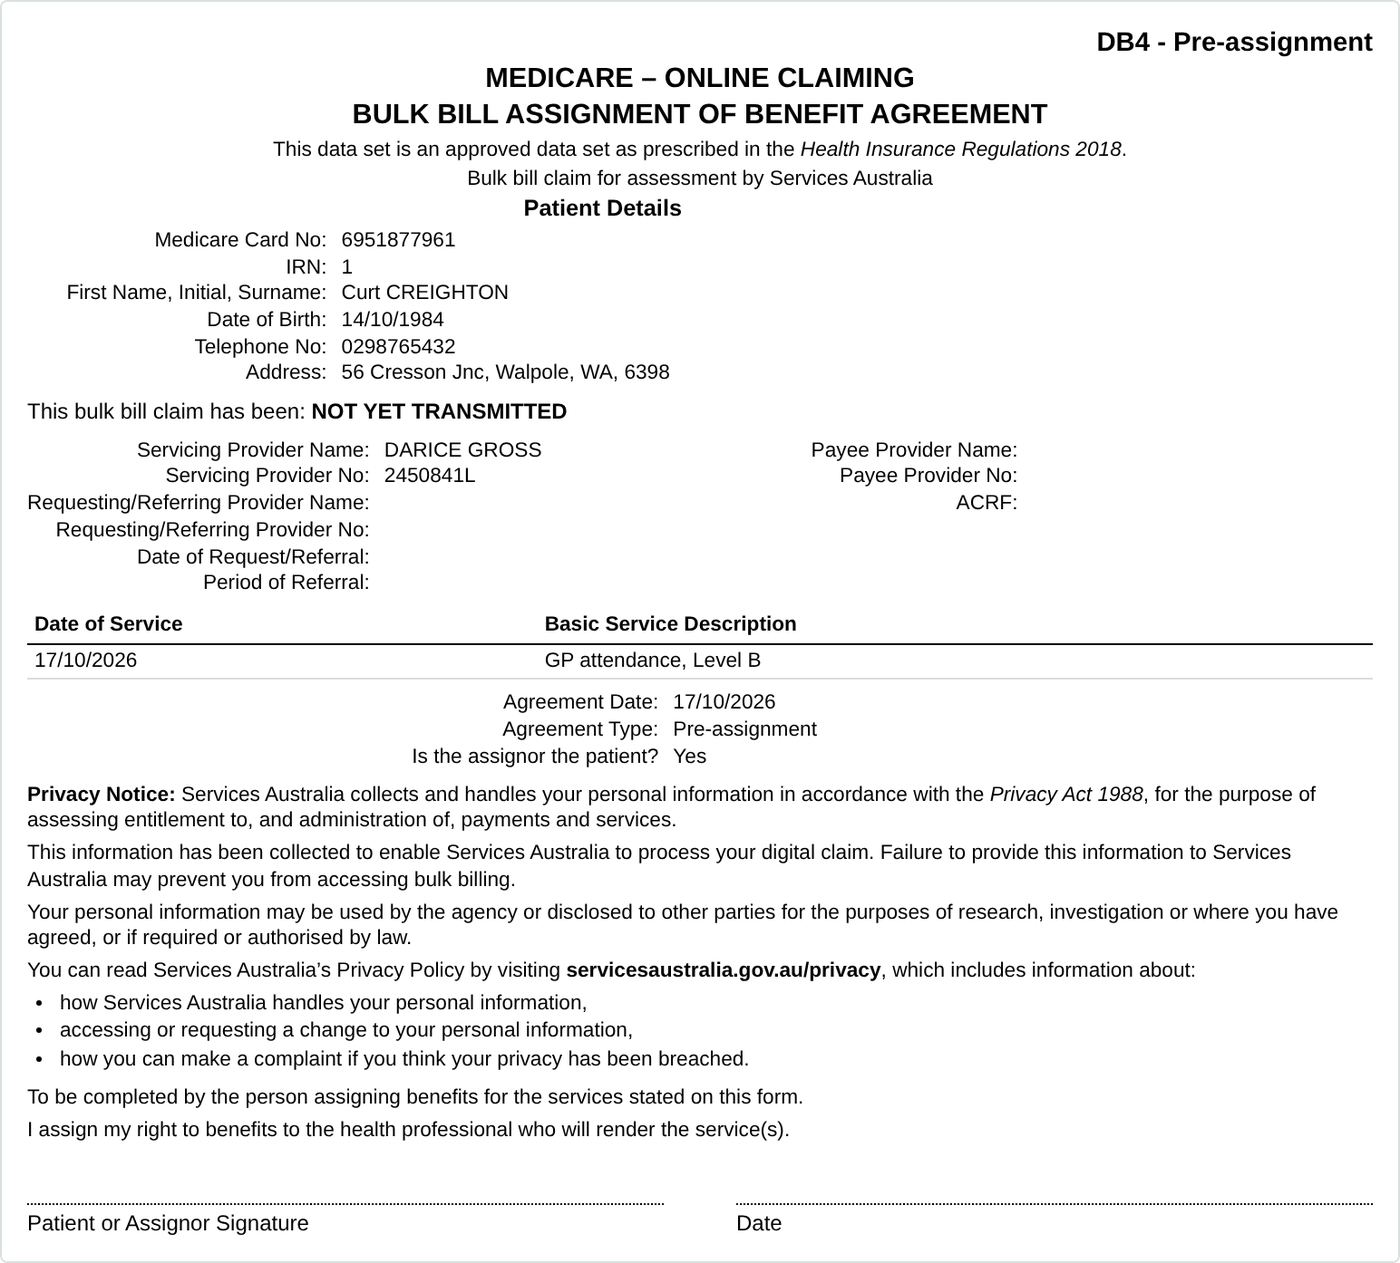
The DB4 records the patient assigning their Medicare benefit to the provider for a bulk bill claim. HealthOS prints two forms: pre-assignment (DB4 – Pre-assignment, signed before the service, from Print the DB4 for signing) and post-assignment (after the service, from DB4 Assignment of Benefit (after the service)). Both carry the patient and provider details, the services, the agreement date and type, the privacy notice and the signature lines.
13.4 In-patient medical claim consent and declaration
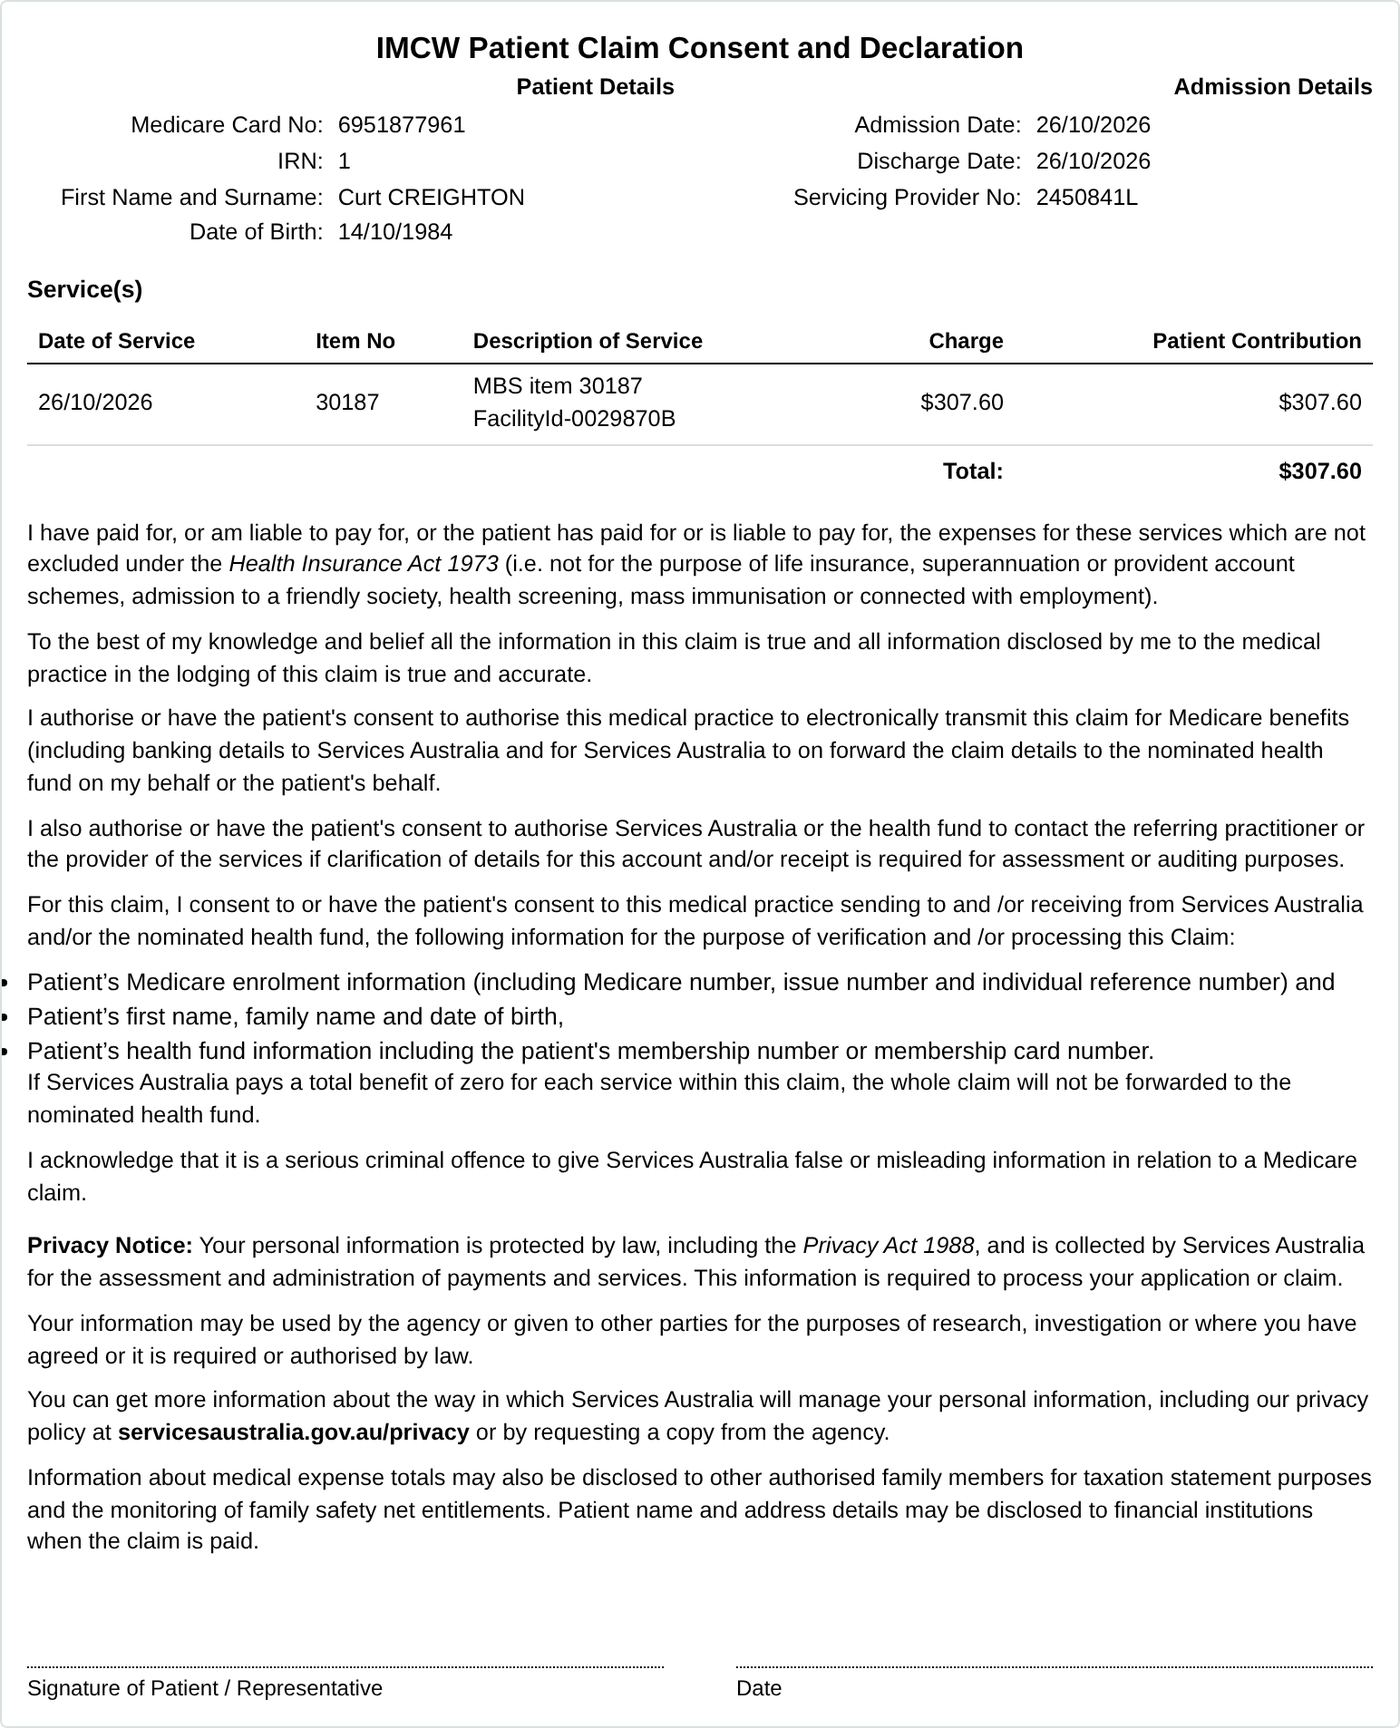
For an IMC patient claim, Show the consent and declaration opens the In-Patient Medical Claim — Patient Claim Consent and Declaration for the patient to read and agree before lodgement.
13.5 DVA claim vouchers
For DVAW and VAAW claims, Print the voucher for signing prints the DVA claim voucher for the claim's service type for the veteran to sign before lodgement.
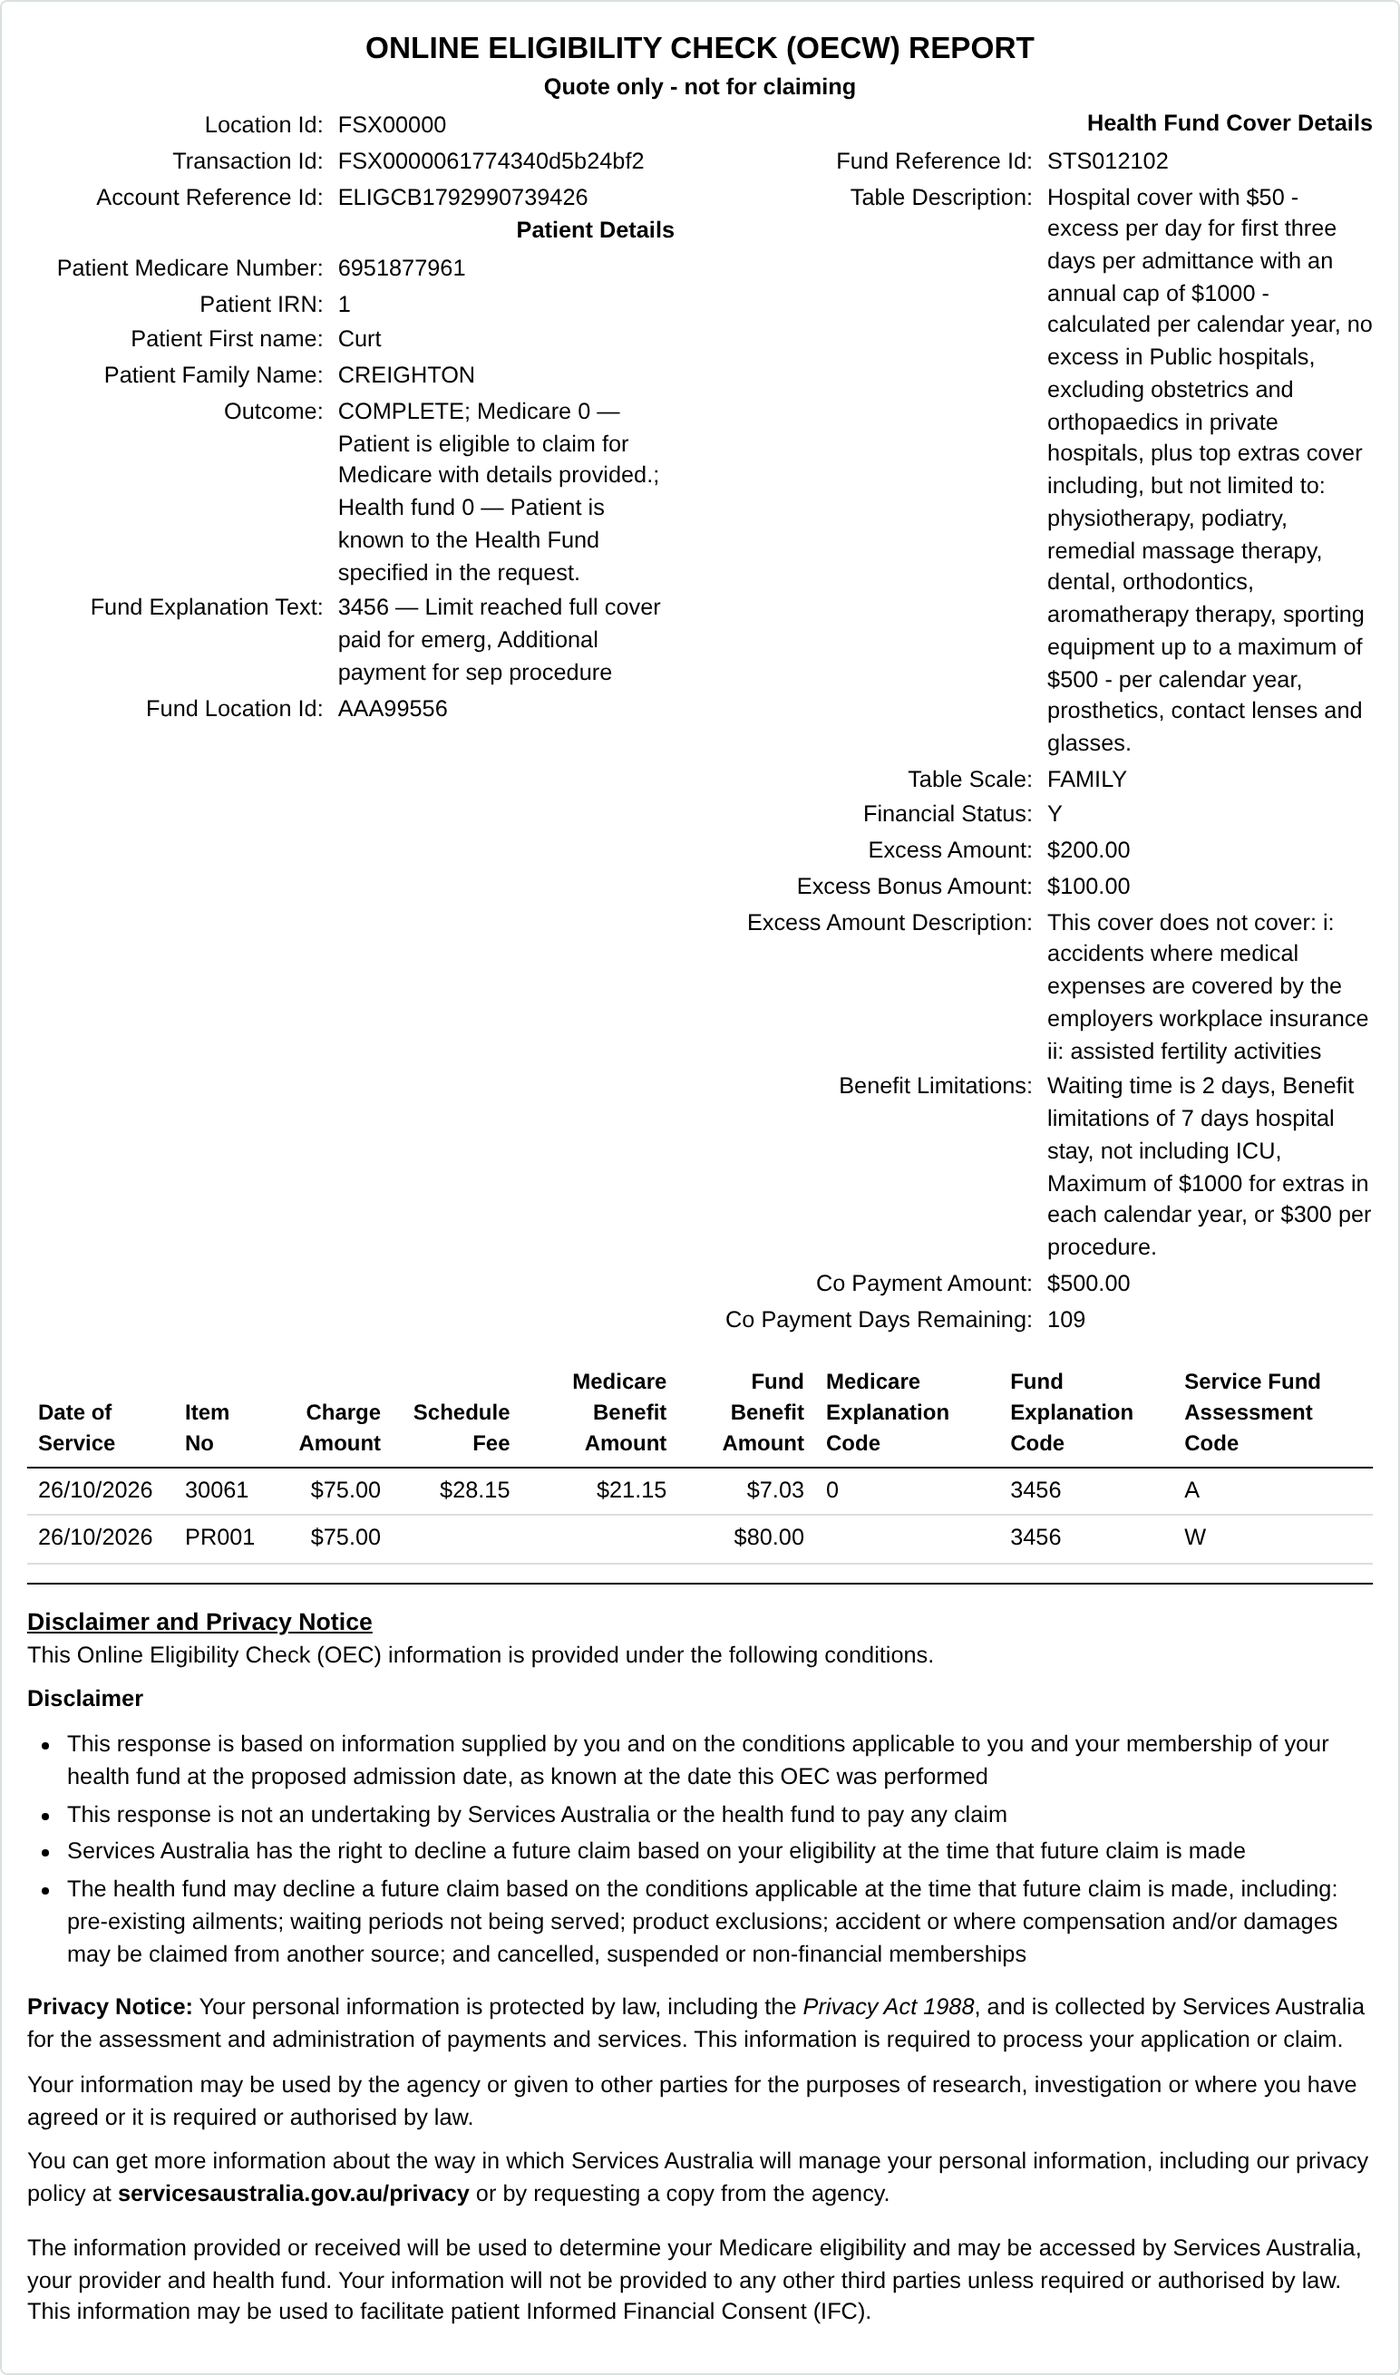
13.6 Online Eligibility Check (OECW) report
The OEC report printed from an eligibility check (section 6) gives the patient the Medicare and fund assessment of each item for informed financial consent. It is marked "Quote only — not for claiming" and carries Services Australia's OECW Disclaimer and Privacy Notice.
14. Reports, report retrieval and reconciliation
Lodging a claim and being paid for it are separate events, usually a day or more apart. Medicare and DVA assess store-and-forward claims overnight, health funds pay in batches, and the reports are how HealthOS — and you — learn the outcome and match payments to claims.
14.1 Which report answers which question
| Report | Web service | Tells you |
|---|---|---|
| Bulk bill processing report | BPRW | Medicare's assessment of each bulk bill service: paid, reduced or rejected, with reason codes |
| Bulk bill payment report | BPYW | The payment run: what was paid and when — reconcile the bank deposit against it |
| DVA processing / payment report | DVRW / DVYW | The same for DVA medical and allied health claims |
| Transmission status report | STSW | The state of each transmission and whether its report is ready |
| ERA status request | STSW (remittance advice) | Which ECLIPSE remittance advices are ready to collect |
| IMC / IHC / OVS claim reports | RTVW | The fund and Medicare outcome of in-patient, in-hospital and overseas claims |
| ECLIPSE Remittance Advice | ERAW | What a health fund paid, against which claims |
| Bulk Bill Integrated report | BIRW | The integrated bulk bill report for a transaction id and payee provider |
14.2 Reports collected automatically
HealthOS asks for outstanding reports by itself:
- Processing and payment reports (BBSW, DVAW, VAAW) are requested every morning for each lodged claim still awaiting an outcome, and the outcomes are applied to the claims.
- Remittance advices (ERA) are collected hourly and matched to claims.
So in normal use the outcome is already there when you look. Use the controls below when you want a report now or for a particular claim.
14.3 Retrieving a report on the pathway
On the claim's pathway, open Reports & Reconciliation:
- Claim Reports lists what Services Australia said about this patient's lodged claims (the latest processing and payment report per claim), with a fetch for the outstanding ones.
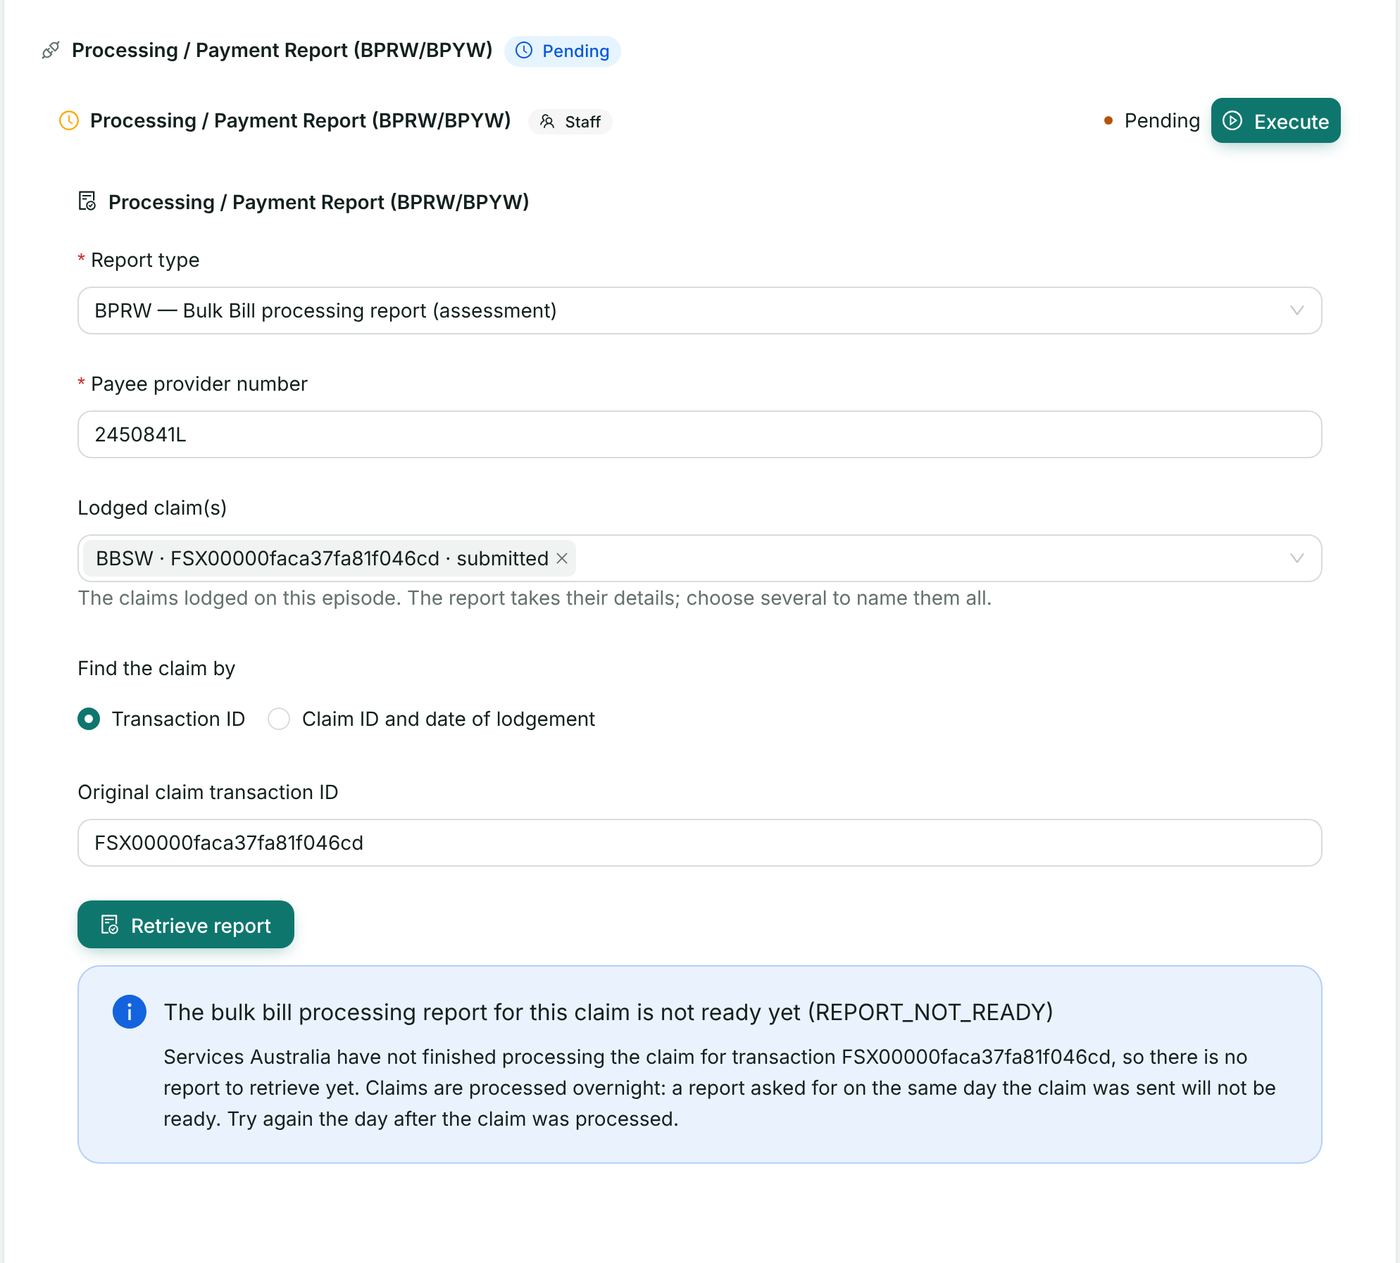
- Processing / Payment Report (BPRW/BPYW), DVA Processing / Payment Report (DVRW/DVYW), Retrieve IMC / IHC Report, Retrieve Overseas Report and Retrieve Claim Report retrieve a specific report by hand:
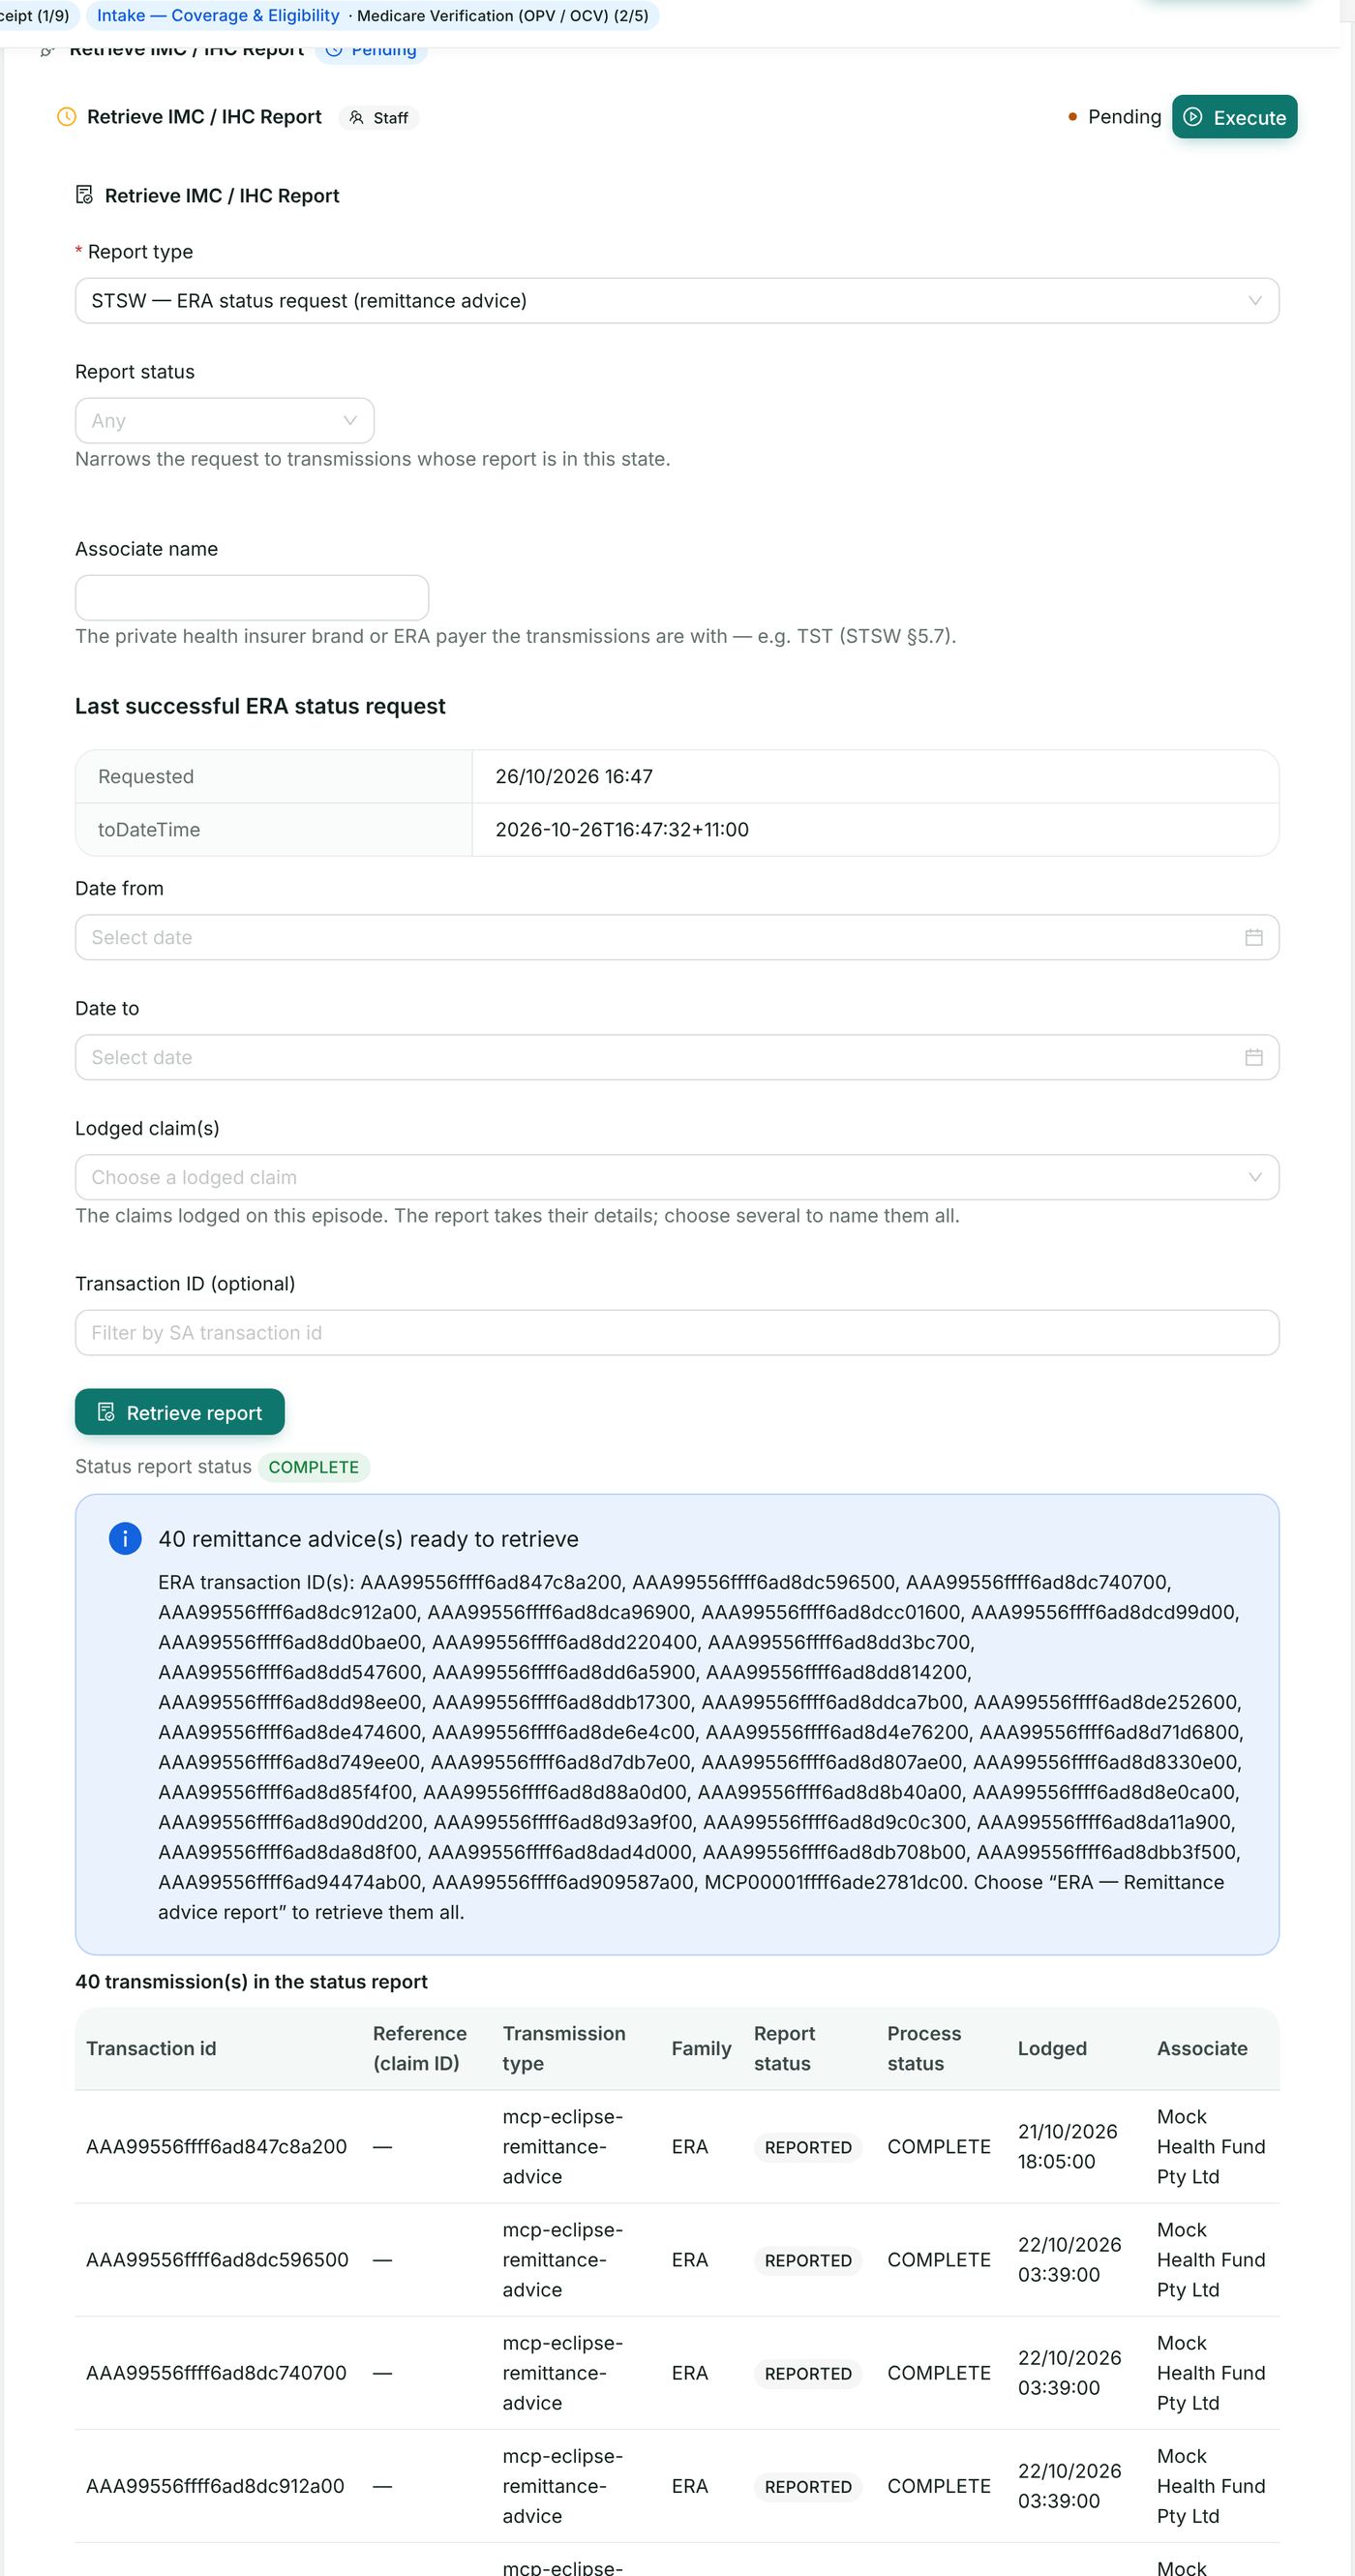
- Choose the Report type: STSW — Transmission status report; STSW — ERA status request; ERA — Remittance advice report; IMC — In-patient Medical Claim report; IHC — In-Hospital Claim report; OVS — Overseas Claim report; DVRW — DVA processing report; DVYW — DVA payment report; BPRW — Bulk Bill processing report; BPYW — Bulk Bill payment report.
- For a processing or payment report, choose the claim(s) under Lodged claim(s) — their transaction ids fill in — and check the Payee provider number. Find the claim by Transaction ID, or by Claim ID and date of lodgement for a claim lodged another way.
- For a status request, optionally narrow by Transmission type, Report status, Associate name and Date from / Date to.
- Choose Retrieve report. The answer is listed per transaction id with its status, assessment, benefit and services; Services Australia's payload shows exactly what came back.
- Bulk Bill Integrated Report (BIRW) takes a transaction id and payee provider number.
Three answers are different and mean different things:
| Answer | Meaning | What to do |
|---|---|---|
| Report received | Stored and applied to the claim | Nothing — read the outcome |
| REPORT_NOT_READY | Services Australia have not finished (normal on the day of lodgement) | Wait; HealthOS asks again the next morning |
| No report available | Finished and nothing to report — usual for a claim paid in full with no adjustment | Nothing |
Ask for the status (STSW) first: a status report filtered to READY tells you which transmissions can be collected. The Last successful ERA status request is shown on the widget.
14.4 Online Claiming → Remittances (ERA)
- Open PAS → Billing & Claims → Online Claiming and choose Remittances.
- Choose Fetch advices. HealthOS asks Services Australia for the remittance advices not yet collected and lists them, each with its payer, date and the number of lines Matched and Unmatched.
- Open an advice to see it line by line: advice number, source, advice and payment date, payer, status, total charged and total paid. A matched line marks its claim paid with the amount and payment run; an unmatched line is listed on its own, to be worked by hand.
A remittance advice is its own transmission with its own transaction id; it is found through the ERA status request (STSW), not by a claim's transaction id.
14.5 Online Claiming → Reports
The Reports tab lists every stored processing and payment report across all patients. Filter by report kind (Processing or Payment), status and date range, or paste a list of transaction ids (for example a list sent by Services Australia). To request the outstanding reports now, choose the date range and, optionally, the claim family (Bulk bill, DVA medical, DVA allied), then Fetch reports. Open a report to see each service line: item, service date, assessment, explanation, charge and benefit. Export CSV downloads the lines as a spreadsheet (CSV) for reconciliation.
14.6 Online Claiming → Transactions
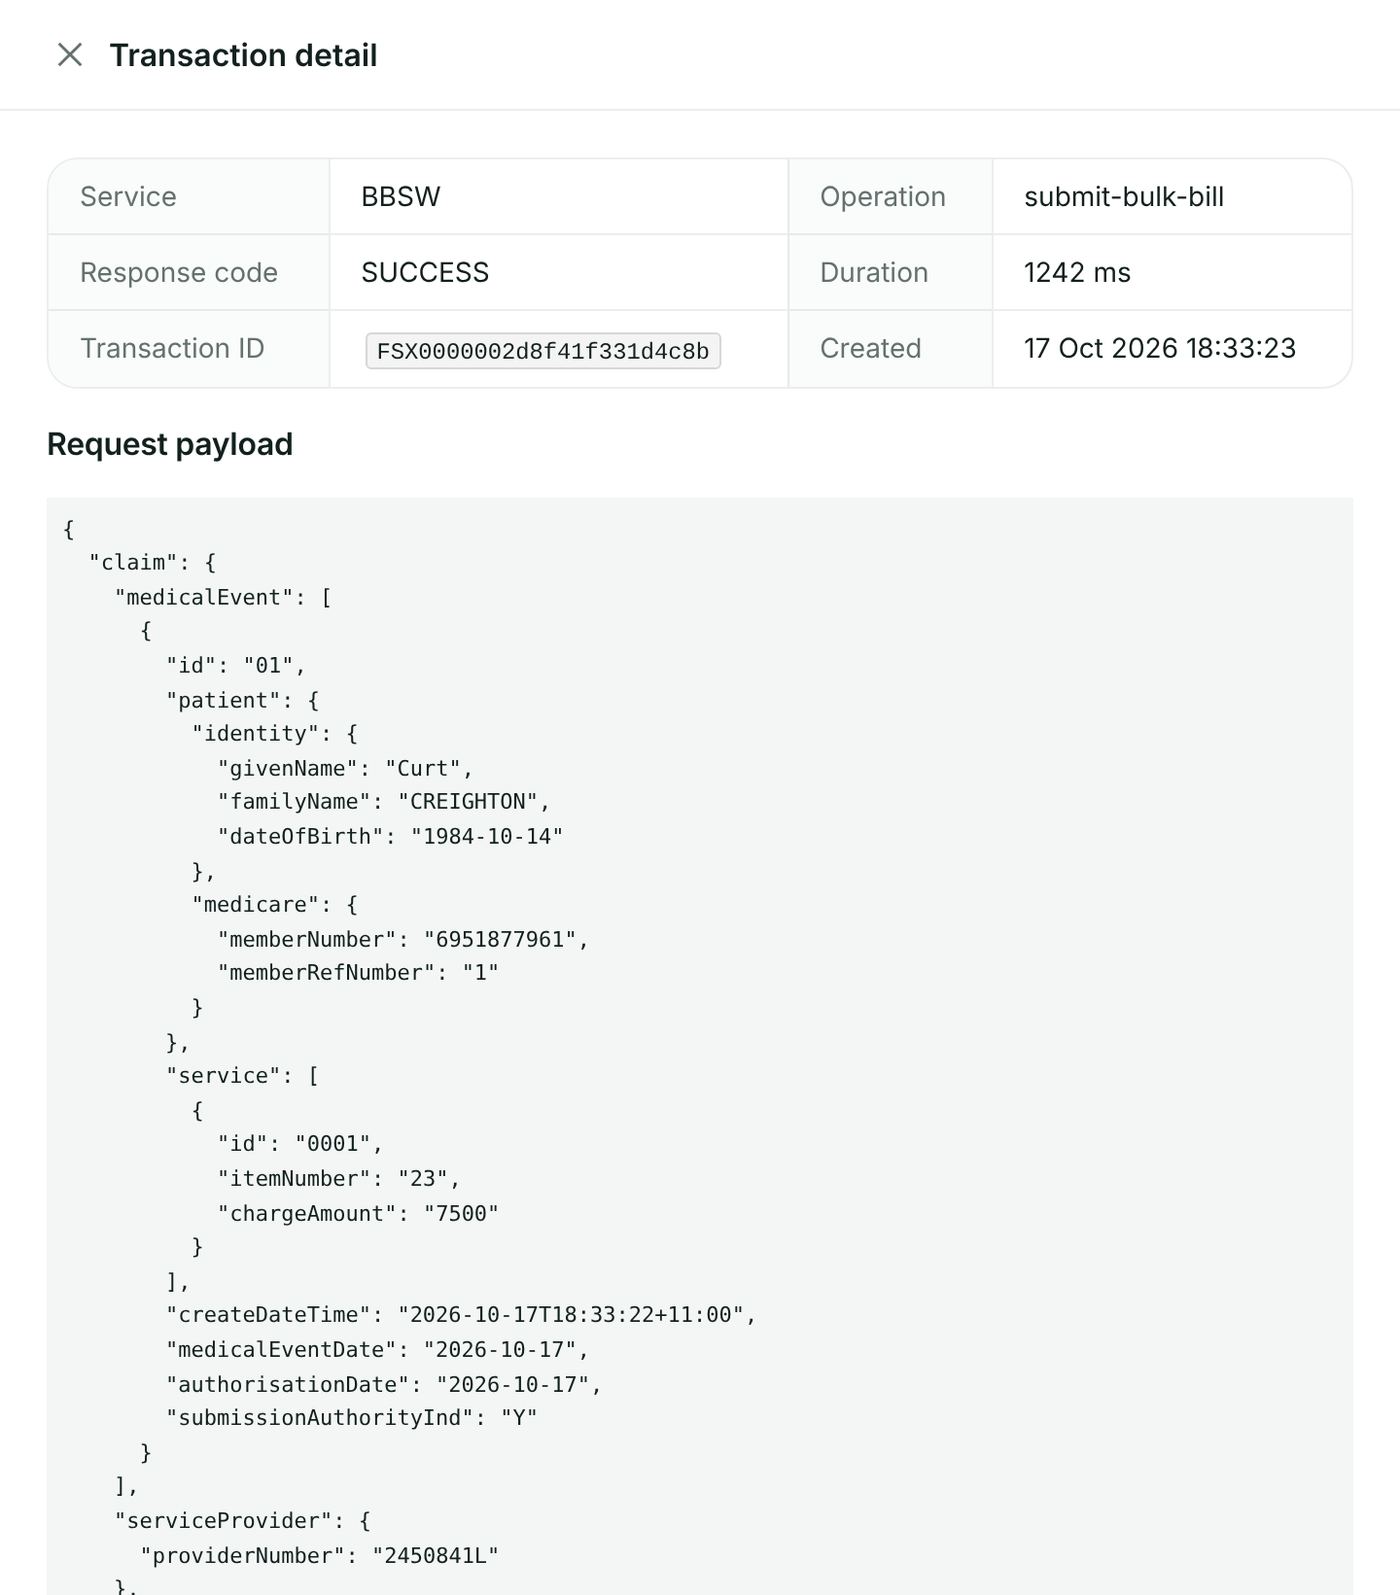
Every call HealthOS makes to Services Australia is listed: when, service, operation, response Code, patient and duration. Filter by operation, response code, transaction id and date, and Export CSV. Detail opens the transaction with the request and response exactly as sent and received. The row actions offer, where they apply: Retry (section 15), Accept for assessment (section 8.4), Lodgement advice / Statement of claim, DB4 (pre-assignment) / DB4 (post-assignment), the DVA voucher and the IMC consent.
14.7 Reconciling
- Take the payment report (BPYW / DVYW) or remittance advice covering the deposit.
- Match each line to its claim. Remittance advices are matched automatically (14.4). For Medicare and DVA payment reports, use the Reports tab filtered to the payment run, or export it and compare with the bank statement.
- Work the unmatched lines. Usual causes: a different payee provider number, or a claim lodged before HealthOS was used.
- A service reduced or rejected keeps its reason code (shown with Medicare's wording), so it can be written off, or corrected and lodged again (section 15).
15. Resubmitting rejected services
A rejected or failed claim has not been paid, so it can be corrected and lodged again — there is no need to start a new claim.
15.1 On the pathway: Correct a Claim
- On the claim's pathway, open Reports & Reconciliation → Correct a Claim.
- Choose the claim. Only claims that were rejected or failed are offered for resubmission.
- Read Why it was rejected — the reason Services Australia gave (section 17 explains the common codes) — and correct the claim: the patient details, provider number, item, referral or whatever the reason names.
- Choose Resubmit to Services Australia. HealthOS lodges the corrected claim as a new attempt with its own Transaction ID; the original attempt stays in the record.
Void locally (offered only on the day of lodgement) removes a claim from HealthOS's own records. It does not withdraw the claim at Services Australia — use Same Day Delete (section 8.6) for a patient claim.
15.2 From Online Claiming → Transactions: Retry
- Open Online Claiming → Transactions and find the failed or rejected submission (its Code is not SUCCESS / 000). Choose Detail to see Services Australia's answer.
- Correct the claim as above.
- Choose Retry and confirm Retry this claim? The claim is resubmitted using the current claim record; the new attempt is logged separately and the original outcome stays in the log.
Retry is not offered for a successful submission, for verifications or eligibility checks, or for a pendable patient claim — that is accepted for assessment instead (section 8.4), because re-lodging it would lose the correlation id the pend relies on.
15.3 A service reduced or rejected in a processing report
When a processing report (BPRW, DVRW) or claim report rejects a service, the reason code and explanation are shown against the service on the Claim Reports widget and the Reports tab. Correct and lodge that service again as a new claim for the affected service only; services already paid must not be lodged again.
16. Reference data: MBS fees and descriptions, reason codes, provider numbers, health funds
16.1 Updating Medicare Benefits Schedule fees and item descriptions
HealthOS holds the MBS item list (item number, description, schedule fee, 75% and 85% benefits, specialty type, status). Claims check items against it — item combinations and ordering rules are applied from it — and the charge on a claim is the practice's fee entered on the claim. The list is national reference data shared by every organisation on the HealthOS platform.
HealthOS keeps the MBS list up to date for every organisation; your practice does not load or edit it. Fees and descriptions change when the Department of Health, Disability and Ageing publishes a new MBS release (each 1 July, and the amendments between). HealthOS loads every release before the date it takes effect, from the MBS XML file published on MBS Online (mbsonline.gov.au), using Care Admin → MBS Items → Import MBS Items in the admin portal. Loading and editing the list are limited to HealthOS's platform administrators, because the list is shared by every organisation.
How a release is loaded:
- The MBS XML file is downloaded from MBS Online as published (.xml, or gzipped as .gz).
- On MBS Items the administrator chooses Import MBS Items and drops the file in. HealthOS checks it first and writes nothing yet: it shows "n items ready to load" and lists any records it would leave out.
- The administrator chooses Load n items (n is the number of items). HealthOS reports how many items are new, corrected and unchanged. A new fee becomes a new version of the item from the date it starts, so a claim for a service before that date keeps the earlier fee.
Your practice sees the current list on MBS Items (search with Search MBS items...). The charge on a claim is still your practice's own fee, entered on the claim. If an item looks wrong or a release has not appeared by its start date, email support@healthos.net.au with the item number.
16.2 Medicare reason codes
Reason codes (assessment and explanation codes) are returned by Services Australia with each verification, claim and report, together with their wording. HealthOS shows the code and Medicare's text against the service it applies to — on the claim's result, the Claim Reports widget, the Reports tab and the Statement of Claim and Benefit. Because the text comes from Services Australia with each answer, it is always current and there is no local reason-code table to maintain or update. Section 17 lists the codes met most often and what to do.
16.3 Provider numbers
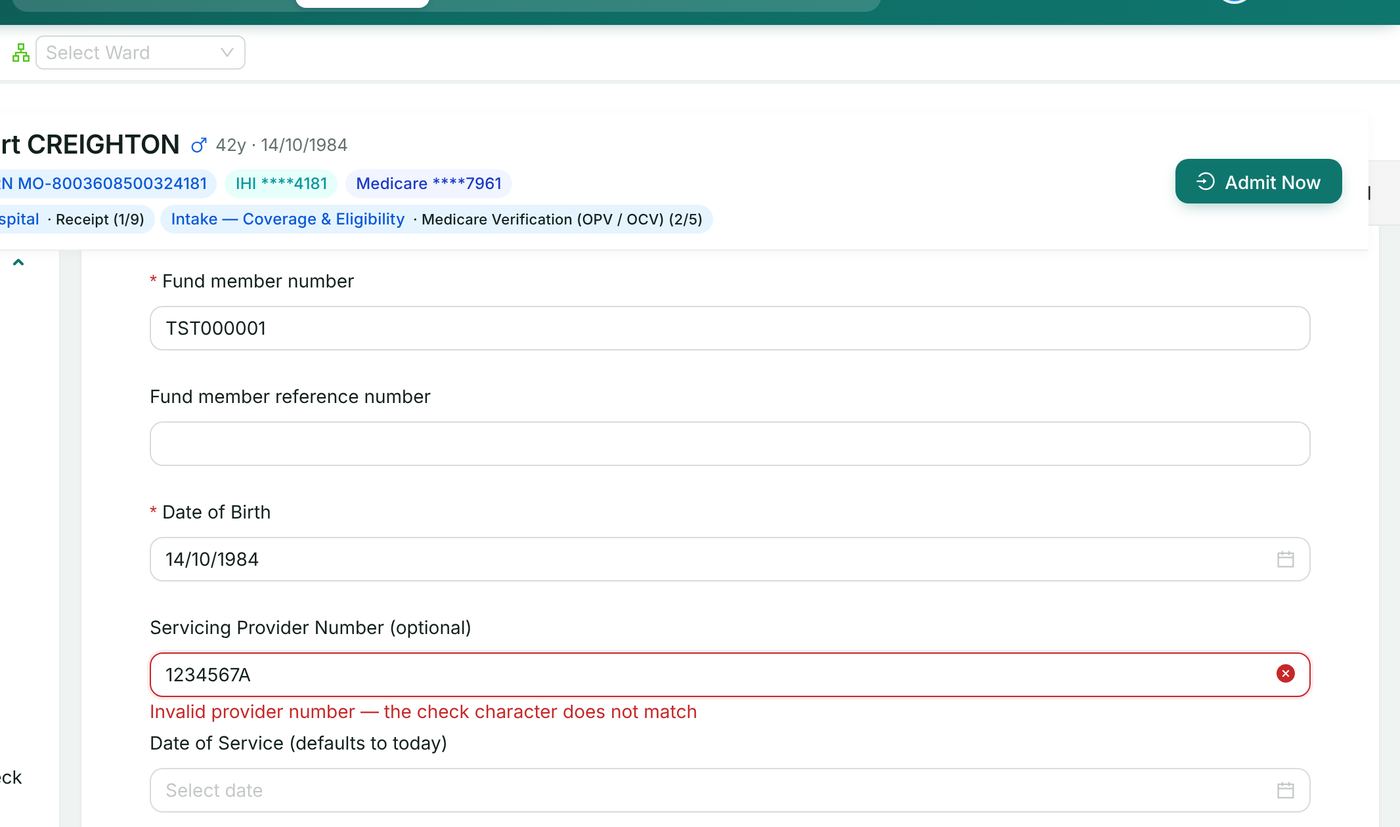
A Medicare provider number is six digits, a location character and a check character (for example 2450841L). HealthOS checks every provider number as it is typed: a valid number shows a tick and "Provider number … is valid — check character matches"; an invalid one is refused at the field with the fault named ("Invalid provider number — the check character does not match"), before anything is sent.
- Servicing provider — who performed the service. Required on every claim; entered on the draft (or filled from the eligibility check with Start from it).
- Referring / requesting provider — who referred or requested a specialist or diagnostic service, with the referral date and period.
- Payee provider — who is paid when that is not the servicing provider.
A practitioner's Medicare provider number is also held on the practitioner record (Medicare Provider Number, entered when the practitioner is added). When a practitioner's number changes, use the new number on claims drafted from then on; drafts already created keep the number they were drafted with — correct them before lodging.
16.4 The health fund list (Get Participants, GPRW)
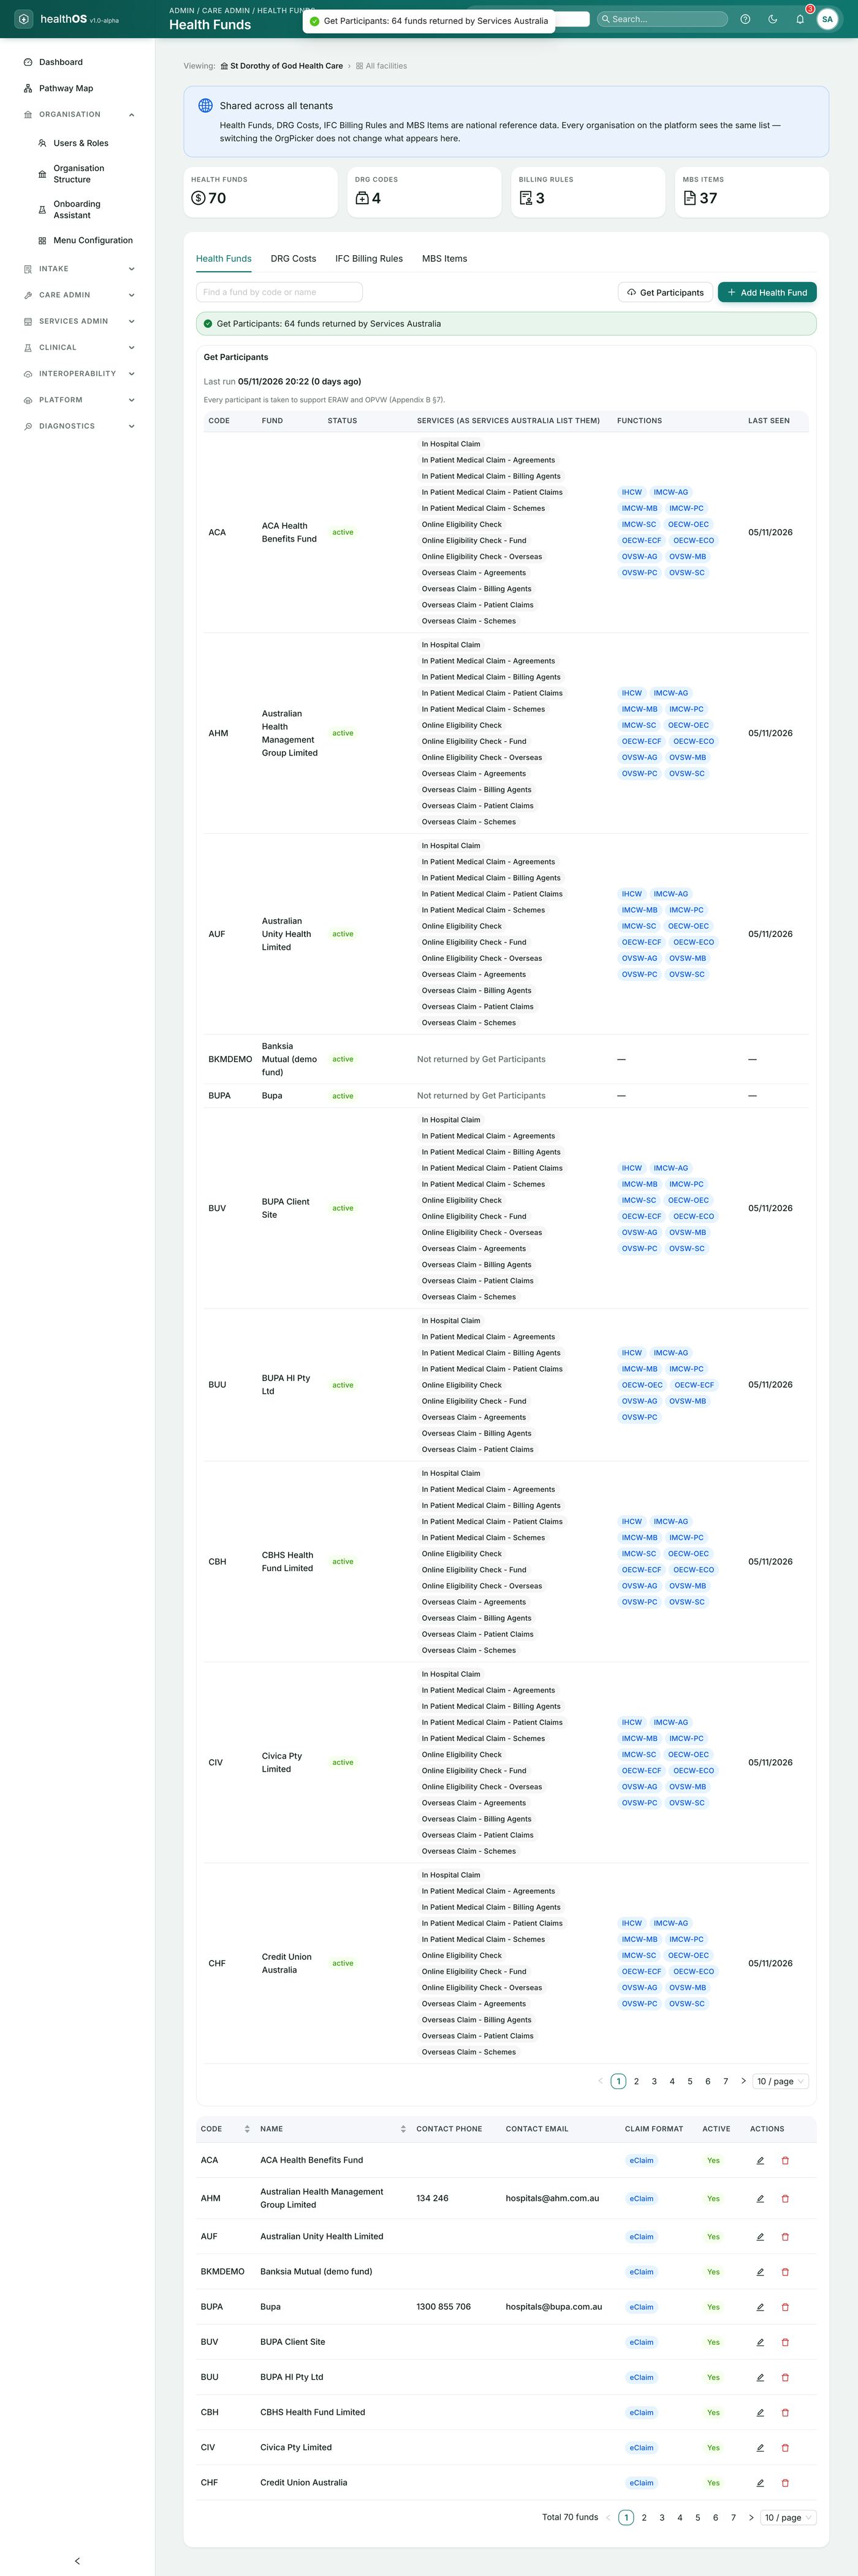
ECLIPSE claims and checks name a health fund, and the list of funds — and which ECLIPSE functions each supports — is maintained by Services Australia.
- In the admin portal open Care Admin → Health Funds.
- Choose Get Participants. HealthOS requests the current list from Services Australia and updates the table; the result reads "Get Participants: n funds returned by Services Australia".
Run it when a fund is refused as unknown, when a new fund is to be billed, and as routine maintenance. Add Health Fund and the edit action let an administrator maintain a fund's contact details.
17. Messages, errors and troubleshooting
17.1 How HealthOS shows a problem
- Before anything is sent — a field is checked as you type (Medicare card number, IRN, provider numbers, DVA file number, BSB) and the fault is named under the field; incompatible items are named in a red box ("These items cannot be claimed together"); a widget that cannot run says why ("Vendor mode required", "No active episode", "No draft claim for this episode yet").
- When Services Australia refuse a request — the widget shows a red box, for example Lodgement failed or Verification failed, followed by "Services Australia: <code> — <text>": the agency's own code and wording.
- When Services Australia accept with advice or a service-level reason — the outcome is shown in an amber or blue box with the code and wording; for a claim, each service line shows its assessment and Reason (code and text).
- Every call — the Transaction ID is shown, and the full request and response are on Online Claiming → Transactions → Detail.
17.2 Common messages and what to do
Search this table for the code or message you see.
| Where | Code / message | What it means | What to do |
|---|---|---|---|
| Any widget | Vendor mode required | PRODA is not enabled, or is in mock mode | An administrator enables PRODA and sets the mode (section 3) |
| Claim widgets | No active episode — open this pathway from the patient chart's Care Admin section | The pathway was opened without a hospital episode | Open the patient's chart → Care Admin with the episode selected |
| Submit widget | No draft claim for this episode yet | Nothing to lodge | Create the draft in the Draft widget first |
| Submit (BBSW) | Lodge claim disabled / assignment not recorded | A bulk bill claim needs its DB4 assignment | Record the assignment (section 7.2) |
| Submit (IMC patient claim) | Lodge claim disabled | Patient consent not confirmed | Show the consent and tick the confirmation (section 10) |
| Field | Invalid provider number — the check character does not match | Typing error in the provider number | Re-enter it from the provider's details |
| Field | Invalid Medicare card number | Card number fails its check digit | Re-enter it from the card |
| Draft | These items cannot be claimed together | Item combination not allowed in one claim (e.g. specialist + pathology outside Group P9) | Lodge them as separate claims |
| Draft | The claim was adjusted | HealthOS re-ordered items as the rules require (for example ECG items first) | Check and continue |
| Admin — PRODA | PRODA device expires in N days — renew the Device in PRODA | Device or key within 30 days of expiry | Renew the device in PRODA and save the new expiry (section 4.3) |
| Admin — PRODA | PRODA device has EXPIRED — re-activate the device in PRODA | Expired key/device; claiming fails with an authentication error | New activation code in PRODA → Re-activate Device (section 4.2) |
| Admin — Setup | Activation failed | Activation code expired, used or mistyped, or device name/RA number do not match PRODA | Check the details; generate a new code and apply again |
| Admin — Setup | Authentication Test Failed / test connection error | PRODA token could not be obtained or Services Australia not reachable | Check RA number, device name, mode and that the device is activated; contact HealthOS support with the message |
| Verification | 9633 — A new Medicare card has been issued | The card number/IRN on record is out of date | Confirm with the patient and choose Update (section 5.5) |
| PCIW | MEDICARE_PENDABLE, 9601 — claim needs referral to a Medicare Customer Services Officer | Medicare will not assess automatically | Give the Lodgement Advice; Resubmit to pend (section 8.4) |
| SDDW | 9645 — status other than Paid Same Day | The claim was pended, not paid same day | It cannot be deleted same day; contact Medicare |
| SDDW / reports | 9646 — The Claim could not be located by Medicare | Usually a claim not (yet) assessed, or the wrong transaction id | Check the claim is assessed and the transaction id; HealthOS lists only qualifying claims |
| Claim | 9202 — invalid value for a data item | A value is not permitted (often a provider number) | Correct the field named and resubmit (section 15) |
| Claim | 2030 — required item missing or contradictory | Two elements that cannot be sent together, or a required one missing (e.g. referral and self-deemed code) | Keep the one that applies and resubmit |
| Claim | 2032 — too many services in one medical event | A medical event allows at most 14 services | Add a second medical event (HealthOS also refuses more than 14 before sending) |
| Claim | 9632 — duplicate of a service already paid | Same item, patient and date already paid | If genuine, record the time or duplicate-service override on the item; otherwise correctly refused |
| Claim | 9011 — billing agent not authorised | The billing agent is not registered against the provider | Confirm the registration with Services Australia |
| IHCW (DVA) | 7013 — Facility Id is not registered at the transmitting Location for IHCW DVA | The DVA facility id is not linked to your location | Register it with Services Australia / DVA, then resubmit |
| Any | 3004 — Services Australia system error | The agency could not process the request | Try again later; if it recurs, give HealthOS support the Transaction ID |
| Any | DHSEIN… schema / message error | The message was refused before assessment | A product defect, not a data error — contact HealthOS support with the Transaction ID |
| Reports | REPORT_NOT_READY | Report not produced yet (overnight processing) | Wait; HealthOS retries each morning (section 14.2) |
| Reports | No report available | Processing finished with nothing to report | Normal for a claim paid in full |
17.3 Before contacting support
- Note the Transaction ID and the exact message.
- Open Online Claiming → Transactions → Detail for the transaction; it shows what was sent and what Services Australia answered.
- Contact HealthOS support (section 1) for product problems; contact Services Australia for questions about an assessment, a provider number or PRODA.
Appendix A. Glossary
| Term | Meaning |
|---|---|
| B2B device | The PRODA device record that lets HealthOS authenticate to Services Australia on your organisation's behalf |
| DB4 | Bulk Bill Assignment of Benefit form |
| ECLIPSE | Electronic Claim Lodgement and Information Processing Service Environment — hospital, specialist and fund claiming |
| ERA | ECLIPSE Remittance Advice |
| IRN | Individual Reference Number — the patient's position on the Medicare card |
| Minor ID / Location ID | The identifier Services Australia issue for the claiming location; the prefix of every Transaction ID |
| NOI | Notice of Integration issued by Services Australia for this product |
| OTAC | One-time activation code for a PRODA B2B device |
| PRODA | Provider Digital Access — Services Australia's authentication service |
| RA number | The PRODA Registration Authority number of your organisation |
| Transaction ID | The identifier HealthOS sends with each request and Services Australia use to find it |
Still stuck? Email support@healthos.net.au